Whittier Wood McKenzie Alder 1614aAUF Скачать руководство пользователя страница 5

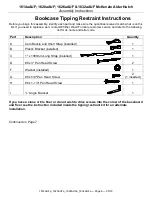
1614aAUF; 1620aAUF; 1626aAUF & 1632aAUF McKenzie Alder Hutch 

Assembly Instructions


1614AUFa_1620AUFa_1626AUFa_1632AUFa — Page 5 — 08/19 

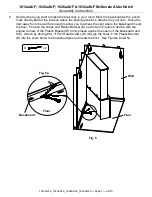
4.  It is important you secure your Hutch to your Cabinet. Place the Hutch on top of the McKenzie 

Alder Cabinet and line it up with the back and sides. Find the Lock Plates (N) attached at each 

side of the Hutch near the bottom edge and remove the innermost screw (I) from each. Rotate 

the end of the Plate downward until the hole for the screw is centered on the back edge of the 

top of the Cabinet. Insert the screws into the Cabinet top to secure the Hutch as shown in 

Figures 4 and 4a. For additional stability, insert a #8 x 1-1/4" Pan Head Screw (J) through the 

pocket hole located behind the face molding on each side panel on the Hutch. Note this will 

create two holes in the top of the Cabinet. See Figures 4b and 4c. 


5.  Your Base unit includes a Tipping Restraint Kit to secure the completed item to the wall to 

protect from possible tip over hazards.  If you are attaching this Hutch to an older Cabinet and 

no longer have the Tipping restraint kit, use the Kit included with this Hutch to secure the 

item.  Attach the end of the Strap to the Bottom Shelf of your Cabinet unit near the back edge at 

the center of the item, and follow the instructions in the Tipping Restraint Kit. 

Fig. 4 

Fig. 4a 

Fig. 4b 

Fig. 4c 

Back on the Hutch removed for illustration purposes. 

Содержание McKenzie Alder 1614aAUF

Страница 1: ...an expose you to wood dust a substance known to the state of California to cause cancer Avoid inhaling wood dust or use a dust mask or other safeguards for personal protection For more information go...

Страница 2: ...C Adjustable Shelf 2 2 2 4 D Lower Shelf installed 1 1 1 0 E Left Lower Shelf installed 0 0 0 1 F Right Lower Shelf installed 0 0 0 1 G 6 x 1 2 Undercut Screw inserted 8 8 8 16 R 8 x 1 Pan Head Screw...

Страница 3: ...the four different holes and install the shelf Insert the 6 x 1 2 Undercut Screws G from the underside of the shelf See Figures 1 and 1a 2 NOTE READ THE RAFIX ATTACHMENT SYSTEM INSTRUCTIONS NOW See Pa...

Страница 4: ...Fa_1632AUFa Page 4 08 19 3 Place the Hutch face up on a clean protected surface Peel the backing tape off one of the Pads Strip M and place it on the bottom of the left side of the Case Assembly Repea...

Страница 5: ...Figures 4 and 4a For additional stability insert a 8 x 1 1 4 Pan Head Screw J through the pocket hole located behind the face molding on each side panel on the Hutch Note this will create two holes i...

Страница 6: ...service and refer to the following list for its name and letter code Part Description Quantity A Cam Buckle and Short Strap installed 1 B Plastic Bracket installed 1 C 1 x 1000mm Long Strap installed...

Страница 7: ...m Move the item away from the wall far enough to allow you to access the spot where the baseboard meets the floor Position the straps and Plastic Bracket B as shown in Figures 6 and 6a with the angled...

Страница 8: ...l the free end of the strap until portion between the Cam Buckle A and the bottom of the item is tight See Figures 7 and 7a If you need to move the bookcase reach beneath and locate the buckle which c...

Страница 9: ...h with the surface of the wood 2 Tap a Rafix Cam into the appropriate hole so the notch faces the edge of the shelf The flat edge of the cam must be parallel to the front edge of the shelf 3 Slide the...

Страница 10: ...he Assembly Instructions for detailed information on how to glue your specific product Use wood glue such as Elmer s Wood Glue Titebond Wood Glue or the equivalent Some instructions call for a slow dr...

Страница 11: ...ollow all label directions Stir your top coat gently do not shake Shaking the can creates bubbles that are hard to remove 2 All surfaces including the underside of table tops and inside drawers must b...

Отзывы: