


5196AFGMS Ambierle Round Side
Table
Assembly Instructions
5196AFGMS
— Page 4 — 06/14
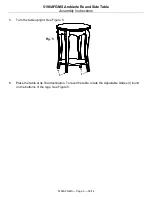
3.
Place the remaining Leg (B) in the final corner and attach with a 5/16" Flat Washer (J) and 3/8"
x 2-1/2" Hex Bolt (K).See Figures 3 and 3a.
4.
Using the pocket holes as guides, secure the Shelf (C) to the Legs (B) with four #8 x 1-1/4" Pan
Head Screws (D). See Figures 4 and 4a.
Fig. 3
B
J
K
x 1
x 1
Fig. 3a
K
J
Fig. 4
D
x 4
D
Fig. 4a


