


3525DUETa Addison 37"W Storage Console
3526DUETa Addison 54"W Storage Console
Parts List
3525DUETa_3526DUETa
— Page 2 — 08/18
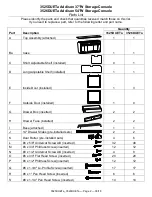
Please identify the parts and check that quantities received match those on this list.
If you need to replace a part, refer to the following letter and part name.
Part
Description
Quantity
3525DUETa
3526DUETa
A
Top Assembly (attached)
1
1
Ba
Case
1
1
C
Short Adjustable Shelf (installed)
0
1
D
Long Adjustable Shelf (installed)
1
1
E
Inside Door (installed)
1
3
F
Outside Door (installed)
1
0
G
Drawer Box (inserted)
2
2
H
Drawer Face (installed)
2
2
I
Base (attached)
1
1
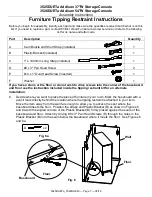
J
14" Drawer Slides (pre-installed sets)
2
2
K
Door Roller (pre-installed sets)
4
6
L
#6 x 5/8" Undercut Screw AB (inserted)
32
48
M
#6 x 3/4" Philtruss Screw (inserted)
12
12
N
#6 x 1/2" Undercut Screw AB (inserted)
4
8
O
#6 x 3/4" Flat Head Screw (inserted)
20
20
P
#6 x 1/2" Philtruss Screw (inserted)
12
12
Q
#8 x 1-3/8" Lo-Profile Screw (inserted)
17
17
R
#8 x 1" Pan Head Screw (inserted)
6
6
S
#8 x 1-1/4" Pan Head Screw (inserted)
14
14


