background image

2400GACd 2400CAFd McKenzie 3-Drawer Desk 

Assembly Instructions


2400GACd_2400CAFd — Page 6 — 05/17 
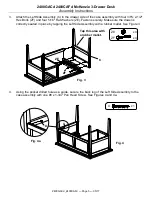
 
5. 

Turn the table upright and insert the Drawers. 
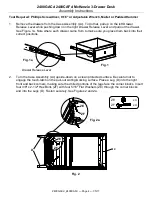
 

6. 

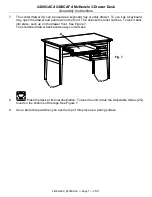
This desk features a Pull-out (Ic) that is above the two drawers on the right side. To access this 
feature, push firmly on the end of the pull-out. This releases the Push Lock. Grab on to the 
underside hand groove and gently pull. See Figures 6 and 6a. 


Fig. 5 

Fig. 6 

Fig. 6a 

Ic 

Ic 

Содержание 2400GACd

Страница 1: ...wood This product can expose you to chemicals including formaldehyde which are known to the State of California to cause cancer For more information go to www p65warnings ca gov furniture DESIGN SUBJECT TO CHANGE WITHOUT NOTICE CUSTOMER SERVICE If you ever have questions about your furniture please do not hesitate to contact us In the unlikely event you need a replacement part we can make those pa...

Страница 2: ...eyboard Tray Box inserted 1 H Keyboard Tray Face installed 1 Ic Pull out installed 1 J 20 Drawer Slides pre installed set 3 K 6 x 3 4 Philtruss Screw inserted 18 L 6 x 1 2 Philtruss Screw inserted 18 M Roller Catch Kit pre installed set 1 N Left Keyboard Hinge attached 1 O Right Keyboard Hinge attached 1 Q Knob attached 2 Rd 8 x 1 1 2 Machine Screw Tuscan installed 2 S Small Knob attached 2 T 4 x ...

Страница 3: ...x 1 1 4 Black Screw inserted 13 ZB 8 x 2 Black Screw inserted 2 ZC Wood Dowel inserted 1 ZD 3 8 x 1 Insert Nut inserted 8 ZE 5 16 Flat Washer 8 ZF 3 8 x 2 1 2 Hex Bolt 8 ZG Adjustable Glide installed 4 ZI 6 x 1 2 Undercut Screw inserted 8 ZJ 3mm x 12mm Pan Head Screw inserted 2 ZK 1 4 x 20mm Insert Nut inserted 4 ZL 8 x 1 3 8 Lo Profile Screw inserted 3 ...

Страница 4: ...each drawer came from to make sure you place them back into their correct positions 2 Turn the Case Assembly Ac upside down on a clean protected surface Be careful not to engage the touch latch on the pull out writing working surface Place a Leg D into the right front and back corners making sure the drilled portions of the legs face the corner blocks Insert four 3 8 x 2 1 2 Hex Bolts ZF with four...

Страница 5: ...four 5 16 Flat Washers ZE Fasten securely Make sure the dowel is correctly seated in place by tapping the Left Side Assembly with a rubber mallet See Figure 3 4 Using the pocket drilled hole as a guide secure the back leg of the Left Side Assembly to the case assembly with one 8 x 1 3 4 Pan Head Screw See Figures 4 and 4a Fig 4 X x 1 X X Fig 4a Fig 3 Tap this area with a rubber mallet ZE ZF x 4 x ...

Страница 6: ...able upright and insert the Drawers 6 This desk features a Pull out Ic that is above the two drawers on the right side To access this feature push firmly on the end of the pull out This releases the Push Lock Grab on to the underside hand groove and gently pull See Figures 6 and 6a Fig 5 Fig 6 Fig 6a Ic Ic ...

Страница 7: ...r and pull down on the front This unlocks the roller catches To lock it back into place push up on the drawer front See Figure 7 The shortened drawer back allows easy cord access 8 Place the desk at its final destination To level the unit rotate the Adjustable Glides ZG found on the bottoms of the legs See Figure 7 9 Use a protective pad when you use the top of this piece as a writing surface Fig ...

Отзывы: