Whittier Wood 2098DUET Скачать руководство пользователя страница 7

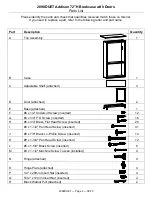
2098DUET Addison 72"H Bookcase with Doors 

Assembly Instructions


2098DUET — Page 7 — 08/19 


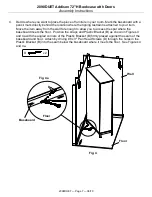
4.  Decide where you want to place the piece of furniture in your room. Mark the baseboard with a 

pencil mark directly behind the location where the tipping restraint is attached to your item.  

Move the item away from the wall far enough to allow you to access the spot where the 

baseboard meets the floor.  Position the straps and Plastic Bracket (B) as shown in Figures 4 

and 4a with the angled corners of the Plastic Bracket (B) firmly placed against the seam of the 

baseboard and floor.  Attach by driving #8 x 3" Pan Head Screws (D) through the holes in the 

Plastic Bracket (B) into the seam below the baseboard where it meets the floor.  See Figures 4 

and 4a. 


Wall 

Fig. 4 

x 2 


Fig. 4a 

Floor 

Floor 

Baseboard 

Содержание 2098DUET

Страница 1: ...hen you receive your furniture be sure to find and install the tipping restraint as instructed in the kit If you cannot locate the restraint please contact us immediately for replacement Drilling sawi...

Страница 2: ...ttached 3 D Door attached 2 E Base attached 1 F 6 x 1 2 Undercut Screw inserted 12 G 6 x 3 4 P O Screw inserted 16 H 6 x 3 4 Brass Flat Head Screw inserted 20 I 8 x 1 1 4 Pan Head Screw inserted 41 J...

Страница 3: ...t 2098DUET Page 3 08 19 Part Description Quantity S Hex Bumper attached 4 T Front 4 Hole Bracket attached 2 U Back 6 Hole Bracket attached 2 V Small Adjustable Glide installed 4 W Shelf Bracket instal...

Страница 4: ...remove the 6 x 1 2 Undercut Screws F and the Shelves C Reposition the Shelf Brackets W to the desired positions replace the shelves and insert the screws See Figures 1 and 1a 2 Place the bookcase at i...

Страница 5: ...the instructions in Figure 3 If there is a problem with a Hinge N do not attempt to remove it Contact Customer Service first Continued on Page 6 Fig 3 Side adjustment To move the door towards the side...

Страница 6: ...d refer to the following list for its name and letter code Part Description Quantity A Cam Buckle and Short Strap installed 1 B Plastic Bracket installed 1 C 1 x 1000mm Long Strap installed 1 D 8 x 3...

Страница 7: ...away from the wall far enough to allow you to access the spot where the baseboard meets the floor Position the straps and Plastic Bracket B as shown in Figures 4 and 4a with the angled corners of the...

Страница 8: ...ap until portion between the Cam Buckle A and the back apron of the item is tight See Figures 5 and 5a If you need to move the piece of furniture reach beneath and locate the buckle which connects the...

Отзывы: