Whittier Wood 2002AEGACa Скачать руководство пользователя страница 4

Page 4 — 2002AEGACa_AEGSPa_AECAFa — 06/14

3.

Fig. 3

Fig. 3a

A

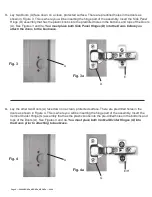
Lay two Doors (A) face down on a clean, protected surface. There are predrilled holes in the doors as 

shown in Figure 3. This is where you will be inserting the hinge part of the assembly. Insert the Side Panel 

Hinge (D) assembly that has the plastic knobs into the predrilled holes in the bottoms and tops of the Doors 

(A). See Figures 3 and 3a. 

You must place both Side Panel Hinges (D) into the Doors before you

attach the doors to the bookcase.


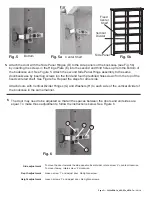
Lay the other two Doors (A) face down on a clean, protected surface. There are predrilled holes in the 

doors as shown in Figure 4. This is where you will be inserting the hinge part of the assembly. Insert the 

Vertical Divider Hinge (G) assembly that has the plastic knobs into the pre-drilled holes in the bottoms and 

tops of the Doors (A). See Figures 4 and 4a. 

You must place both Vertical Divider Hinges (G) into 

the Doors prior to attaching to bookcase. 

D

4.

Fig. 4

Fig. 4a

A

E/H

G

Содержание 2002AEGACa

Страница 1: ...nd Safety Code Section 25249 6 DESIGN SUBJECT TO CHANGE WITHOUT NOTICE CALL US FIRST Do not return this item to the store Service Policy We will replace any part that is defective missing or damaged during assembly For a replacement part directly contact Whittier Wood Products customer service department by phone fax mail or email Hours Our friendly customer service staff can be reached Monday Fri...

Страница 2: ...ase identify the parts and check that quantities received match those on this list If you need to replace a part refer to the following letter and model number Part Description Quantity A Door 4 B Door Knob 4 Ca 8 x 1 1 2 Machine Screw Tuscan 4 D Side Panel Hinge 4 G Vertical Panel Hinge 4 E Hinge Plate 8 F Pad 4 H Washer 8 ...

Страница 3: ...ach of the Hinge Plates E or E H as seen in Figures 2 and 2a 1 Add washers to four of the eight Hinge Plates E You will attach the Vertical Divider Hinges G to these Hinge Plates E Washers H assemblies See Figures 1a 1b and 1c E or E H D or G Fig 2 Fig 2a Fig 1a Fig 1c Fig 1b 2002AEGACa 2002AEGSPa 2002AECAFa 48 W McKenzie Alder Bookcase Door Kit ...

Страница 4: ...s 3 and 3a You must place both Side Panel Hinges D into the Doors before you attach the doors to the bookcase Lay the other two Doors A face down on a clean protected surface There are predrilled holes in the doors as shown in Figure 4 This is where you will be inserting the hinge part of the assembly Insert the Vertical Divider Hinge G assembly that has the plastic knobs into the pre drilled hole...

Страница 5: ... below See Figure 6 Fig 5 Fig 5a Center Shelf Fig 5b Side Panel 5 Attach the door with the Side Panel Hinges D to the side panels of the bookcase see Fig 5b by inserting the screws in the Hinge Plate E into the second and third holes up from the bottom of the bookcase unit See Figure 5 Attach the second Side Panel Hinge assembly to the same door bookcase by inserting screws ino the third and fourt...

Страница 6: ...e Doors A with 8x1 1 2 Machine Screws Tuscan Ca See Figure 7 Door Ca B 8 Attach a Pad F to the back of each door where it comes in contact with the adjustable shelf F x 4 B x 4 Fig 7 Page 6 2002AEGACa_AEGSPa_AECAFa 06 14 Ca x 4 ...

Отзывы: