


1671DUET Addison Rectangular Mirror
Assembly Instructions
1671DUET
— Page 3 — 08/18
Tools Required:
Phillips Screwdriver, Tape Measure, Pencil
You have the option of attaching your Mirror to the wall or to
selected Addison
Dressers. To
attach your Mirror to the wall, follow steps 1
– 4. To attach the Mirror horizontally to a
compatible Addison Dresser, follow steps 5
– 9.
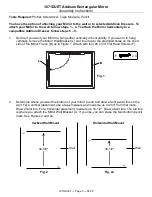
1.
Decide if you want your Mirror to hang either vertically or horizontally. If you want it to hang
vertically, remove the Mirror Wall Bracket (L) and line it up to the predrilled holes on the short
side of the Mirror Frame (B) as in Figure 1. Attach with four #6 x 3/4" Flat Head Screws (F).
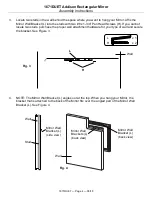
2.
Determine where you want the bottom of your mirror to end and draw a faint pencil line on the
wall. For a vertical placement, use a tape measure and measure up 44-3/4" from that mark.
Draw a faint line. For a horizontal placement, measure up 34-1/2". Draw a faint line. The top line
is where you attach the Mirror Wall Bracket (L). If you like, you can erase the faint bottom pencil
mark. See Figures 2 and 2a.
Vertical Wall Mount
Wall
Horizontal Wall Mount
Fig. 2
Fig. 2a
Wall
34-1/2"
44-3/4"
Fig. 1
B
L
F
x 4


