Whittier Wood 1370CAFl Скачать руководство пользователя страница 9

1370GACl 1370CAFl 1370FSTl McKenzie Queen Bookcase Storage Bed 

Assembly Instructions 

This assembly requires two people.


1370GACl_1370CAFl_1370FSTl — Page 9 — 12/19 


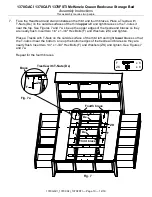
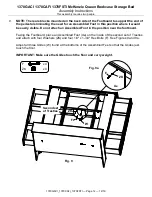
6.  Open the drawers. Face the Footboard and stand in between the first and second braces. 

Place a Trestle with T-Nuts (De) on the outside surfaces of the first upper left and right braces 

so that the T-Nuts (ZU) sit near the top. See Figure 6a. Line up the upper edges of the trestle 

and braces so they are nearly flush. Insert two 1/4" x 1-3/4" Hex Bolts (F) and Washers (ZK) 

and tighten. Repeat for the second upper brace. 


Place a Trestle with T-Nuts (De) on the outside surface of the second lower brace so that  

the T-Nuts (ZU) sit near the bottom. Line up the bottom edges of the trestle and braces so they 

are nearly flush. Insert two 1/4" x 1-3/4" Hex Bolts (F) and Washers (ZK) and tighten.  

See Figures 6 and 6a. 


Fig. 6 

De 

First brace 

Second brace 

De 

ZK 

Footboard 

Headboard removed for illustration purposes. 

Fig. 6a 

ZK 

Brace 

De 

ZK 

x 6 

x 6  

Содержание 1370CAFl

Страница 1: ...xpose you to chemicals including formaldehyde which are known to the State of California to cause cancer For more information go to www p65warnings ca gov furniture DESIGN SUBJECT TO CHANGE WITHOUT NO...

Страница 2: ...attached 1 XB Power Bar and USB installed 1 YA Large Adjustable Glide installed 2 YB 8 x 5 8 Pan Head Screw inserted 8 YJ 8 x 1 3 8 Lo Profile Screw inserted 8 YL 8 x 7 8 Black Lo Profile Screw insert...

Страница 3: ...l McKenzie Queen Bookcase Storage Bed Parts List 1370GACl_1370CAFl_1370FSTl Page 3 12 19 Part Description Quantity ZR Right Bracket attached 2 ZS Wire Clip Screw attached 6 ZT Tack Glide attached 4 ZZ...

Страница 4: ...estle With T Nuts 7 E 8 x 1 1 4 Black Screw 33 9 inserted F 1 4 x 1 3 4 Hex Bolt 26 Ue Assembled Foot 3 W Adjustable Glide installed 3 YD 6 x 1 2 Philtruss Screw 8 YH 90o Bracket 2 YM 10 x 3 4 Pan Hea...

Страница 5: ...awer Box assembled 1 L Small Drawer Face attached 2 Md Large Drawer Face attached 1 Ne 8 x 1 1 2 Machine Screw Tuscan installed 3 O Knob attached 3 Pd Deckboard 1 Q 20 Drawer Slides installed 3 sets T...

Страница 6: ...ools Required Phillips screwdriver Slotted screwdriver 7 16 open end or box end wrench and Tape measure 1 Remove the Trestles De and Assembled Feet Ue from the backs of the Footboard Be and place them...

Страница 7: ...mbly requires two people 1370GACl_1370CAFl_1370FSTl Page 7 12 19 3 To attach the Footboard Be to the Pedestal Assembly Id align the Brackets and slide the Pedestal Assembly down on to the Footboard Be...

Страница 8: ...ookcase Storage Bed Assembly Instructions This assembly requires two people 1370GACl_1370CAFl_1370FSTl Page 8 12 19 5 Align the Brackets on both sides and slide the Pedestal Footboard assembly down on...

Страница 9: ...ure 6a Line up the upper edges of the trestle and braces so they are nearly flush Insert two 1 4 x 1 3 4 Hex Bolts F and Washers ZK and tighten Repeat for the second upper brace Place a Trestle with T...

Страница 10: ...res 7 and 7a Line up the upper edges of the trestle and braces so they are nearly flush Insert two 1 4 x 1 3 4 Hex Bolts F and Washers ZK and tighten Place a Trestle with T Nuts on the outside surface...

Страница 11: ...eliminating the need for an Assembled Foot in this position where it would be easily visible Do not attach an Assembled Foot in the position near the footboard Facing the Headboard place two Assembled...

Страница 12: ...on where it would be easily visible Do not attach an Assembled Foot in the position near the footboard Facing the Footboard place an Assembled Foot Ue on the inside of the second set of Trestles and a...

Страница 13: ...his assembly requires two people 1370GACl_1370CAFl_1370FSTl Page 13 12 19 10 Facing the Footboard attach the Pedestal Assembly to the Footboard with a 90 Bracket YH and four 6 x 1 2 Philtruss Screws Y...

Страница 14: ...r See Figure 11 To level the headboard stand in the open area in between the two attached deckboards and reach through the front of the platform See Figure 11 Using a slotted screwdriver rotate the La...

Страница 15: ...2 To make sure the bed is square measure the distance between opposing corners If one of the measurements is larger tap on a footboard leg until the measurement is equal See Figure 12 13 Place the Dec...

Страница 16: ...osen or counterclockwise to tighten See Figures 14 and 14a 15 Unwrap the False Bottoms Sd and place them on top of the rails in the Headboard Assembly Aj Make sure the finger holes face forward as sho...

Отзывы: