Whittier Wood 1300CAFf Скачать руководство пользователя страница 5

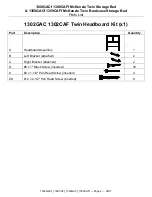
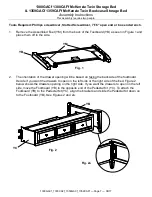
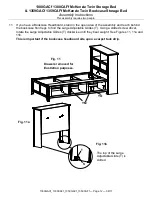
1300GACf 1300CAFf McKenzie Twin Storage Bed 

& 1359GACf 1359CAFf McKenzie Twin Bookcase Storage Bed 

Parts List


1300GACf_1300CAFf_1359GACf_1359CAFf — Page 5 — 08/17 

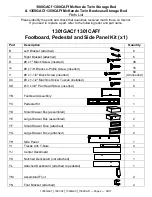
1361GACf 1361CAFf Bookcase Headboard Kit (x1) 


Part 

Description 

Quantity 

Left Bracket (attached) 


Right Bracket (attached) 


#8 x 1" Black Screw (inserted) 


16 

Ed 

Bookcase Headboard Assembly 


Assembled Door (attached) 


False Bottom 


Ie 

#8 x 7/8" Black Lo-Profile Screw (inserted) 


Wire Clip Screw (attached) 


Door Stay (attached) 


#6 x 5/8" Undercut Screw ZN (inserted) 


Door Stay Support (attached) 


#6 x 1-1/4" Black Pan Head Screw (inserted) 


Hinge (installed) 


#6 x 5/8" Undercut Screw AB (inserted) 


22 

Magnetic Catch Kit (attached) 


2 sets 

#6 x 5/8" Philtruss Screw (inserted) 


Corner Brace (attached) 


Large Adjustable Glide (installed) 


#8 x 5/8" Pan Head Screw (inserted) 


#8 x 1-1/4" Black Screw (inserted) 


#8 x 2-1/4" Black Screw (inserted) 


#8 x 1-1/4" Pan Head Screw (inserted) 


XA 

Top Assembly (attached) 


XB 

Power Bar and USB (installed) 


Содержание 1300CAFf

Страница 1: ...r more information go to www p65warnings ca gov furniture DESIGN SUBJECT TO CHANGE WITHOUT NOTICE CUSTOMER SERVICE If you ever have questions about your furniture please do not hesitate to contact us In the unlikely event you need a replacement part we can make those parts available through an authorized Whittier Wood Furniture dealer If you cannot order replacement parts through your dealer pleas...

Страница 2: ...cket attached 6 C Right Bracket attached 6 D 8 x 1 Black Screw inserted 48 Ie 8 x 7 8 Black Lo Profile Screw inserted 16 V 8 x 1 1 4 Black Screw inserted 60 40 inserted XC 8 x 1 1 2 Machine Screw Tuscan installed 3 XD 10 x 3 4 Pan Head Screw inserted 8 YB Footboard Assembly 1 YC Pedestal Kit 1 YD Small Drawer Box assembled 1 YE Large Drawer Box assembled 2 YF Small Drawer Face attached 1 YG Large ...

Страница 3: ...ets 3 YS 6 x 1 2 Philtruss Screw 26 18 inserted YT 6 x 3 4 Philtruss Screw inserted 18 YU 1 4 x 1 3 4 Hex Bolt 8 YV Washer 8 YW 90o Bracket 2 holes 2 YY 1 4 X 20mm Insert Nut inserted 6 YZ 1 4 T Nut inserted 8 ZA 8 x 1 5 8 Black Screw inserted 18 ZB 8 x 2 Black Screw inserted 16 ZG 90o Bracket 4 holes 1 Please note this Assembly Instruction is for either the Twin Storage Bed or the Twin Bookcase S...

Страница 4: ... List 1300GACf_1300CAFf_1359GACf_1359CAFf Page 4 08 17 1302GAC 1302CAF Twin Headboard Kit x1 Part Description Quantity A Headboard Assembly 1 B Left Bracket attached 2 C Right Bracket attached 2 D 8 x 1 Black Screw inserted 16 X 8 x 1 1 4 Pan Head Screw inserted 4 ZD 12 x 2 1 2 Pan Head Screw inserted 6 ...

Страница 5: ... Black Lo Profile Screw inserted 4 J Wire Clip Screw attached 3 K Door Stay attached 1 L 6 x 5 8 Undercut Screw ZN inserted 4 M Door Stay Support attached 1 N 6 x 1 1 4 Black Pan Head Screw inserted 3 O Hinge installed 3 P 6 x 5 8 Undercut Screw AB inserted 22 Q Magnetic Catch Kit attached 2 sets R 6 x 5 8 Philtruss Screw inserted 9 S Corner Brace attached 2 T Large Adjustable Glide installed 2 U ...

Страница 6: ...zie Twin Storage Bed 1359GACf 1359CAFf McKenzie Twin Bookcase Storage Bed Parts List 1300GACf_1300CAFf_1359GACf_1359CAFf Page 6 08 17 Part Description Quantity YA Tack Glide attached 4 ZI 8 x 1 3 8 Lo Profile Screw inserted 6 ...

Страница 7: ...Figure 1 and place them off to the side 2 The orientation of the drawer opening will be based on facing the backside of the footboard Decide if you want the drawers to open on the left side or the right side of the bed Figure 2 below shows the drawers opening on the right side If you want the drawers to open on the left side move the Footboard YB to the opposite end of the Pedestal Kit YC To attac...

Страница 8: ... on to the Footboard YB See Figures 3 and 3a 4 Move your Twin Headboard A or Twin Bookcase Headboard Ed into position Make sure the drawers are opening on the side you desire If you are satisfied align and slide the brackets of the Bed Assembly on to the brackets of the Headboard A or Ed If you are not satisfied with the drawer position remove the Footboard YB from the Bed Assembly and install at ...

Страница 9: ...in the pedestal closest to the Headboard Place the other end of the Trestle into the notched bracket in the Side Panel YH See Figure 5 Place a Washer YV onto a 1 4 x 1 3 4 YU and insert through the holes in the rib and Trestle as seen in Figure 5a threading into the T Nut Repeat for a second Trestle with T Nuts YI 6 Attach two more Trestles with T Nuts YI that face the Footboard YB as seen in Figu...

Страница 10: ...8 NOTE There are blocks mounted on the back side of the Footboard to support the end of the pedestal eliminating the need for an Assembled Foot in this position where it would be easily visible Do not attach an Assembled Foot in the position near the footboard Locate the holes and T nuts in the horizontal stretchers of the Pedestal Assembly In the sets of stretcher holes nearest the Headboard atta...

Страница 11: ...7 9 Facing the Footboard attach the lower brace of the Pedestal Assembly to the Footboard with the 90 bracket with four holes ZG and four 6 x 1 2 Philtruss Screws YS See Figures 9 and 9a 10 Move the Bed Assembly to its final destination Adjust the Glides YO in the bottoms of the Assembled Feet YM so that they touch the floor and bear weight See Figure 10 Fig 10 YM YO Fig 9 ZG YS Fig 9a ZG YS x 1 x...

Страница 12: ...tand in the open area of the assembly and reach behind the bookcase front legs to find the Large Adjustable Glides T Using a slotted screw driver rotate the Large Adjustable Glides T clockwise until they bear weight See Figures 11 11a and 11b This is important if the bookcase headboard sits upon a carpet tack strip Fig 11 Drawers removed for illustration purposes YM YO Fig 11a Fig 11b The top of t...

Страница 13: ...e bed is square measure the distance between opposing corners If one of the measurements is larger tap on a footboard leg until the measurement is equal See Figure 12 13 Place the Center Deckboard YJ in the middle and with the notches facing out place the Notched Deckboard YK as shown in Figure 13 There should be a small gap between each deckboard Secure with twenty 8 x 1 1 4 Black Screws V Fig 13...

Страница 14: ...crew on the Door Stay clockwise to loosen or counterclockwise to tighten See Figures 14 and 14a 15 Unwrap the False Bottoms G and place them on top of the rails in the Headboard Assembly Ed Make sure the finger holes face forward as shown in Figure 15 After you have placed your electronics inside the cubbies use the Wire Clips J on the underside of the cubbies to secure the wires Close the door ti...

Отзывы: