Whittier Wood 1143DUETd Скачать руководство пользователя страница 4

1143DUETd 6-Drawer Addison Chest 

Assembly Instructions


1143DUETd 

— Page 4 — 05/18 

 
Tools Required: Phillips Screwdriver, Pencil.
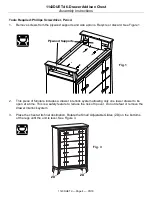
 

1. 

Remove screws from the plywood supports and side aprons. Recycle or discard. See Figure 1. 


2. 

This piece of furniture includes a drawer interlock system allowing only one lower drawer to be 
open at a time. This is a safety feature to reduce the risk of tip over. Do not defeat or remove the 
drawer interlock system. 
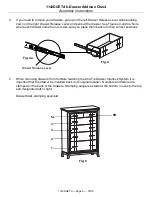
 

3. 

Place the chest at its final destination. Rotate the Small Adjustable Glides (ZD) on the bottoms 
of the legs until the unit is level. See Figure 3. 


Fig. 3 

ZD 

ZD 

Fig. 1 

Plywood Supports 

Содержание 1143DUETd

Страница 1: ...ase contact us immediately for replacement Drilling sawing sanding or machining wood products can expose you to wood dust a substance known to the state of California to cause cancer Avoid inhaling wo...

Страница 2: ...ted 2 E Medium Lower Drawer Box inserted 1 F Large Lower Drawer Box inserted 1 G Left Top Drawer Face installed 1 H Right Top Drawer Face installed 1 I Small Lower Drawer Face installed 2 J Medium Low...

Страница 3: ...e Screw Tuscan installed 20 ZA 1 4 x 20mm Insert Nut inserted 4 ZB 5 32 x 10mm Insert Nut inserted 20 ZC Black Walnut Pull attached 10 ZD Small Adjustable Glide installed 4 ZE Base attached 1 ZF Front...

Страница 4: ...re 1 2 This piece of furniture includes a drawer interlock system allowing only one lower drawer to be open at a time This is a safety feature to reduce the risk of tip over Do not defeat or remove th...

Страница 5: ...h drawer came from to make sure you place them back into their correct positions 5 When removing drawers from furniture featuring the Anti Tip Drawer Interlock System it is important that the drawer b...

Страница 6: ...d the front of the case you cannot remove the First Drawer Move the upper arms of the Anti tip Snapper to the unlocked position as shown in Figure 6e You can then remove the First Drawer as shown in S...

Страница 7: ...e screws into the corner of the baseboard and floor see the instruction included inside the tipping restraint kit for an alternate installation 7 Decide where you want to place the piece of furniture...

Страница 8: ...ntil portion between the Cam Buckle A and the back apron of the item is tight See Figures 8 and 8a If you need to move the piece of furniture reach beneath and locate the buckle which connects the two...

Отзывы: