background image

2168AUF 54"W McKenzie Media Console W/Notched Top 
2169AUF 64"W McKenzie Media Console W/Notched Top 

Assembly Instructions


2168AUF_2169AUF — Page 5 — 11/12 

 
3. 

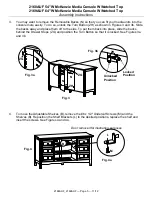
You may want to remove the Removable Backs (N) so that you can fit your media units into the 
console more easily. To do so, unlock the Turn Button (ZH) as shown in Figures 3 and 3b. Slide 
the backs away and place them off to the side. To put them back into place, slide the backs 
behind the Drawer Stops (ZG) and position the Turn Button so that it is locked. See Figures 3a 
and 3b. 


4. 

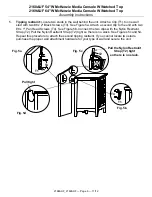
To move the Adjustable Shelves (B), remove the #6 x 1/2" Undercut Screws (M) and the 
Shelves (B). Reposition the Shelf Brackets (L) to the desired positions, replace the shelf and 
insert the screws. See Figures 4 and 4a. 


Fig. 4 

M

L

Fig. 4a 

Door removed for illustration purposes. 

ZG 

ZH 

Locked 
Position 

Fig. 3 

Fig. 3b 

Fig. 3a 

ZH 

ZG 

Unlocked 
Position 

Содержание McKenzie 2168AUF

Страница 1: ...he bottom drawers Unless specifically designed to accommodate do not set TVs or other heavy objects on top of this product Never allow children to climb or hang on drawers doors or shelves Never open more than one drawer at a time Use of tip over restraints may only reduce but not eliminate the risk of tip over DESIGN SUBJECT TO CHANGE WITHOUT NOTICE CALL US FIRST Do not return this item to the st...

Страница 2: ... Face installed 6 6 F Drawer Box inserted 6 6 G Drawer Slides pre installed sets 6 6 H Door Frame 1 1 I Door Glass attached 1 1 J Case 1 1 L Shelf Bracket installed 8 8 M 6 x 1 2 Undercut Screw inserted 8 8 N Removable Back attached 2 2 O Door Glass Support Rail attached 2 2 P Door Glass Support Stile attached 2 2 Q 6 x 3 4 Flat Head Screw inserted 12 12 R Magnetic Catch Kit attached 2 2 S 6 x 5 8...

Страница 3: ... 2 Black Screw inserted 2 2 ZG Drawer Stop attached 4 4 ZH Turn Button attached 4 4 ZI 6 x 5 8 Undercut Screw inserted 4 4 ZJ 6 x 1 2 Philtruss Screw inserted 36 36 ZK 6 x 3 4 Philtruss Screw inserted 36 36 ZQ Foot Assembly attached 1 1 ZR 8 x 1 1 8 Lo Profile Screw inserted 10 10 ZS Insert Nut inserted 5 5 ZT 8 x 1 3 8 Lo Profile Screw inserted 6 6 TR Furniture Tipping Restraint 2 sets 2 sets 216...

Страница 4: ...or Glass Support Stiles P Door Glass Support Rails O and set aside Carefully lift the Door Glass I and put it safely away Finish the door frame stiles and rails and after the finish dries replace the glass and attach the Door Glass Support Rails O and Door Glass Support Stiles P with 6 x 3 4 Brass Flat Head Screws Q See Figures 1 1a and 1b Rehang the door 2 Place the console at its final destinati...

Страница 5: ...Slide the backs away and place them off to the side To put them back into place slide the backs behind the Drawer Stops ZG and position the Turn Button so that it is locked See Figures 3a and 3b 4 To move the Adjustable Shelves B remove the 6 x 1 2 Undercut Screws M and the Shelves B Reposition the Shelf Brackets L to the desired positions replace the shelf and insert the screws See Figures 4 and ...

Страница 6: ...ond clip to the unit with two 8 x 1 Pan Head Screws T4 See Figure 5b Connect the two clips with the Nylon Restraint Strap T2 Pull the Nylon Restraint Strap T2 tight so there is no slack See Figures 5c and 5d Repeat this procedure to attach the second tipping restraint If you cannot locate two studs purchase the proper wall attachment hardware for your type of wall and secure the unit Fig 5a T1 T3 ...

Страница 7: ...they fit together before assembling with glue Glue will set up quickly You can damage parts if you try to reposition any that have been assembled incorrectly 2 For glue to properly bond it is very important to apply the wood glue to bare wood Protect your eyes and blow into holes to clear excess dust This will help the glue to adhere to a clean surface 3 If you plan on finishing the product before...

Страница 8: ... Always read and follow all label directions Stir your top coat gently do not shake Shaking the can creates bubbles that are hard to remove 2 All surfaces including the underside of table tops and inside drawers must be sealed with at least one layer of a top coat This will help minimize wood swelling shrinkage warping and cupping due to changes in moisture content or temperature 3 Apply a minimum...

Отзывы: