background image

37

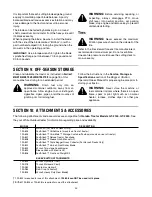
IMPORTANT:

 For a proper 

working machine, use 
Factory Approved Parts.
V-belts are designed to 
engage and disengage 
safely. A substitute (non 
OEM) V-belt can be 
dangerous by not 
disengaging completely.

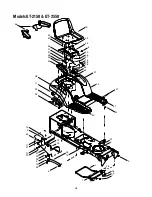
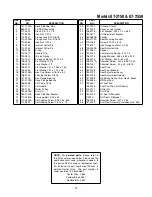
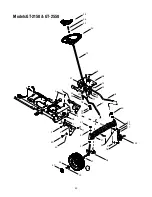
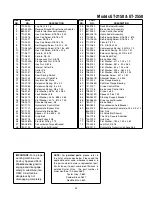
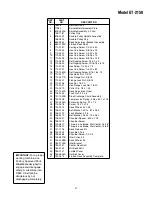
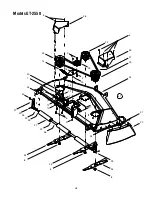
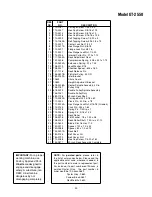
Model GT-2150

REF.

NO.

PART

NO.

DESCRIPTION

1

16606

Retainer Hook

2

17982

Spindle Reinforcement Plate

3

618-0430A

Spindle Assembly, 5.0 Dia.

756-1187

Pulley Only

4

618-0431

Double Pulley Spindle Assembly

756-0603

Double Pulley Only

5

683-0254

Deck Adjustment Bracket Assembly

6

683-0199C

46-inch Deck Shell

7

710-0167

Carriage Screw, 1/4-20 x .50

8

710-0344

Hex Cap Screw, 3/8-16 x 1.5

9

710-0501

Hex Cap Screw, 1/4-20 x 2.0

10

710-0514

Hex Cap Screw, 3/8-16 x 1.0

11

710-0528

Hex Cap Screw, 5/8-18 x 1.25

12

710-0599

Self-tapping Screw,1/4-20 x .5

13

710-0650

Self-tapping Screw,15/16-18 x .875

14

710-0703

Hex Screw, 1/4-20 x .75

15

710-0751

Hex Cap Screw, 1/4-20 x .62

16

710-1260A

Self-tapping Screw, 5/16-18 x .75

17

712-0271

Hex Sems Nut, 1/4-20

18

712-0417A

Hex Flange Nut, 5/8-18

19

712-0431

Flange Lock Nut, 3/8-16

20

712-3006

Hex Nut, 1/4-20

21

712-3027

Hex Flange Lock Nut, 1/4-20

22

714-0470

Cotter Pin, 1/8 x 1.25

23

717-1553A

Deck Adjustment Gear

24

726-0233

Push Nut. .25 x .5

25

731-1032B

Side Discharge Chute Assembly

26

732-0306

Compression Spring, .406 x .531 x 1.75

27

732-0594A

Extension Spring, .91 x 7.3

28

710-0578

Screw, 1/4-20 x 1.5

29

734-0973

Deck Wheel, 5 x 1.38

30

736-0105

Bell Washer, .401 x .87 x .063

31

736-0119

Lock Washer, 5/16

32

736-0270

Bell Washer, .265 x .75 x .062

33

738-0347

Shoulder Spacer, .625 x 1.16

34

738-0373

Shoulder Screw

35

742-0611

Three-in-one Blade, Star Center, 16.28"

36

742-0612

Three-in-one Blade, Star Center, 14.88"

37

747-1116

Deck Release Pin

38

754-0349

Deck Belt, Poly

39

738-3056

Shoulder Screw, 1/2-2.5

40

756-0627B

Idler Pulley, 3.5

41

734-3058B

Deck Wheel, 5.0

42

783-0139A

Idler Bracket

43

783-0141

Center Deck Skirt

44

783-0142

RH Deck Skirt

45

783-0747

LH Belt Cover

46

783-0805A

RH Belt Cover

47

753-0875

46-inch Deck Assembly Complete

Содержание GT-2150

Страница 1: ...uipped with a spark arrester meeting applicable local or state laws if any If a spark arrester is used it should be maintained in effective working order by the operator In the State of California the above is required by law Section 4442 of the California Public Resources Code Other states may have similar laws Federal laws apply on federal lands A spark arrester for the muffler is available thro...

Страница 2: ...ormation on the model plate is very important if you need help from your White Outdoor dealer You can locate the model number by looking beneath the seat A sample model plate is explained below For future reference please copy the model number and the serial number of the equipment in the space below CALLING CUSTOMER SUPPORT If you have difficulty assembling this product or have any questions rega...

Страница 3: ...ry 7 Plan your mowing pattern to avoid discharge of material toward roads sidewalks bystanders and the like Also avoid discharging material against a wall or obstruction which may cause discharged material to ricochet back toward the operator 8 Always wear safety glasses or safety goggles during operation and while performing an adjustment or repair to protect your eyes Thrown objects which ricoch...

Страница 4: ...n hide obstacles 3 Use slow speed Choose a low enough speed setting so that you will not have to stop or shift while on the slope Tires may lose traction on slopes even though the brakes are functioning properly Always keep machine in gear when going down slopes to take advantage of engine braking action 4 Follow the manufacturer s recommendations for wheel weights or counterweights to improve sta...

Страница 5: ...ruck or trailer and refuel it on the ground If this is not possible then refuel such equipment on a trailer with a portable container rather than from a gasoline dispenser nozzle d Keep the nozzle in contact with the rim of the fuel tank or container opening at all times until fueling is complete Do not use a nozzle lock open device e Extinguish all cigarettes cigars pipes and other sources of ign...

Страница 6: ...al laws and regulations for gas oil etc to protect the environment WARNING YOUR RESPONSIBILITY Restrict the use of this power machine to persons who read understand and follow the warnings and instructions in this manual and on the machine TO REDUCE THE RISK OF INJURY DO NOT OPERATE UNLESS DISCHARGE COVER OR GRASS CATCHER IS IN ITS PROPER PLACE IF DAMAGED REPLACE IMMEDIATELY KEEP HANDS AND FEET AW...

Страница 7: ...P E Do not mow on inclines with a slope in excess of 15 degrees a rise of approximately 2 1 2 feet every 10 feet A riding mower could overturn and cause serious injury If operating a walk behind mower on such a slope it is extremely difficult to maintain your footing and you could slip resulting in serious injury Operate RIDING mowers up and down slopes never across the face of slopes WARNING ...

Страница 8: ... explosive Never fuel machine indoors or while the engine is hot or running Extinguish cigarettes cigars pipes and other sources of ignition Service the engine with gasoline and oil as instructed in the separate Briggs Stratton Operator Owner Manual packed with your tractor Read instructions carefully IMPORTANT Your tractor is shipped with motor oil in the engine However you MUST check the oil lev...

Страница 9: ...on the left side of the deck outward and align it with the hole on the rear of the left deck lift arm before releasing the pin to lock it in place as shown in Figure 3 Repeat on the right side Route the PTO belt around the electric PTO clutch as shown in Figure 3 Grasp the PTO idler pulley bracket and pull it towards the discharge chute then route the belt around the PTO idler pulley as shown in F...

Страница 10: ... s position A Systems Indicator Monitor Hour Meter G Cruise Control Button B PTO Power Take off Knob H Ignition Switch C Choke Control I Brake Pedal D Cup Holder J Drive Pedal E Throttle Control Lever K Deck Lift Lever F Parking Brake Button L Seat Adjustment Lever H E A C G F D K J I L NOTE Steering Wheel not shown for clarity P 1 10 P B ...

Страница 11: ...or Hour Meter Your tractor is equipped with four indicator lights and an hour meter located on the left side of the dash panel See Figure 6 Figure 6 If the Brake light or PTO light illuminates when attempting to start the unit proceed as follows Brake Engage the parking brake PTO Move the PTO knob into the disengaged OFF position It is normal for the Oil light and the Battery light to illuminate w...

Страница 12: ...best suited for your application Electric PTO Power Take off Knob To engage the power to the cutting deck or other separately available attachments pull outward on the PTO knob Push the PTO knob inward to disengage the power NOTE The PTO knob must be in the disengaged OFF position when starting the engine when traveling in REVERSE and if the operator leaves the seat Cruise Control Button The cruis...

Страница 13: ...driveway WARNING Keep hands and feet away from the discharge opening of the cutting deck NOTE The deck wheels are an anti scalp feature of the deck and are not designed to support the weight of the cutting deck Refer to Leveling the Deck on page 16 of this manual for more detailed instructions regarding various deck adjustments Starting the Engine WARNING Do not operate the tractor if the interloc...

Страница 14: ...d Hold the parking brake button in while removing your foot from the brake pedal Once engaged the parking brake button and the brake pedal will lock in the down position To disengage the parking brake Slightly depress the brake pedal NOTE The parking brake must be engaged if the operator leaves the seat with the engine running or the engine will automatically shut off Driving On Slopes Refer to th...

Страница 15: ...lly without first engaging the relief valve Doing so will result in damage to the tractor s transmission Engaging the PTO Engaging the PTO transfers power to the cutting deck or other separately available attachments To engage the PTO proceed as follows Move the throttle control lever to the FAST rabbit position Pull the PTO knob outward into the engaged ON position See Figure 9 Figure 9 Keep the ...

Страница 16: ...r s tire pressure before performing any deck leveling adjustments Refer to Tires on page 23 for information regarding tire pressure Front To Rear The front of the cutting deck is supported by a stabilizer bar that can adjusted to level the deck from front to rear The front of the deck should be between 1 4 inch and 3 8 inch lower than the rear of the deck Adjust if necessary as follows With the tr...

Страница 17: ...nto the drag links will cause the front tires to toe in too far Proper toe in is between 1 16 and 5 16 Front tire toe in can be measured as follows Place the steering wheel in position for straight ahead travel In front of the axle measure the distance horizontally from the inside of the left rim to the inside of the right rim Note the distance Behind the axle measure the distance horizontally fro...

Страница 18: ...lean your tractor is NOT recommended It may cause damage to electrical components spindles pulleys bearings or the engine The use of water will result in a shortened life of the tractor and reduce its serviceability Engine Refer to the Briggs Stratton Operator Owner Manual for engine maintenance instructions Check engine oil level before each use as instructed in the Briggs Stratton Operator Owner...

Страница 19: ... fender Remove the PTO belt from around the electric PTO clutch Refer to Figure 14 Looking at the cutting deck from the left side of the tractor locate the deck support pin on the rear left side of the deck Pull the deck support pin outward to release the deck from the deck lift arm See Figure 13 Figure 13 Rotate the pin slightly toward the rear of the tractor and release the pin into the hole pro...

Страница 20: ... unintended starting before removing the belt s All belts on your tractor are subject to wear and should be replaced if any signs of wear are present IMPORTANT The V belts found on your tractor are specially designed to engage and disengage safely A substitute non OEM V belt can be dangerous by not disengaging completely For a proper working machine use factory approved belts To change or replace ...

Страница 21: ...nnect the NEGATIVE Black wire from it s terminal first followed by the POSITIVE Red wire Re install in reverse order NOTE Proper removal of the drive belt requires the removal of several tractor components Read through the following procedure prior to attempting it to determine if you feel you could successfully complete it If you don t see your White Outdoor dealer to have the belt changed NOTE N...

Страница 22: ...removing the drive belt from around the transmission pulley Reroute the new belt around the pulleys and belt keepers if present EXACTLY as the old one was routed Refer to Figure 15 Cutting Blades WARNING Be sure to shut the engine off remove ignition key disconnect the spark plug wire s and ground against the engine to prevent unintended starting before removing the cutting blade s for sharpening ...

Страница 23: ... away from an open flame Allow engine to cool Extinguish cigarettes cigars pipes and other sources of ignition prior to draining fuel Follow the instructions in the Service Storage Specifications section of the Briggs Stratton Operator Owner Manual for proper engine care prior to storing your tractor WARNING Never store the machine or fuel container indoors where there is an open flame spark or pi...

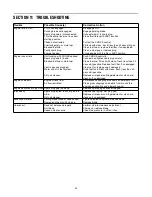
Страница 24: ...ire s Clean fuel line fill tank with clean fresh less than 30 days old gasoline Replace fuel filter if so equipped Clear vent or replace cap if damaged Drain fuel tank Refill with clean fresh less than 30 days old gasoline Replace air cleaner cartridge element or clean pre cleaner if so equipped Engine overheats Engine oil level low Air flow restricted Fill crankcase with proper capacity and weigh...

Страница 25: ...15 Self tapping Screw 3 8 16 x 1 25 7 712 3017 Hex Nut 3 8 16 8 721 0460 Exhaust Gasket 9 726 0205 Hose Clamp 10 736 0119 Lock Washer 5 16 11 736 0300 Flat Washer 12 751B221535 Casing Clamp 13 751 0535 Fuel Line Hose 14 751 0564 Muffler Deflector 15 751 0616 Muffler Twin Inlet 16 751 0650 RH Exhaust Pipe 17 751 0651 LH Exhaust Pipe 18 751 3140 Oil Drain Valve 19 751 3141 Oil Drain Hose 20 751 3142...

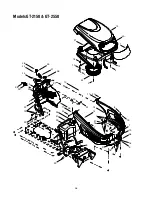
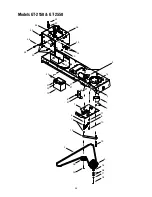
Страница 26: ...26 2 32 4 12 21 10 11 40 18 4 18 13 41 Models GT 2150 GT 2550 17 20 14 6 22 22 22 22 34 31 33 26 35 23 24 28 25 30 29 4 27 9 9 36 1 7 18 8 19 1 19 3 16 1 16 37 15 19 22 19 17 20 8 10 38 39 ...

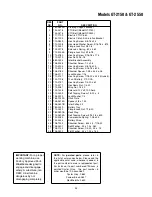
Страница 27: ...f tapping Screw 1 4 14 x 625 24 710 3217 Torx Screw 8 32 x 375 25 712 0142 Hex Nut 8 32 26 731 0071 Dash Panel 4 style 27 731 0072 Parking Brake Button 28 731 1857 Throttle Control Lever 29 731 2106 Cruise Control Button 30 747 1155 Brake Cruise Pivot Rod 31 749 1087 Dash Support Tube 32 731 2232 Intake Bellow 33 751 0658B Fuel Tank 3 gallon 34 751 0603 Fuel Cap 35 725 1745 Ignition Key w plastic ...

Страница 28: ... 49 39 46 6 40 45 41 37 43 42 36 47 48 44 16 30 28 38 33 27 31 34 51 50 11 28 29 14 8 52 17 21 10 20 12 23 21 22 24 6 2 52 14 18 25 19 5 3 4 1 16 9 7 17 15 6 26 13 35 54 53 32 Models GT 2150 GT 2550 55 56 ...

Страница 29: ... x 063 33 783 0677 Lift Adjustment Bracket 34 783 0685B Fender 35 783 0715A Seat Mounting Bracket 36 710 1268 Screw 10 16 x 375 37 712 3027 Hex Flange Lock Nut 1 4 20 38 720 0309A Seat Adjuster Grip 39 731 1989 Spacer 40 732 0499 Compression Spring 41 x 1 5 41 736 0175 Spring Washer 265 x 562 x 025 42 736 0204 Flat Washer 344 x 62 x 03 43 738 0137A Shoulder Screw 340 x 285 1 4 20 44 738 1007 Shoul...

Страница 30: ...30 Models GT 2150 GT 2550 2 1 2 5 3 9 6 38 7 10 12 13 11 13 14 15 16 17 18 19 21 20 22 20 25 26 27 28 31 30 29 31 34 30 31 36 33 37 39 40 11 8 22 4 31 24 23 35 32 ...

Страница 31: ...ering Wheel 24 731 2625 Steering Wheel Cap 25 638 0017 LH Axle Assembly 75 Diameter 26 638 0018 RH Axle Assembly 75 Diameter 27 719 0525B Cast Iron Pivot Bar w Fittings 750 28 712 0431 Flange Lock Nut 3 8 16 29 714 0470 Cotter Pin 30 726 0341 Push Cap 75 31 736 0316 Flat Washer 78 x 1 59 x 06 32 736 0242 Bell Washer 34 x 872 33 736 0285 Flat Washer 635 x 1 589 x 06 34 738 1011 Shoulder Screw 5 x 2...

Страница 32: ...17 9 11 30 13 35 10 36 9 37 6 19 21 34 32 12 43 28 29 3 7 15 23 26 13 15 16 33 55 55 16 45 45 64 62 61 17 54 59 46 25 16 41 60 51 67 27 9 16 52 13 16 56 66 14 47 57 63 54 59 60 17 49 44 44 50 42 4 68 16 7 33 38 5 1 14 8 2 24 16 31 22 27 13 ...

Страница 33: ... 44 710 1260A Self tapping Screw 5 16 18 x 75 45 711 0736 Ferrule 1 4 20 46 711 1363 Pin 3 8 16 x 2 43 47 732 0437 Compression Spring 34 OD x 1 0 48 732 0955 Extension Spring 50 OD x 1 41 49 732 0963 Extension Spring 50 OD x 6 37 50 735 0662 Drive Pedal Pad 51 735 3049 Brake Pedal Pad 52 736 0133 Flat Washer 411 x 1 25 x 1 0 53 736 0142 Flat Washer 281 x 50 x 063 54 736 0187 Flat Washer 64 x 1 24 ...

Страница 34: ...34 15 9 1 4 3 2 28 5 7 12 11 8 10 13 16 17 18 14 Models GT 2150 GT 2550 29 31 34 25 24 35 32 36 32 23 32 33 30 6 27 9 9 26 20 21 22 19 37 38 ...

Страница 35: ... Extension Spring 62 x 5 62 9 712 3004A Flange Lock Nut 5 16 18 10 710 3180 Hex Cap Screw 5 16 18 x 1 75 11 712 3010 Hex Nut 5 16 18 12 683 0294 Idler Bracket Assembly 13 738 3056 Shoulder Screw 1 2 x 2 5 14 710 3144 Hex Cap Screw 3 8 16 x 2 0 15 710 3025 Hex Cap Screw 5 16 18 x 625 16 738 0785 Shoulder Spacer 1 38 x 445 x 36 17 736 0171 Lock Washer 7 16 18 710 3157 Hex Cap Screw 7 16 20 x 3 25 Gr...

Страница 36: ...36 Model GT 2150 30 41 39 12 12 45 46 19 4 4 40 3 38 20 32 24 25 27 9 20 32 19 33 42 8 22 26 37 5 23 31 11 47 48 10 17 6 7 32 21 14 13 16 2 2 13 44 43 19 30 34 29 15 21 1 15 17 18 18 18 35 35 36 47 19 ...

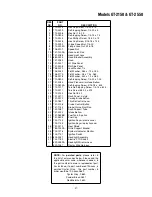
Страница 37: ...g Screw 5 16 18 x 75 17 712 0271 Hex Sems Nut 1 4 20 18 712 0417A Hex Flange Nut 5 8 18 19 712 0431 Flange Lock Nut 3 8 16 20 712 3006 Hex Nut 1 4 20 21 712 3027 Hex Flange Lock Nut 1 4 20 22 714 0470 Cotter Pin 1 8 x 1 25 23 717 1553A Deck Adjustment Gear 24 726 0233 Push Nut 25 x 5 25 731 1032B Side Discharge Chute Assembly 26 732 0306 Compression Spring 406 x 531 x 1 75 27 732 0594A Extension S...

Страница 38: ...38 Models GT 2550 5 39 22 38 23 14 9 19 2 16 18 23 5 37 24 27 17 20 3 6 26 10 12 15 4 11 13 13 40 41 7 1 25 30 21 35 32 33 31 32 36 34 8 34 8 34 8 29 50 ...

Страница 39: ...649 Chute Guard 21 12650 Height Adjustment Bracket 22 618 0428A Center Spindle Assembly 5 Dia 756 1187 Pulley Only 23 618 0429 Double Pulley Spindle Assembly 756 1041 Double Pulley Only 24 683 0196 50 inch Deck Shell 25 710 0260A Carriage Bolt 5 16 18 x 62 26 711 0332 Clevis Pin 50 Dia x 78 27 712 3004A Hex Flange Lock Nut 5 16 18 Grade 5 28 714 0145 Click Pin 092 x 1 64 29 715 0108 Spring Pin 1 4...

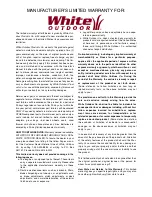
Страница 40: ...n these items b Routine maintenance items such as lubricants filters blade sharpening and tune ups or adjustments such as brake adjustments clutch adjustments or deck adjustments and normal deterioration of the exterior finish due to use or exposure c Log splitter pumps valves and cylinders have a sepa rate one year warranty d White Outdoor Co does not extend any warranty for products sold or expo...

Отзывы: