background image

6

INSTALLATION INSTRUCTIONS

E

LECTRICAL REQUIREMENTS

(

CONT

.

)

GROUNDING INSTRUCTIONS

For all cord connected appliances:

The microwave oven must be grounded. In the 
event of an electrical short circuit, grounding 
reduces the risk of electric shock by providing an 
escape wire for the electric current. The 
microwave oven is equipped with a cord having 
a grounding wire with a grounding plug. The plug
must be plugged into an outlet that is properly 
installed and grounded.

WARNING:

Improper use of the grounding can

result in a risk of electric shock.

Consult a qualified electrician or serviceman if the
grounding instructions are not completely 
understood, or if doubt exists as to whether the 
microwave oven is properly grounded.

Do not use an extension cord. If the power supply
cord is too short, have a qualified electrician or 
serviceman install an outlet near the microwave oven.

For a permanently connected appliance:

The microwave oven must be connected to a
grounded, metallic, permanent wiring system, or 
an equipment grounding conductor should be run
with the circuit conductors and connected to the 
equipment grounding terminal or lead on the
microwave oven.

SAVE THESE INSTRUCTIONS

Содержание YMT3115SH

Страница 1: ...3135SH 11 Setting the clock 12 Using the minute timer 12 Using Your Microwave Oven 13 Cooking at high cook power 13 Cooking at different cook powers 13 Cooking with more than one cook cycle 14 Using AUTO DEFROST 15 Defrosting tips 15 Using JET START 16 Using Warm Hold option 16 Sensor cooking 17 Using SENSOR COOK 17 Sensor cooking chart 17 Using SENSOR REHEAT 18 Sensor reheating chart 18 Using SEN...

Страница 2: ...rial number label plate see the diagram in the Getting to Know section Please also record the purchase date of your appliance and your dealer s name address and telephone number Keep this book and the sales slip together in a safe place for future reference It is important for you to save your sales receipt showing the date of purchase Proof of purchase will assure you of in warranty service OurCo...

Страница 3: ...IVE MICROWAVE ENERGY found in this section The microwave oven must be grounded Connect only to properly grounded outlet See GROUND ING INSTRUCTIONS found in the Installation Instructions section Install or locate the microwave oven only in accordance with the installation instructions Some products such as whole eggs and sealed containers for example closed glass jars may explode and should not be...

Страница 4: ...wave energy It is important not to defeat or tamper with the safety interlocks b Do not place any object between the oven front face and the door or allow soil or cleaner residue to accumulate on sealing surfaces c Do not operate the oven if it is damaged It is particularly important that the oven door close properly and that there is no damage to the 1 door bent 2 hinges and latches broken or loo...

Страница 5: ...he exhaust vents or air intake openings Allow a few inches of space at the back and side of the oven where the exhaust vents are located Blocking the exhaust vents could cause damage to the oven and poor cooking results Make sure the microwave oven legs are in place to ensure proper airflow If vents are blocked a sensitive thermal safety device automatically turns the oven off The oven should work...

Страница 6: ...the grounding can result in a risk of electric shock Consult a qualified electrician or serviceman if the grounding instructions are not completely understood or if doubt exists as to whether the microwave oven is properly grounded Do not use an extension cord If the power supply cord is too short have a qualified electrician or serviceman install an outlet near the microwave oven For a permanentl...

Страница 7: ...m the microwave oven Plugging the microwave oven into a different outlet so that the microwave oven and receiver are on different branch circuits TESTING YOUR MICROWAVE OVEN To test the oven put about 1 cup 250 mL of cold water in a glass container in the oven Close the door Make sure it latches Cook at 100 power for 2 minutes When the time is up the water should be heated HOW YOUR MICROWAVE OVEN ...

Страница 8: ...Do not use newspaper or other printed paper in the oven Do not dry flowers fruit herbs wood paper gourds or clothes in the oven Do not start a microwave oven when it is empty Product life may be shortened If you practice programming the oven put a container of water in the oven It is normal for the oven door to look wavy after the oven has been running for a while Do not try to melt paraffin wax i...

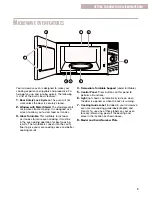
Страница 9: ... for more even cooking It must be in the oven during operation for best cooking results The turntable is sunken into the cavity floor to give you more cooking space and better cooking results 4 Removable Turntable Support under turntable 5 Control Panel Press buttons on this panel to perform all functions 6 Light not shown Automatically turns on when the door is opened or when the oven is running ...

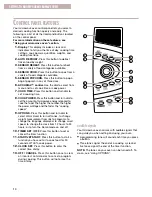
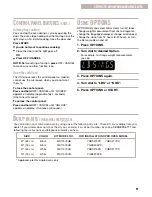
Страница 10: ...s button and turn dial to set the amount of microwave energy released to cook the food The higher the number the higher the power wattage and the faster the cooking speed 9 OPTIONS Press this button and turn dial to select Warm Hold to turn off tones to change weight measurement from lbs to kilograms to change the language displayed to change scroll speed to change the clock from 12 hours to 24 ho...

Страница 11: ...function press OFF CANCEL to make sure no other function is on Usingthechildlock The Child Lock locks the control panel so children cannot use the microwave when you do not want them to To lock the control panel Press and hold OFF CANCEL until LOCKED appears on display approximately 4 seconds One tone will sound To unlock the control panel Press and hold OFF CANCEL until UNLOCK appears on display ...

Страница 12: ...2 Turn dial to desired hour 3 Press CLOCK SET again 4 Turn dial to desired minutes 5 Press CLOCK SET or START USING THE MINUTE TIMER You can use your microwave oven as a kitchen timer Use the minute timer for timing up to 90 minutes 1 Press TIMER SET OFF 2 Turn dial to desired time 3 Press START or TIMER SET OFF or allow the timer to start automatically after a short delay 4 At the end of the set ...

Страница 13: ... Quick heating many convenience foods and foods with high water content such as soups and beverages Cooking small tender pieces of meat ground meat poultry pieces fish fillets and most vegetables Heating cream soups Heating rice pasta or stirrable casseroles Cooking and heating foods that need a cook power lower than high for example whole fish and meat loaf or when food is cooking too fast Reheat...

Страница 14: ...lete 2 tones sound and the next cycle s will count down 6 At the end of the cooking time The display will show END and 3 tones will sound NOTES You can set your chosen cook functions in any order However when you use AUTO DEFROST it must be the first cycle Cooking with more than one cook cycle will not work with SENSOR COOK or SENSOR REHEAT functions NAME Medium Medium Low Defrost Low COOK POWER P...

Страница 15: ...y are placed in the oven Always slit or pierce plastic pouches or packaging If food is foil wrapped remove foil and place it in a suitable container Slit the skins if any of frozen food such as sausage Bend plastic pouches of food to ensure even defrosting Always underestimate defrosting time If defrosted food is still icy in the center return it to the microwave oven for more defrosting The lengt...

Страница 16: ...total of 10 minutes 3 At the end of the cooking time Display will show END and 3 tones will sound USING WARM HOLD OPTION You can safely keep hot cooked food warm in your microwave oven for up to 90 minutes NOTES Warm Hold operates for up to 90 minutes Food cooked should be covered during Warm Hold Pastry items pies turnovers etc should be uncovered during Warm Hold Complete meals kept warm on a di...

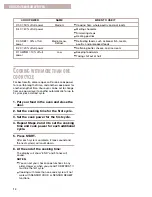
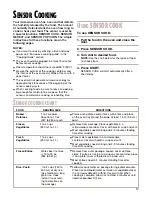
Страница 17: ...OOK will start automatically after a short delay SENSOR COOKING CHART DIRECTIONS Pierce each potato several times with a fork and place on the oven tray around the edge at least 1 inch 2 5 cm apart Remove from package Place vegetables in a microwavable container Cover with plastic wrap and vent Most vegetables need stirring and 2 3 minutes standing time after cooking Place moist vegetables in a mi...

Страница 18: ... wrap Vent cover for well done meat Place the food around the sides of a microwave safe container Season and add 1 4 to 1 2 cup 63 to 125 mL liquid wine water salsa etc if desired Cover with plastic wrap vented Break eggs into a 4 cup 1 L measuring cup or 1 quart 1 L casserole Add 1 tablespoon 15 mL milk or water per egg and beat Cover with plastic wrap vented When cooking is complete remove from ...

Страница 19: ...will determine popping time based on the size of the package DIRECTIONS Follow package directions Use a popcorn package which is made especially for microwave cooking Do not try to pop unpopped kernels Pop only 1 package at a time Do not leave the microwave oven unattended while popping popcorn If you are using a microwave popcorn popper follow manufacturer s instructions How well your popcorn coo...

Страница 20: ...ou can use any covering that lets microwaves pass through See Getting to Know Your Microwave Oven for materials that microwaves will pass through If you are using the Sensor function be sure to vent Releasingpressureinfoods Several foods for example baked potatoes sausages egg yolks and some fruits are tightly covered by a skin or membrane Steam can build up under the membrane during cooking causi...

Страница 21: ...gyoushouldnotdoinyourmicrowaveoven Do not do canning of foods in the oven Closed glass jars may explode resulting in damage to the oven Do not use the microwave oven to sterilize objects baby bottles etc It is difficult to keep the oven at the high temperature needed for safe sterilization CARING FOR YOUR MICROWAVE OVEN To make sure your microwave oven looks good and works well for a long time you...

Страница 22: ...ditional time to allow it to finish cooking This frees the oven for other cooking Steam is normally produced during cooking The microwave oven has been designed to vent this steam out the vents Yes Pop packaged microwave popcorn following manufacturer s guidelines or use the preset SENSOR POPCORN button Do not use regular paper bags Use the listening test by stopping the oven as soon as the poppin...

Страница 23: ...orrect side up and is sitting securely on center shaft The support is not operating correctly Remove turntable check that the turntable support is properly in place and restart oven If turntable support does not move call a designated service technician for repair Cooking without the turntable can give you poor results The oven door is not closed completely You have set the controls as a kitchen t...

Страница 24: ...st you When calling Please know the purchase date and the complete model and serial number of your appliance see the A Note to You section This information will help us better respond to your request FOR FURTHER ASSISTANCE If you need further assistance you can write to Inglis Limited with any questions or concerns at Consumer Relations Department Inglis Limited 1901 Minnesota Court Mississauga On...

Страница 25: ...Built In kits section for a list of approved built in kits D Damage to your microwave oven caused by accident misuse fire flood acts of God or use of products not approved by Whirlpool Corporation or Inglis Limited E Any labor costs during limited warranty F Repairs to parts or systems resulting from unauthorized modifications made to the appliance G Replacement parts or repair labor costs for uni...

Отзывы: