background image

27

Demande d’assistance ou de service

.

Si vous avez besoin d’assistance :

Téléphoner au Centre d'interaction avec la 

         clientèle KitchenAid Canada sans 
         frais d’interurbain, entre 8 h 30 et 
         17 h 30 (HNE) en composant le 
         1-800-461-5681. Nos consultants 
         sont prêts à vous aider.

Lors de l’appel :
Veuillez connaître la date d’achat, le numéro de série et 
le numéro de modèle complets de l’appareil (voir la 
section “Note à l’utilisateur”). Ces renseignements 

nous aideront à mieux répondre à votre demande.

Pour plus d’assistance :

Si vous avez besoin de plus d’assistance, 
vous pouvez écrire à KitchenAid en 
soumettant toute question ou préoccupation au :

Centre d'interaction avec la clientèle
KitchenAid Canada
1901 Minnesota Court
Mississauga, Ontario L5N 3A7

Veuillez indiquer dans votre correspondance 
un numéro de téléphone où l’on peut vous joindre le
jour.

Si vous avez besoin de pièces ou de service

Contacter le service KitchenAid Canada 
de n’importe où au Canada au 

1-800-807-6777.


.

Avant de faire un appel pour assistance ou service, veuillez vérifier la section "Dépannage".  Cette action peut 
vous faire économiser le coût d'une visite de service.  Si vous avez encore besoin d'assistance, suivre les 
instructions ci-dessous.

Содержание YKHMS147H

Страница 1: ... Manual Cooking in stages 17 Using Defrost 17 Using Pan Brown 18 Using EASY SIMMER 19 Using 2 4 Plates 20 Using the Exhaust Fan 20 Using the Cooktop Light 21 Using the cooking rack 21 Caring for Your Microwave Oven 22 Questions and Answers 24 Troubleshooting 25 Requesting Assistance or Service 27 Warranty 28 LIGHT ON OFF FAN ON OFF POPCORN COOK TIME TURNTABLE ON OFF TIMER SET OFF OFF CANCEL PREVIO...

Страница 2: ...leshooting additional help can be found by checking the Requesting Assistance or Service section or by calling the telephone number above When calling you will need to know your appliance s complete model number and serial number You can find this information on the model and serial number label plate see diagram in the Getting to Know Your Microwave Oven section Keep this book and the sales slip ...

Страница 3: ...ce with the provided Installation Instructions Some products such as whole eggs in the shell and sealed containers for example closed glass jars may explode and should not be heated in the microwave oven Use the microwave oven only for its intended use as described in this manual Do not use corrosive chemicals or vapors in the microwave oven This type of oven is specifically designed to heat cook ...

Страница 4: ...hood turn the fan on Use care when cleaning the vent hood filter Corrosive cleaning agents such as lye based oven cleaners may damage the filter Do not cover or block any openings on the micro wave oven Do not store this microwave oven outdoors Do not use the microwave oven near water for example near a kitchen sink in a wet basement or near a swimming pool and the like Do not immerse cord or plug...

Страница 5: ...electric shock Consult a qualified electrician or serviceman if the grounding instructions are not completely under stood or if doubt exists as to whether the microwave oven is properly grounded Electrical requirements Observe all governing codes and ordinances A 120 Volt 60 Hz AC only 15 or 20 amp fused electrical supply is required A time delay fuse is recommended It is recommended that a separa...

Страница 6: ... microwave oven to the upper cabinet B C A D F E 5 Grasp the microwave oven Rotate the microwave oven downward Be careful that door does not swing open 6 Lift off the support tabs F at the bottom of the mounting plate Set the microwave oven aside on a protected surface To replace 1 Carefully lift microwave oven and hang it on the support tabs at the bottom of the mounting plate 2 Rotate the front ...

Страница 7: ...ections supplied with the browning dish Electrical connection If your electric power line or outlet voltage is less than 110 volts cooking times may be longer Have a qualified electrician check your electrical system Never cook or reheat a whole egg inside the shell Steam buildup in whole eggs may cause them to burst and possibly damage the oven Slice hard boiled eggs before heating In rare cases ...

Страница 8: ...s 1 Door Handle Pull to open door 2 Door Safety Lock System The oven will not operate unless the door is securely closed 3 Window with Metal Shield Shield prevents microwaves from escaping It is designed as a screen to allow you to view food as it cooks 4 Cooking Rack Use for extra space when cooking in more than one container at the same time See Page 21 5 Glass Turntable PN 4393751 not shown Inc...

Страница 9: ... this pad to choose and store and recall favorite programs see pg 14 5 MICRO DIAL Control Use this control to select oven functions such as quantities of food and cooking times powers 6 LIGHT ON OFF Touch this pad to switch the cook top light on and off Touch up or down arrows to control brightness 7 POPCORN Touch this pad to make perfect microwave popcorn automatically 8 COOK TIME Touch this pad ...

Страница 10: ...e cooking with the new MICRO DIAL control Just watch the display screen and choose what you want from the menus How to use your new MICRO DIAL Control Turn MICRO DIAL control To select a function To set cook time To set cook power To set the clock To set Minute Timer Press MICRO DIAL control Enter a selection To see Next Page To start cooking Function Selections Touch FIRST SCREEN pad To start ove...

Страница 11: ...ich function you select its program gets you cooking in a hurry If you d like to practice before you actually start microwave cooking see Using Learning Mode section TOUCH FIRST SCREEN pad TURN to select Cook and PRESS TURN to select Cereals and PRESS TURN to select Instant All Cereal and PRESS TURN to select 3 servings and PRESS If you already know how to prepare food TURN to select START and PRE...

Страница 12: ...tes the features and capabilities of your microwave hood combination featuring the MICRO DIALTM System Microwave cooking simply doesn t get any quicker easier or better TOUCH FIRST SCREEN pad TURN to select Custom and PRESS Using Hints This section offers helpful information and suggestions about using and caring for your microwave hood combination This example follows Hints about Cleaning startin...

Страница 13: ... enter the time TURN to Set Clock and PRESS Using the Child Lock The Child Lock locks the control panel so children cannot use the microwave oven when you do not want them to To lock the control panel 1 TURN to select Custom PRESS for Next Screen 2 PRESS to select Child Lock will appear on the display screen 3 TURN left to CLOSED LOCKED will appear when you touch the control or any pad except FAN ...

Страница 14: ...URN to select a function TURN to select food 3 TOUCH the BOOKMARK pad PRESS to add selected function to Bookmark To use a function in Bookmark 1 TOUCH the FIRST SCREEN pad 2 TOUCH the BOOKMARK pad 3 TURN to select a bookmarked function and PRESS 4 Follow instructions for selected function Using Bookmark To delete a program in Bookmark 1 TOUCH the FIRST SCREEN pad 2 TOUCH the BOOKMARK pad The list ...

Страница 15: ...sing START Understanding Doneness Control For many cooking functions the screen displays a Doneness bar which you control by turning the MICRO DIALTM control toward Plus or Minus For most foods the maximum and minimum Doneness settings add or subtract about 6 from Normal cook time For Defrost the controlled percentage depends on food type and weight NOTE When the Doneness function is completed for...

Страница 16: ...NAME High Medium High Medium Medium Low Defrost Low Manual Cooking at variable powers Many microwave cookbook recipes tell you by number percent or name which cook power to use The following chart gives the percentage of cook power each number stands for and the cook power name usually used It also tells you when to use each cook power Follow recipe or food package instructions if available NOTE R...

Страница 17: ...select category and PRESS 3 TURN to select No Help me and PRESS 4 If steaks chops or poultry pieces are selected TURN to select Size and PRESS 5 TURN to enter amount and PRESS 6 TURN to START and PRESS Defrosting tips Always underestimate defrosting time If defrost ed food is still icy in the center return it to the microwave oven for more defrosting The length of defrosting time varies according ...

Страница 18: ...g the pan Do not use plastic utensils on the pan The pan becomes very hot quickly and could melt the utensils Do not use any metal utensils as they can scratch the pan Do not use the pan in any other microwave oven or in a thermal oven Always use the turntable as support for the pan For best results when cooking with the pan preheat for 3 minutes on High before using it Coat pan lightly with cooki...

Страница 19: ...aper containers The time when food is ready will vary depending upon the type of container you use Let food stand for 2 to 3 minutes after heating so that heat is spread evenly throughout container Using EASY SIMMER Use EASY SIMMER to prepare food such as rice pasta soups and vegetables All you do is set an EASY SIMMER time and your oven will bring your food to a boil and then simmer it for the ti...

Страница 20: ...start at the last speed used 2 Turn off fan when desired TOUCH FAN ON OFF FAN ON OFF Using Your Microwave Oven When heating food with a cook time that you set you can heat two 10 1 4 in 26 7 cm plates side by side or one dish larger than the turntable plus two plates on the cooking rack For best results halfway through cooking turn the plates halfway around Do the same when heating a larger 9 to 1...

Страница 21: ...ht conditions LIGHT ON OFF Current room light level Set activation level NOTES Only use the cooking rack when cooking at more than one level Use rack only in the microwave oven Do not let food container on rack touch the top or sides of the oven Do not use rack with browning dish Do not place a metal cooking container on rack Do not store the cooking rack in the oven Do not operate the oven with t...

Страница 22: ...corrosive cleaning agents such as lye based oven cleaners or place in a dishwasher The filter will turn black or could be damaged 22 Caring for Your Microwave Oven 22 5 To replace the charcoal filters push each filter to the back of the opening between the upper and lower lips against the springs Swing the front of the filter up against the upper lip Slide the filter forward while pushing it up ag...

Страница 23: ...age halogen capsule bulb PN 8169418 Use a soft tissue to handle the lamp or wear a cotton glove Do not touch lamp with your bare fingers 6 Close the bulb cover 7 Slide the top of the vent grille into place Push the bottom until it snaps into place Replace the mounting screws 8 Plug in microwave oven or reconnect power To order bulbs call 1 800 807 6777 and follow the instructions and telephone pro...

Страница 24: ...epending on the rotation of the motor when the cooking cycle begins This appearance is normal and does not affect the operation of your oven You hear the sound of the transformer when the magnetron tube cycles on As the food becomes hot it will conduct the heat to the dish Be prepared to use hot pads to remove food after cooking Steam is normally produced during cooking The microwave oven has been...

Страница 25: ...Check the lists below and on the next page before calling for assistance or service If you still need help see the Requesting Assistance or Service section Microwave oven does not work PROBLEM Nothing works The microwave oven will not run Cooking times PROBLEM Food is not cooked enough The display shows a time counting down but the oven is not cooking CAUSE The electric supply to your home or wall...

Страница 26: ...CAUSE You have turned off the tone See the Audible signals section on page 14 PROBLEM You do not hear the programming or end of cycle tone If none of these items are causing your problem see Requesting Assistance or Service section 26 Display messages If the oven detects an internal problem it will run a self checking program and a screen similar to the one shown here will appear If this occurs pl...

Страница 27: ...t you When calling Please know the purchase date and the complete model and serial number of your appliance see the A Note to You section This information will help us better respond to your request For further assistance If you need further assistance you can write to KitchenAid with any questions or concerns at Customer Interaction Center KitchenAid Canada 1901 Minnesota Court Mississauga Ontari...

Страница 28: ...ansportation expenses for customers who reside in remote areas 3 00 KITCHENAID CANADA DOES NOT ASSUME ANY RESPONSIBILITY FOR INCIDENTAL OR CONSEQUENTIAL DAMAGES Some provinces do not allow the exclusion or limitation of incidental or consequential damages so this exclusion or limitation may not apply to you This warranty gives you specific legal rights and you may also have other rights which may ...

Страница 29: ... variable 16 Réglage manuel cuisson par étapes 17 Fonction de décongélation 17 Utilisation de la fonction Brunissage 18 Utilisation de la fonction de mijotage EASY SIMMER 19 Cuisson sur 2 4 assiettes 20 Utilisation du ventilateur d évacuation 20 Illumination de la table de cuisson 21 Utilisation de la grille de cuisson 21 Entretien du four à micro ondes 22 Questions et réponses 24 Dépannage 25 Dem...

Страница 30: ...teraction avec la clientèle sans frais 1 800 461 5681 Pour service 1 800 807 6777 Si vous avez besoin d assistance ou de service consulter d abord la section Dépannage dans cette brochure Après avoir consulté la section Dépannage on peut également obtenir de l aide à la section Demande d assistance ou de service ou en téléphonant à l un des numéros mentionnés ci dessus Lors de votre appel vous dev...

Страница 31: ...vaux de service doivent être exécutés exclusivement par un personnel d entretien qualifié Contacter un centre de service agréé pour les opérations d inspection de réparation ou de réglage Ne jamais recouvrir ou obstruer une ouverture du four à micro ondes Ne pas remiser ce four à micro ondes à l extérieur Ne pas utiliser le four à micro ondes à proximité d eau par exemple évier de cuisine sous sol...

Страница 32: ...er à l intérieur autre chose que les accessoires recommandés par le fabricant Ne jamais recouvrir les grilles ou autres composants du four avec une feuille métallique ceci susciterait un échauffement excessif du four Ne rien remiser sur le sommet du four à micro ondes lorsque le four fonctionne Voir les instructions de nettoyage de la surface de la porte à la section Conseils de la commande MICRO ...

Страница 33: ...onge Si le cordon d alimentation électrique est trop court demander à un électricien qualifié d installer une prise de courant à proximité du four à micro ondes Pour un appareil à connexion permanente Cet appareil doit être relié à un câblage métallique permanent relié à la terre ou on doit installer avec les conducteurs d alimentation électrique un conducteur de liaison à la terre connecté à la b...

Страница 34: ... de montage S il n est pas possible d enlever la grille voir les instructions à la partie 2 insérer une boucle de fil métallique mince ou un instrument similaire à travers une ouverture de la grille pour tirer sur le crochet B C A D F E 5 Saisir le four à micro ondes Faire pivoter le four à micro ondes vers le bas Veiller à ce que la porte ne s ouvre pas 6 Soulever tirer les pattes de support F en...

Страница 35: ...ion de la ligne d alimentation électrique est inférieure à la tension normale de 110 volts le temps de cuisson peut augmenter Demander à un électricien qualifié d inspecter l installation électrique Ne jamais faire cuire ou réchauffer un oeuf entier dans sa coquille La vapeur qui s accumule à l intérieur d un oeuf peut en provoquer l explosion ce qui pourrait faire subir des dommages au four Coupe...

Страница 36: ...anément dans le four pour la cuisson Voir page 21 5 Plateau rotatif en verre N de pce 4393751 pas illustré Placer le plateau dans la cavité du four selon les instructions d installation ci dessous Ce plateau fait tourner le plat au cours de la cuisson du mets ce qui rend la cuisson plus uniforme On doit l utiliser pour chaque cuisson pour obtenir les meilleurs résultats On place ce plateau rotatif...

Страница 37: ...on puissance de chauffage 6 LIGHT ON OFF Bouton marche arrêt lampe Appuyer sur cette touche pour commander l allumage et l extinction de la lampe d illumination du plan de travail Appuyer sur les touches fléchées haut bas pour sélectionner l intensité de la lumière 7 POPCORN Maïs soufflé Appuyer sur cette touche pour sélectionner les programmes de préparation automatique de maïs soufflé aux micro ...

Страница 38: ... nouveau bouton de commande MICRO DIAL Faire tourner le bouton de commande MICRO DIAL Pour sélectionner une fonction Pour définir un temps de cuisson Pour définir la puissance de chauffage Pour régler l horloge Pour régler la minuterie Appuyer sur le bouton de commande MICRO DIAL Pour entrer un paramètre sélectionné Pour passer à la page suivante Pour commander l exécution de la cuisson Sélection ...

Страница 39: ... de vraiment effectuer des cuissons voir la section Utilisation du mode apprentissage APPUYER SUR la touche FIRST SCREEN FAIRE TOURNER pour sélectionner Cook Cuisson et APPUYER FAIRE TOURNER pour sélectionner Cereals Céréales et APPUYER FAIRE TOURNER pour sélectionner Instant All Cereals Céréales cuisson instantanée et APPUYER FAIRE TOURNER pour sélectionner 3 portions et APPUYER Lorsqu on sait dé...

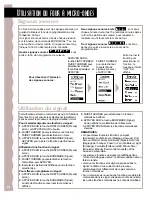
Страница 40: ...APPUYER Ce programme présente une démonstration des fonctions et capacités de l ensemble four à micro ondes hotte et l utilisation du système de commande MICRO DIAL La cuisson aux micro ondes ne peut tout simplement pas être plus rapide plus facile ou meilleure APPUYER SUR la touche FIRST SCREEN FAIRE TOURNER pour sélectionner Custom Fonctions spéciales et APPUYER Conseils pour l utilisation On pr...

Страница 41: ...rrouillage du module de commande pour les enfants La fonction de verrouillage désactive le tableau de commande pour que les enfants ne puissent utiliser le four à micro ondes sans supervision Pour verrouiller le tableau de commande 1 FAIRE TOURNER pour sélectionner Custom Fonctions spéciales APPUYER pour passer à Next Screen l écran suivant 2 APPUYER pour sélectionner Child Lock Verrouillage pour ...

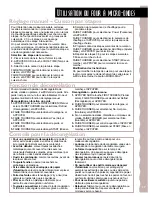
Страница 42: ...ur sélectionner un mets 3 APPUYER SUR la touche BOOKMARK Signet APPUYER pour ajouter la fonction sélectionnée au signet Utilisation d une fonction du signet 1 APPUYER SUR la touche FIRST SCREEN Premier écran 2 APPUYER SUR la touche BOOKMARK Signet 3 FAIRE TOURNER pour sélectionner la fonction mémorisée puis APPUYER 4 Exécuter les instructions affichées pour la fonction sélectionnée Pour effacer un...

Страница 43: ...er le programme de réchauffage REMARQUE Si on souhaite augmenter diminuer le temps de cuisson sélectionner et régler Doneness Degré de cuisson avant de sélectionner START Mise en marche Commande Doneness Degré de cuisson Pour de nombreuses fonctions de cuisson l écran affiche une barre graphique qui indique l avancement de la cuisson on contrôle ceci en faisant tourner le bouton MICRO DIAL vers Pl...

Страница 44: ...NER pour sélectionner Power Puissance et APPUYER FAIRE TOURNER pour sélectionner la puissance de chauffage et APPUYER APPELLATION Haute Moyenne haute Moyenne Moyenne basse Décongélation Basse PUISSANCE DE CHAUFFAGE 100 de la puissance maximale 90 de la puissance maximale 80 de la puissance maximale 70 de la puissance maximale 50 de la puissance maximale 40 de la puissance maximale 30 de la puissan...

Страница 45: ...er le poids et APPUYER 5 FAIRE TOURNER pour sélectionner START Mise en marche et APPUYER Décongélation poids inconnu 1 APPUYER SUR la touche FIRST SCREEN Premier écran FAIRE TOURNER pour sélectionner Defrost Décongélation et APPUYER 2 FAIRE TOURNER pour sélectionner la catégorie et APPUYER 3 FAIRE TOURNER pour sélectionner No Help me Non Aide et APPUYER 4 Si on a sélectionné steaks côtelettes ou m...

Страница 46: ...sation du plat de brunissage Ne pas placer un ustensile de plastique dans le plat Le plat de brunissage devient très chaud très rapidement et pourrait faire fondre l ustensile Ne pas utiliser un ustensile métallique susceptible d érafler le plat de brunissage Ne pas utiliser le plat de brunissage dans un autre four à micro ondes ou dans un four thermique On doit toujours placer le plat de brunissa...

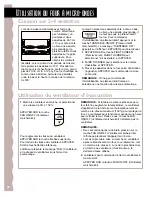
Страница 47: ...riode d attente de 2 à 3 minutes après la cuisson afin que la chaleur se répartisse uniformément dans tout le récipient Utilisation de la fonction de mijotage EASY SIMMER Utiliser la fonction EASY SIMMER Mijotage pour préparer certains mets comme riz pâtes soupes et légumes Il suffit de sélectionner le temps de mijotage le four portera le mets à ébullition puis maintiendra la température de mijota...

Страница 48: ... OFF Ventilateur marche arrêt FAN ON OFF Utilisation du four à micro ondes Lors de la cuisson d aliments avec temps de cuisson sélectionné par l utilisateur on peut placer deux assiettes de 26 7 cm 101 4 po côte à côte ou bien une assiette plus grande sur le plateau rotatif et deux assiettes sur la grille supérieure Pour obtenir les meilleurs résultats vers le milieu de la période de cuisson faire...

Страница 49: ...vel Niveau d illumination et APPUYER 4 FAIRE TOURNER pour sélectionner le niveau d illumination entre 0 et 100 Pour que l allumage se produise à un niveau d illumination plus élevé faire tourner le bouton MICRO DIAL vers l avant pour sélectionner le niveau désiré et APPUYER REMARQUE Le niveau réel d illumination dans la pièce varie en fonction de l heure de la journée et de l ensoleillement LIGHT ...

Страница 50: ...e l eau chaude additionnée d un détergent doux Frotter et agiter dans l eau pour éliminer les souillures incrustées et la graisse Bien rincer et secouer pour faire sécher Ne pas utiliser d ammoniaque ou un produit de nettoyage corrosif comme un produit de nettoyage de four très alcalin ne pas placer non plus le filtre dans un lave vaisselle le filtre prendrait une teinte noire et pourrait subir de...

Страница 51: ... bien consulter notre site Internet à l adresse www kitchenaid com canada 3 Enlever la lampe grillée installer une lampe halogène basse tension 10 W n de pce 8169418 Utiliser un linge doux pour manipuler les lampes ou porter un gant de coton Ne pas toucher les lampes avec les doigts nus 4 Réinstaller le cabochon et la vis de montage 5 Reconnecter l alimentation électrique ou brancher le four à mic...

Страница 52: ...urne dans le sens horaire ou antihoraire selon la rotation du moteur lorsque le programme de cuisson commence Cette apparence est normale et elle n affecte pas le fonctionnement du four Il s agit du son émis par le transformateur lors du fonctionnement du magnétron Le contenu du plat s échauffe et transmet de la chaleur au plat par conduction Ne pas oublier d utiliser des gants de cuisine pour ret...

Страница 53: ...t à la page suivante avant de faire appel à nos services d assistance Si vous avez encore besoin d aide voir la section Demande d assistance ou de service PROBLÈME Rien ne fonctionne Le four à micro ondes ne fonctionne pas Temps de cuisson PROBLÈME Les aliments ne sont pas suffisamment cuits L afficheur présente le décompte du temps mais le four n exécute pas la cuisson CAUSE La tension fournie pa...

Страница 54: ...à la page 14 la section Signaux sonores PROBLÈME Les signaux sonores ne sont pas émis durant la programmation ou en fin de programme 26 Messages affichés Si le module de commande du four détecte un problème interne il exécute un programme d auto contrôle et on voit apparaître un affichage similaire à celui représenté ici Si ceci se produit contacter KitchenAid au 1 800 461 5681 pour obtenir de l a...

Страница 55: ...sistance Si vous avez besoin de plus d assistance vous pouvez écrire à KitchenAid en soumettant toute question ou préoccupation au Centre d interaction avec la clientèle KitchenAid Canada 1901 Minnesota Court Mississauga Ontario L5N 3A7 Veuillez indiquer dans votre correspondance un numéro de téléphone où l on peut vous joindre le jour Si vous avez besoin de pièces ou de service Contacter le servi...

Страница 56: ...ications non autorisées exécutées sur l appareil H Coûts des pièces de remplacement ou de la main d oeuvre de réparation pour les appareils fonctionnant hors du Canada I Les dépenses de voyage ou de transport pour les clients qui habitent dans des régions éloignées KITCHENAID CANADA PAIERA POUR Coûts de remplacement des pièces et de la main d oeuvre pour réparation pour corriger les vices de matér...

Отзывы: