background image

12

Oven Vent

The oven vent releases hot air and moisture from the oven, and 
should not be blocked or covered. Blocking or covering the vent 
will cause poor air circulation, affecting cooking and cleaning 
results. Do not set plastics, paper or other items that could melt or 
burn near the oven vent.
On coil element models, the element can be used when the oven 
is in use as long as the cookware does not extend more than 
1" (2.5 cm) over the element.

Baking and Roasting

Before baking and roasting, position racks according to the 
“Positioning Racks and Bakeware” section. When roasting, it is 
not necessary to wait for the oven preheat conditioning time to 
end before putting food in, unless recommended in the recipe.

Style 1 - Electronic Oven Control

To Bake or Roast:

1. Press BAKE. The bake oven indicator light will light up.
2. Set the temperature (optional).

Press TEMP/TIME “up” or “down” arrow pad to set a 
temperature other than 350°F (177ºC) in 5°F (5ºC) amounts. 
The bake range can be set between 170°F (77ºC) and 
500°F (260ºC).

When the oven temperature is greater than 170°F (77ºC), no 
preheat conditioning time will be shown in the display.

The preheat conditioning time will not change if the 
temperature is reset before the countdown time ends.

If baking and roasting while the minute timer is counting 
down, the set temperature can be seen for 5 seconds by 
pressing BAKE.

3. Press START/ENTER.

The oven control automatically sets preheating times based 
on the oven temperature selected. 

The temperature can be changed after this step. START/
ENTER does not need to be pressed again.

After the oven is preheated and the countdown time is 
finished, a 1-second tone will sound, the ON indicator light will 
go off and the set temperature will appear on the display.

4. Press OFF/CANCEL when finished.

Preheating

After START/ENTER is pressed, the oven will enter a timed 
preheat conditioning. “PrE” and the time countdown will appear 
on the display. When the preheat conditioning time ends, a tone 
will sound and the selected temperature will appear on the 
display.
Preheat temperatures are affected by varying factors such as 
room temperature and peak energy usage times. It is normal for 
the temperature showing on the display and the actual oven 
temperature to differ.
Waiting an additional 10 minutes after the preheat conditioning 
time ends to put food in the oven is suggested when baking foods 
with leavening ingredients, such as yeast, baking powder, baking 
soda and eggs.

Style 2 - Manual Oven Control

To Bake or Roast:

1. Push in and turn the oven selector knob to BAKE and turn the 

oven temperature control knob to the desired temperature 
setting. The OVEN HEATING indicator light will turn on and will 
turn off once the oven is preheated.

2. Place food in oven.

The bake and roasting elements will turn on and off to keep 
the oven temperature at the setting. The OVEN HEATING 
indicator light will turn on and off with the elements.

3. Push in and turn both the oven selector and oven temperature 

control knobs to OFF. The OVEN HEATING indicator light will 
turn off.

Broiling and Custom Broiling

Broiling uses direct radiant heat to cook food. Changing the 
temperature when Custom Broiling allows more precise control 
when cooking. The lower the temperature, the slower the cooking. 
Thicker cuts and unevenly shaped pieces of meat, fish and poultry 
may cook better at lower broiling temperatures.
If your model does not have a broiler pan, one may be ordered. 
Ask for Part Number 4396923.

For best results, use a broiler pan and grid (provided on some 
models). It is designed to drain juices and help prevent spatter 
and smoke.

For proper draining, do not cover the grid with foil. The bottom 
of the pan may be lined with aluminum foil for easier cleaning.

Trim excess fat to reduce spattering. Slit the remaining fat on 
the edges to prevent curling.

Pull out oven rack to stop position before turning or removing 
food. Use tongs to turn food to avoid the loss of juices. Very 
thin cuts of fish, poultry or meat may not need to be turned.

After broiling, remove the pan from the oven when removing 
the food. Drippings will bake on the pan if left in the heated 
oven, making cleaning more difficult.

Before broiling, position rack according to Broiling Chart. It is not 
necessary to preheat the oven before putting food in unless 
recommended in the recipe. Position food on grid in the broiler 
pan, then place it in the center of the oven rack. Close the door to 
the broil stop position to ensure proper broiling temperature.

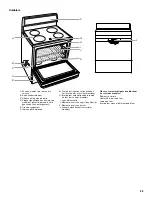
A. Oven vent (ceramic 

glass model)

A. Oven vent (coil 

element model)

A

A

Содержание YIES366RS0

Страница 1: ...istance 1 800 461 5681 for installation and service call 1 800 807 6777 or visit our website at www ikea com CUISINIÈRE ÉLECTRIQUE Guide d utilisation et d entretien Au Canada pour assistance composez le 1 800 461 5681 pour installation ou service le 1 800 807 6777 ou visitez notre site web à www ikea com Table of Contents Table des matières 2 9761892 ...

Страница 2: ...La bride antibasculement 21 PIÈCES ET CARACTÉRISTIQUES 24 UTILISATION DE LA TABLE DE CUISSON 26 Commandes de la table de cuisson 26 Vitrocéramique sur certains modèles 26 Éléments en spirale et cuvettes des brûleurs 27 Table de cuisson relevable 27 Préparation de conserves à la maison 27 Ustensiles de cuisson 28 COMMANDE ÉLECTRONIQUE DU FOUR 28 Témoins lumineux du four 28 Affichage 28 Mise en marc...

Страница 3: ... instructions instructions DANGER WARNING Tip Over Hazard A child or adult can tip the range and be killed Connect anti tip bracket to rear range foot Reconnect the anti tip bracket if the range is moved See the installation instructions for details Failure to follow these instructions can result in death or serious burns to children and adults Anti Tip Bracket Making sure the anti tip bracket is ...

Страница 4: ...hese pans or bowls during cooking may subject wiring or components underneath to damage Protective Liners Do not use aluminum foil to line surface unit drip bowls or oven bottoms except as suggested in the manual Improper installation of these liners may result in a risk of electric shock or fire Glazed Cooking Utensils Only certain types of glass glass ceramic ceramic earthenware or other glazed ...

Страница 5: ... knob B Surface heating indicator light C Left rear control knob D Electronic oven control E Right rear control knob F Right front control knob G Surface cooking area locator A C E D B F G A Left front control knob B Left rear control knob C Bake and broil oven control knob D Oven temperature control knob E Oven heating indicator light F Surface heating indicator light G Right rear control knob H ...

Страница 6: ...Storage drawer F Control panel G Hot surface indicator light on ceramic glass models H Automatic oven light switch on some models I Gasket J Broil element not shown K Bake element L Self clean latch on some models Parts and Features not shown on some models Coil elements Oven door window Oven light Manual oven light switch L A B C D E F H G I J K ...

Страница 7: ...y Then while wearing oven mitts remove the spills while the surface is still warm If sugary spills are allowed to cool down they can adhere to the cooktop and can cause pitting and permanent marks Do not slide cookware or bakeware across the cooktop Aluminum or copper bottoms and rough finishes on cookware or bakeware could leave scratches or marks on the cooktop Do not cook popcorn in prepackaged...

Страница 8: ... in the burner bowl with the coil element receptacle 2 Holding the coil element as level as possible slowly push coil element terminal into the receptacle 3 When the terminal is pushed into the receptacle as far as it will go push down the edge of the coil element opposite the receptacle Lift up Cooktop on some models The lift up cooktop provides easy access for cleaning beneath Do not drop the co...

Страница 9: ...r on the display Press OFF CANCEL to clear If PF or a flashing time appears at any other time a power failure has occurred Press OFF CANCEL and reset the clock if needed When the oven is in use the display shows preheat time or oven temperature setting When the oven is not in use the display shows the time of day When using Start Time Cook Time the display will show either hours and minutes or min...

Страница 10: ... ENTER When the set time ends four 1 second tones will sound 4 Press TIMER CANCEL anytime to cancel the timer and or stop reminder tones To cancel the timer during the countdown press TIMER CANCEL twice The time can be reset during the countdown by repeating the above steps To display the time of day when the timer is counting down press CLOCK Control Lock The Control Lock shuts down the control p...

Страница 11: ... bakeware and oven walls Use the following chart as a guide Bakeware The bakeware material affects cooking results Follow manufacturer s recommendations and use the bakeware size recommended in the recipe Use the following chart as a guide FOOD RACK POSITION Frozen pies large roasts turkeys angel food cakes 1 or 2 Bundt cakes most quick breads yeast breads casseroles meats 2 Cookies biscuits muffi...

Страница 12: ...ure showing on the display and the actual oven temperature to differ Waiting an additional 10 minutes after the preheat conditioning time ends to put food in the oven is suggested when baking foods with leavening ingredients such as yeast baking powder baking soda and eggs Style 2 Manual Oven Control To Bake or Roast 1 Push in and turn the oven selector knob to BAKE and turn the oven temperature c...

Страница 13: ...dicator light will turn off To Broil at a Lower Temperature If food is cooking too fast turn the oven temperature control knob counterclockwise until the OVEN HEATING indicator light goes off To broil food slower from the start of cook time set the oven temperature control knob between 150 F and 325 F 65 C and 163 C These temperature settings let the broil elements cycle and slow cooking results B...

Страница 14: ...he oven door to clear the display RANGE CARE Self Cleaning Cycle on some models IMPORTANT The health of some birds is extremely sensitive to the fumes given off during the Self Cleaning cycle Exposure to the fumes may result in death to certain birds Always move birds to another closed and well ventilated room Self clean the oven before it becomes heavily soiled Heavy soil results in longer cleani...

Страница 15: ...inegar and tomato should be cleaned as soon as the entire appliance is cool These spills may affect the finish Glass cleaner mild liquid cleaner or nonabrasive scrubbing pad Gently clean around the model and serial number plate because scrubbing may remove numbers STAINLESS STEEL on some models Do not use soap filled scouring pads abrasive cleaners Cooktop Polishing Creme steel wool pads gritty wa...

Страница 16: ...en cleaner Follow product label instructions Mildly abrasive cleanser Scrub with wet scouring pad Porcelain enamel only not chrome Dishwasher SURFACE UNDER COOKTOP on some models Do not remove the cooktop to avoid product damage For more information see Lift up Cooktop section Steel wool pad OVEN DOOR EXTERIOR Glass cleaner and paper towels or nonabrasive plastic scrubbing pad Apply glass cleaner ...

Страница 17: ...ers Do not remove the pins while the door is removed from the range 2 Slowly close the door until it rests against the door removal pins 3 Grasp the door on the sides with your fingers on the front of the door and your thumbs on the inside surface 4 Pull door straight up then toward you Hinge hangers will slide out of front frame hinge slot Do not remove door removal pins until the door is replace...

Страница 18: ... the oven indicator lights flash See the Oven Indicator Lights section If the indicator light s keeps flashing call for service See Assistance or Service section Display shows messages Is the display showing PF or a flashing time There has been a power failure Clear the display See Display s section On some models reset the clock if needed See Clock section Is the display showing a letter followed...

Страница 19: ...ted service technicians are trained to fulfill the product warranty and provide after warranty service anywhere in the United States To locate the Whirlpool designated service company in your area you can also look in your telephone directory Yellow Pages For further assistance If you need further assistance you can write to Whirlpool Corporation with any questions or concerns at Whirlpool Brand H...

Страница 20: ...OR INCIDENTAL OR CONSEQUENTIAL DAMAGES Some states or provinces do not allow the exclusion or limitation of incidental or consequential damages so this exclusion or limitation may not apply to you This warranty gives you specific legal rights and you may also have other rights which may vary from state to state or province to province Outside the 50 United States and Canada this warranty does not ...

Страница 21: ...sécurité et de vous y conformer AVERTISSEMENT DANGER Voici le symbole d alerte de sécurité Ce symbole d alerte de sécurité vous signale les dangers potentiels de décès et de blessures graves à vous et à d autres Tous les messages de sécurité suivront le symbole d alerte de sécurité et le mot DANGER ou AVERTISSEMENT Ces mots signifient Risque de basculement Un enfant ou une personne adulte peut fai...

Страница 22: ...ée Les endroits près des éléments de surface peuvent devenir assez chauds pour causer des brûlures Pendant et après l utilisation ne pas toucher les éléments chauffants et ne pas laisser les vêtements ou autres matériaux inflammables entrer en contact avec ces éléments de surface ou les endroits près des éléments avant qu ils soient suffisamment refroidis Ces endroits comprennent la table de cuiss...

Страница 23: ... pour causer des brûlures Pendant et après l utilisation ne pas toucher ou laisser des vêtements ou autres matériaux inflammables venir en contact avec les éléments chauds ou les surfaces intérieures chaudes du four avant qu ils aient eu assez de temps pour refroidir D autres surfaces de l appareil peuvent devenir assez chaudes pour causer des brûlures Ces surfaces comprennent les ouvertures de l ...

Страница 24: ...e de la surface C Bouton de commande arrière gauche D Commande électronique du four E Bouton de commande arrière droit F Bouton de commande avant droit G Repère de zone de cuisson à la surface A C E D B F G A Bouton de commande avant gauche B Bouton de commande arrière gauche C Bouton de commande de cuisson au four et du gril D Bouton de commande de la température du four E Témoin lumineux de chau...

Страница 25: ... Témoin lumineux de surface chaude sur les modèles avec vitrocéramique H Interrupteur automatique de la lampe du four sur certains modèles I Joint d étanchéité J Élément de cuisson au gril non illustré K Élément de cuisson au four L Loquet autonettoyant sur certains modèles Pièces et caractéristiques non illustrées sur certains modèles Éléments à spirale Hublot de la porte du four Lampe du four In...

Страница 26: ...uis en portant des mitaines de four essuyer les renversements tandis que la surface est encore tiède Si on laisse le sucre refroidir sur la table de cuisson il se peut que celui ci adhère à la surface et entraîne de la corrosion et des marques permanentes Ne pas faire glisser sur la table de cuisson les ustensiles de cuisson ou de pâtisserie qui ont des bases en aluminium ou en cuivre et des finit...

Страница 27: ...ssez pour éviter la cuvette du brûleur 2 Tirer l élément tout droit hors de la prise 3 Soulever la cuvette du brûleur Réinstallation 1 Aligner les ouvertures de la cuvette du brûleur avec la prise de l élément 2 Tenir l élément le plus possible à niveau et pousser doucement la fiche de l élément dans la prise 3 Lorsque la fiche de l élément est enfoncée jusqu au fond appuyer sur les rebords de l é...

Страница 28: ...ANCEL et régler de nouveau l horloge au besoin Lorsque le four est en marche l affichage indique la durée de préchauffage ou le réglage de la température du four Lorsque le four n est pas en marche l affichage indique l heure Lors de l utilisation de Start Time Cook Time heure de mise en marche durée de cuisson l affichage indiquera les heures et les minutes ou les minutes et les secondes Lors du ...

Страница 29: ...uler la minuterie lors du compte à rebours appuyer sur TIMER CANCEL deux fois La durée de cuisson peut être réglée de nouveau durant le compte à rebours en répétant les étapes ci dessus Pour afficher l heure du jour lorsque la minuterie compte à rebours appuyer sur CLOCK horloge Verrouillage des commandes Le verrouillage des commandes désactive les touches du tableau de commande pour empêcher l ut...

Страница 30: ...uivants comme guide USTENSILES DE CUISSON L air chaud doit pouvoir circuler autour de l aliment pour le cuire uniformément de telle sorte qu il faut laisser 2 5 cm entre les ustensiles de cuisson et les parois du four Se servir du tableau suivant comme guide Ustensiles de cuisson Le matériau des ustensiles de cuisson affecte les résultats de cuisson Suivre les recommandations du fabricant et utili...

Страница 31: ... À la fin du préchauffage de conditionnement un signal sonore est émis et la température sélectionnée apparaît sur l afficheur Les températures de préchauffage sont affectées par divers facteurs tels que la température ambiante et les heures de pointe de consommation d énergie Il est normal que la température indiquée sur l affichage diffère de la température réelle du four On suggère d attendre 1...

Страница 32: ...ments au gril plus lentement dès le début de la cuisson Appuyer sur la touche à flèche TEMP TIME vers le haut ou vers le bas pour entrer une température entre 300 F et 500 F 149 C et 260 C 2 Appuyer sur START ENTER mise en marche entrée Style 2 Commande manuelle du four Cuisson au gril 1 Enfoncer puis tourner les boutons de commande du four et de la température du four sur BROIL cuisson au gril Le...

Страница 33: ...tiquement Il est possible de changer les réglages de température et ou de durée en tout temps après avoir appuyé sur START ENTER en répétant les étapes 2 à 7 Lorsque la durée de cuisson réglée est terminée le four s arrête automatiquement et End fin apparaît sur l afficheur 8 Appuyer sur OFF CANCEL arrêt annulation ou ouvrir la porte du four pour effacer l affichage ENTRETIEN DE LA CUISINIÈRE Prog...

Страница 34: ...raîtra sur l affichage du four et les témoins lumineux du four s éteindront 4 Appuyer sur OFF CANCEL arrêt annulation pour effacer l affichage du four Pour arrêter le programme d autonettoyage à tout moment Appuyer sur OFF CANCEL arrêt annulation Si la température du four est trop élevée la porte demeure verrouillée Elle ne se déverrouillera pas avant que le four n ait refroidi Nettoyage général I...

Страница 35: ...r four Ne pas immerger les boutons Lors de la réinstallation des boutons s assurer que chaque bouton est à la position d arrêt OFF Sur certains modèles ne pas enlever les joints sous les boutons Savon et eau ou lave vaisselle Tirer les boutons hors du tableau de commande pour les enlever TABLEAU DE COMMANDE Ne pas utiliser des nettoyants abrasifs tampons en laine d acier chiffons de lavage rugueux...

Страница 36: ...r l allumer et l éteindre Avant le remplacement s assurer que le four et la table de cuisson sont froids et que les boutons de commande sont à la position off arrêt Pour réinstaller 1 Débrancher la cuisinière ou déconnecter la source de courant électrique 2 Tourner dans le sens inverse des aiguilles d une montre le couvercle en verre de l ampoule à l arrière du four et l enlever 3 Tourner l ampoul...

Страница 37: ...rt Remplacer le fusible ou remettre le disjoncteur en fonction La table de cuisson ne fonctionne pas Le bouton de commande est il réglé correctement Enfoncer le bouton avant de le tourner à un réglage Sur les modèles en vitrocéramique le verrouillage des commandes est il réglé Voir la section Verrouillage des commandes Chaleur excessive autour des ustensiles de cuisson sur la table de cuisson L us...

Страница 38: ...ifier pour s assurer que la pâte est répartie uniformément dans le plat Utilise t on une durée de cuisson appropriée Ajuster la durée de cuisson La porte a t elle été ouverte pendant la cuisson L ouverture de la porte pour vérifier la cuisson laisse la chaleur du four s échapper et peut nécessiter des durées de cuisson plus longues Les articles cuits au four sont ils trop bruns à la base Déplacer ...

Страница 39: ...E AUCUNE RESPONSABILITÉ POUR LES DOMMAGES FORTUITS OU INDIRECTS Certaines provinces ne permettent pas l exclusion ou la limitation des dommages fortuits ou indirects de sorte que cette exclusion ou limitation peut ne pas être applicable dans votre cas Cette garantie vous confère des droits juridiques spécifiques et vous pouvez également jouir d autres droits qui peuvent varier d une province à une...

Страница 40: ...9761892 2005 All rights reserved Tous droits réservés IKEA is a registered trademark of Inter Ikea Systems B V IKEA est une marque déposée de Inter Ikea Systems B V 2 05 Printed in U S A Imprimé aux É U ...

Отзывы: