background image

3

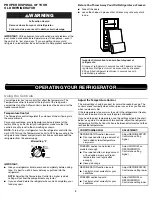
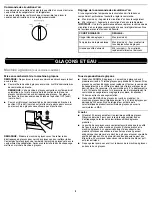
Airflow Control

The Airflow control regulates the amount of air flowing between the 
freezer and the refrigerator compartments. 

When you plug in the refrigerator for the first time, turn the Airflow 
control to the Recommended setting. 

Adjust the Airflow Control

If you want to temporarily increase the cold air flow to a specific 
compartment, adjust the control.

Max - Increase airflow to the freezer

Min - Increase airflow to the refrigerator

IMPORTANT: Once the performance is achieved, return the Airflow 
control to the Recommended setting to keep the refrigerator operating 
at optimum efficiency. 

Ice Maker 

(on some models)


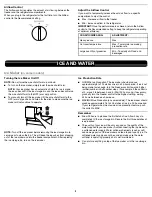
Turning the Ice Maker On/Off

NOTE: Do not force the wire shutoff arm up or down. 

To turn on the ice maker, simply lower the wire shutoff arm.

NOTE: Your ice maker has an automatic shutoff. As ice is made, 
the ice cubes will fill the ice storage bin and the ice cubes will raise 
the wire shutoff arm to the OFF (arm up) position.

To manually turn off the ice maker, lift the wire shutoff arm to the 
OFF (arm up) position and listen for the click to make sure the ice 
maker will not continue to operate. 

NOTE: Turn off the ice maker before removing the ice storage bin to 
serve ice or to clean the bin. This will keep the ice cubes from dropping 
out of the ice maker and into the freezer compartment. After replacing 
the ice storage bin, turn on the ice maker. 

Ice Production Rate

NORMAL Ice Production: The ice maker should produce 
approximately 8 to 12 batches of ice in a 24-hour period. If ice is not 
being made fast enough, turn the Freezer control toward a higher 
(colder) number in half number steps. (For example, if the control is 
at 3, move it to between 3 and 4.) Wait 24 hours and, if necessary, 
gradually turn the Freezer control to the highest setting, waiting 
24 hours between each increase.

MAXIMUM Ice Production (on some models): The ice maker should 
produce approximately 16 to 20 batches of ice in a 24-hour period. 
If your refrigerator has the maximum ice production feature, push 
the switch to MAX.

Remember

Allow 24 hours to produce the first batch of ice. Allow 3 days to 
completely fill the ice storage bin. Discard the first three batches of 
ice produced.

The quality of your ice will be only as good as the quality of the 
water supplied to your ice maker. Avoid connecting the ice maker to 
a softened water supply. Water softener chemicals (such as salt) 
can damage parts of the ice maker and lead to poor quality ice. If a 
softened water supply cannot be avoided, make sure the water 
softener is operating properly and is well maintained.

Do not store anything on top of the ice maker or in the ice storage 
bin.

CONDITION/REASON:

ADJUSTMENT:

Heavy ice use

Max 

Hot room temperature

Max - To maintain ice making 
production rate

Large quantity of groceries

Min - To quickly chill food and 
beverages

ICE AND WATER

Содержание WRT104TFDW

Страница 1: ... manual and on your appliance Always read and obey all safety messages This is the safety alert symbol This symbol alerts you to potential hazards that can kill or hurt you and others All safety messages will follow the safety alert symbol and either the word DANGER or WARNING These words mean follow instructions DANGER WARNING IMPORTANT SAFETY INSTRUCTIONS To reduce the risk of fire electric shoc...

Страница 2: ...y faster If you add food before the refrigerator has cooled completely your food may spoil Adjust the Temperature Control The mid settings should be correct for normal household usage The controls are set correctly when milk or juice is as cold as you like and when ice cream is firm If the temperature is too warm or too cold in the refrigerator or freezer first check the air vents to be sure they ...

Страница 3: ... After replacing the ice storage bin turn on the ice maker Ice Production Rate NORMAL Ice Production The ice maker should produce approximately 8 to 12 batches of ice in a 24 hour period If ice is not being made fast enough turn the Freezer control toward a higher colder number in half number steps For example if the control is at 3 move it to between 3 and 4 Wait 24 hours and if necessary gradual...

Страница 4: ... If You Choose to Leave the Refrigerator On While You re Away 1 Use up any perishables and freeze other items 2 If your refrigerator has an automatic ice maker and is connected to the household water supply turn off the water supply to the refrigerator Property damage can occur if the water supply is not turned off 3 If you have an automatic ice maker turn off the ice maker NOTE Raise the wire shu...

Страница 5: ... The following accessories are available for your refrigerator To order contact us and ask for the Part Number In the U S A visit our webpage www whirlpool com accessories or call 1 800 901 2042 In Canada visit our webpage www whirlpoolparts ca or call 1 800 807 6777 affresh Stainless Steel Cleaner In U S A order Part W10355016 In Canada order Part W10355016B affresh Stainless Steel Wipes In U S A...

Страница 6: ...ee Using the Control s New Installation Allow 24 hours following installation for the refrigerator to cool completely NOTE Adjusting the temperature control s to coldest setting will not cool the refrigerator more quickly The motor seems to run too much Your new refrigerator may run longer than your old one Energy efficient refrigerators run longer at lower more energy efficient speeds Your refrig...

Страница 7: ...for ice production to begin Wait 3 days for full ice production Large amount of ice recently removed Allow sufficient time for ice maker to produce more ice Ice cube jammed in the ice maker ejector arm Remove ice from the ejector arm with a plastic utensil A reverse osmosis water filtration system connected to your cold water supply can decrease water pressure See Water Supply Requirements The ice...

Страница 8: ...f non genuine Whirlpool parts or accessories 6 Conversion of products from natural gas or L P gas 7 Damage from accident misuse abuse fire floods acts of God or use with products not approved by Whirlpool 8 Repairs to parts or systems to correct product damage or defects caused by unauthorized service alteration or modification of the appliance 9 Cosmetic damage including scratches dents chips and...

Страница 9: ...t se produire en cas de non respect des instructions Votre sécurité et celle des autres est très importante Nous donnons de nombreux messages de sécurité importants dans ce manuel et sur votre appareil ménager Assurez vous de toujours lire tous les messages de sécurité et de vous y conformer AVERTISSEMENT DANGER AVERTISSEMENT prendre quelques précautions fondamentales y compris les suivantes Pour ...

Страница 10: ...t se gâter Réglage de la commande de température Les réglages moyens indiqués à la section précédente devraient être corrects pour l utilisation normale du réfrigérateur domestique Les réglages sont faits correctement lorsque le lait ou le jus est aussi froid que vous l aimez et lorsque la crème glacée est ferme Si la température est trop tiède ou trop froide dans le réfrigérateur ou le congélateu...

Страница 11: ...tion Après avoir réinstallé le bac d entreposage mettre en marche la machine à glaçons Taux de production de glaçons Production NORMALE de glaçons La machine à glaçons devrait produire environ 8 à 12 lots de glaçons par période de 24 heures Si les glaçons ne sont pas fabriqués assez rapidement tourner la commande du congélateur vers un chiffre plus élevé plus froid par étapes de un demi numéro Par...

Страница 12: ...inge doux 4 Nettoyer régulièrement les serpentins du condenseur Il se peut que les serpentins aient besoin d être nettoyés tous les deux mois Ce nettoyage pourrait aider à économiser de l énergie Éloigner le réfrigérateur du mur Voir la section Déballage du réfrigérateur Nettoyer à l aspirateur les serpentins lorsqu ils sont sales ou poussiéreux Remettre le réfrigérateur en position S assurer qu i...

Страница 13: ...et consultez la section Instructions d installation pour les instructions de préparation D autre part si votre réfrigérateur a une machine à glaçons automatique rappelez vous de raccorder l approvisionnement d eau au réfrigérateur Remplacement des ampoules d éclairage REMARQUE Votre réfrigérateur ne pourra pas accommoder toutes les ampoules pour les appareils ménagers Veiller à remplacer l ampoule...

Страница 14: ...r le disjoncteur Si le problème persiste appeler un électricien La commande n est pas allumée Mettre en marche la commande du réfrigérateur Voir Utilisation des commande Nouvelle installation Attendre 24 heures après l installation pour permettre au réfrigérateur de refroidir complètement REMARQUE Le fait de placer la les commande s de température au réglage le plus froid ne refroidira pas le réfr...

Страница 15: ... assurer que le bras de commande de la machine à glaçons ou l interrupteur selon les modèles sont bien à la position ON marche Nouvelle installation Attendre 24 heures après l installation de la machine à glaçons pour que la production de glaçons commence Attendre 3 jours pour que la production de glaçons soit complète Une grande quantité de glaçons a été récemment prélevée Accorder suffisamment d...

Страница 16: ...uthentiques 6 Conversion de votre produit du gaz naturel ou du gaz de pétrole liquéfié 7 Dommages causés par accident mésusage abus incendie inondations catastrophe naturelle ou l utilisation de produits non approuvés par Whirlpool 8 Réparations aux pièces ou systèmes dans le but de rectifier un dommage ou des défauts résultant d une réparation altération ou modification non autorisée faite à l ap...

Отзывы: