background image

3

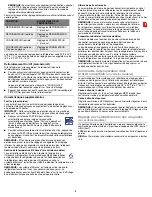
When adjusting temperature set points, use the following chart as a 
guide.      

The set point range for the refrigerator is 33°F to 45°F (0°C to 7°C). The 
set point range for the freezer is -5°F to 5°F (-21°C to -15°C). 

Cooling On/Off 

Your refrigerator and freezer will not cool when cooling is turned off.

To turn cooling off, press and hold the LOCK and FILTER buttons at 
the same time for 3 seconds. 

IMPORTANT: To avoid unintentionally locking the dispenser or 
changing other settings, be sure to press both buttons at exactly the 
same time.

When cooling is off, “COOLING OFF” will appear on the display 
screen.

Press and hold LOCK and FILTER for 3 seconds again to turn 
cooling back on. 

Additional Features

Fast Ice

The Fast Ice feature assists with temporary periods of heavy ice use by 
increasing ice production over a 24-hour period. 

IMPORTANT: This feature only works if the ice maker is turned on. See 
“Ice Maker and Storage Bin.”

Press FAST ICE to turn on the Fast Ice feature. When 
the feature is on, the Fast Ice icon will appear on the 
dispenser display screen. The Fast Ice setting will 
remain on for 24 hours unless manually turned off. 

To manually turn off the Fast Ice feature, press FAST 
ICE again or adjust the freezer temperature set point. The Fast Ice 
icon will disappear when the feature is off.

NOTE: If increased ice production is desired at all times, change the 
freezer set point to a lower setting. Setting the freezer to a colder 
temperature may make some foods, such as ice cream, harder.

6th Sense

®

 Temperature Management (on some models)

The 6th Sense

®

 feature assists with regulating the temperature 

inside the refrigerator. If a large quantity of warm food is placed 
in the refrigerator or warm air enters the refrigerator while the 
door is held open, the 6th Sense

®

 system activates to quickly 

restore the temperature to the set point. 

NOTE: The 6th Sense

®

 system is always on when your refrigerator is 

operating. You do not need to press any buttons to activate it. The 6th 
Sense

®

 icon on the dispenser display screen indicates that the feature 

is functioning properly.

Door Ajar Alarm

The Door Ajar Alarm feature sounds an alarm when the refrigerator or 
freezer door is open for 5 minutes and the product cooling is turned on. 
The alarm will repeat every 2 minutes. Close both doors to turn it off. 
The feature then resets and will reactivate when either door is left open 
again for 5 minutes.

NOTE: To mute the audible alarm while keeping the doors 
open, such as while cleaning the inside of the refrigerator, 
press any button on the control panel. The alarm sound will be 
temporarily turned off, but the Door Ajar icon will still be 
displayed on the dispenser control panel. 

Dual Evaporator (on some models) 

Some models come equipped with a dual sequential evaporation 
system, which includes two separate evaporators for the refrigerator 
and freezer compartments. 

Dual evaporation results in higher humidity, which helps keep foods in 
the refrigerator from spoiling as quickly and improves food quality and 
freshness in the freezer due to decreased freezer burn. In addition, the 
dual evaporation system helps keep food smells in the refrigerator from 
transferring to ice in the freezer. 

NOTE: The dual evaporation system is always activated when your 
refrigerator is operating. You do not need to press any buttons to turn it 
on.

Convertible Drawer Temperature Control 

(on some models)

The control can be adjusted to properly chill meats or vegetables. The 
air inside the pan is cooled to avoid “spot” freezing and can be set to 
keep meats at the National Livestock and Meat Board recommended 
storage temperatures of 28° to 32°F (-2° to 0°C). 

To store meat:

Set the control to one of the three MEAT settings to store meat at its 
optimal storage temperature.

To store vegetables: 

Set the control to VEG to store vegetables at their optimal storage 
temperatures. 

NOTE: If food starts to freeze, move the control to the right (less cold), 
toward the VEG setting. Remember to wait 24 hours between 
adjustments.

Crisper Humidity Control 

(on some models)

You can control the amount of humidity in the moisture-sealed crisper. 
Adjust the control to any setting between LOW and HIGH.

LOW (open) for best storage of fruits and vegetables with skins. 

HIGH (closed) for best storage of fresh, leafy vegetables. 

CONDITION:

TEMPERATURE ADJUSTMENT:

REFRIGERATOR too cold

REFRIGERATOR Setting
1° higher 

REFRIGERATOR too warm 

REFRIGERATOR Setting
1° lower

FREEZER too cold

FREEZER Setting
1° higher

FREEZER too warm /
Too little ice

FREEZER Setting
1° lower

Содержание WRSA71CIHN

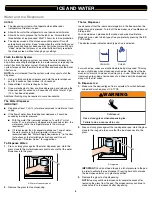
Страница 1: ... appliance Always read and obey all safety messages This is the safety alert symbol This symbol alerts you to potential hazards that can kill or hurt you and others All safety messages will follow the safety alert symbol and either the word DANGER or WARNING These words mean DANGER WARNING IMPORTANT SAFETY INSTRUCTIONS WARNING To reduce the risk of fire electric shock or injury when using your ref...

Страница 2: ...t check the air vents to be sure they are not blocked before adjusting the controls The preset settings should be correct for normal household usage The controls are set correctly when milk or juice is as cold as you like and when ice cream is firm Wait at least 24 hours between adjustments Recheck the temperatures before other adjustments are made To view and adjust the set points press and hold ...

Страница 3: ...or freezer door is open for 5 minutes and the product cooling is turned on The alarm will repeat every 2 minutes Close both doors to turn it off The feature then resets and will reactivate when either door is left open again for 5 minutes NOTE To mute the audible alarm while keeping the doors open such as while cleaning the inside of the refrigerator press any button on the control panel The alarm...

Страница 4: ...equirement If it takes longer than 8 seconds to dispense 1 cup of water the water pressure to the refrigerator is lower than recommended See Water Supply Requirements in the User Instructions or the Installation Instructions and Owner s Manual or Problem Solver for suggestions To Dispense Water 1 Press a sturdy glass against the water dispenser pad Hold the glass close to the water dispenser spout...

Страница 5: ...ftener is operating properly and is well maintained Do not use anything sharp to break up the ice in the storage bin This can cause damage to the ice container and the dispenser mechanism Do not store anything on top of or in the ice maker or storage bin Style 1 Turning the Ice Maker On Off The On Off switch located on the left wall of the freezer door can only be accessed when the ice storage bin...

Страница 6: ...to REPLACE NOTE If water flow to your water dispenser or ice maker decreases noticeably change the filter sooner The filter should be replaced at least every 6 months depending on your water quality and usage Resetting the Filter Status After changing the water filter reset the status light by pressing and holding the FILTER button for 3 seconds When the system is reset the ORDER and REPLACE icons...

Страница 7: ...sted here For a complete Problem Solver listing with more information about additional topics see the Installation Instructions and Owner s Manual provided with your refrigerator or visit our website and download the User Instructions for your model If you need further assistance or more recommendations that may help you avoid a service call refer to the warranty page in this manual and scan the c...

Страница 8: ...tc 5 Conversion of products from natural gas or L P gas 6 Damage from accident misuse abuse fire floods acts of God or use with products not approved by Whirlpool 7 Repairs to parts or systems to correct product damage or defects caused by unauthorized service alteration or modification of the appliance 8 Cosmetic damage including scratches dents chips and other damage to the appliance finishes un...

Страница 9: ...lle des autres est très importante Nous donnons de nombreux messages de sécurité importants dans ce manuel et sur votre appareil ménager Assurez vous de toujours lire tous les messages de sécurité et de vous y conformer AVERTISSEMENT DANGER AVERTISSEMENT réfrigérateur prendre quelques précautions fondamentales y compris les suivantes Pour réduire les risques d incendie de choc électrique ou des bl...

Страница 10: ...u le congélateur vérifier d abord les évents pour s assurer qu ils ne sont pas bloqués avant de régler les commandes Les réglages préréglés devraient être corrects pour l utilisation domestique normale Les réglages sont faits correctement lorsque le lait ou le jus sont aussi froids que vous l aimez et lorsque la crème glacée est ferme Attendre au moins 24 heures entre les ajustements Vérifier de n...

Страница 11: ...e La caractéristique d alarme de porte entrouverte fait entendre un signal d alarme lorsque la porte du réfrigérateur ou du congélateur est ouverte pendant 5 minutes et que le système de refroidissement fonctionne L alarme retentira toutes les 2 minutes Fermer les deux portes pour l arrêter La caractéristique se réinitialise ensuite et se réactive si l une des deux portes est de nouveau laissée ou...

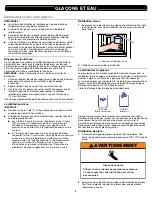
Страница 12: ...eau Si l équivalent d une 1 tasse d eau est distribué en 8 secondes ou moins cela signifie que la pression en eau alimentant le réfrigérateur répond au critère minimal S il faut plus de 8 secondes à la machine pour distribuer l équivalent d une 1 tasse d eau cela signifie que la pression en eau alimentant le réfrigérateur est inférieure au niveau recommandé Voir Spécifications de l alimentation en...

Страница 13: ...chine à glaçons et bac d entreposage Accorder 24 heures pour produire la première quantité de glaçons Jeter les trois premières quantités de glaçons produites La qualité de vos glaçons dépend de la qualité de l eau fournie à votre machine à glaçons Éviter de brancher la machine à glaçons à un approvisionnement d eau adoucie Les produits chimiques adoucisseurs d eau tels que le sel peuvent endommag...

Страница 14: ...le bac à glaçons en le retirant hors de la base 2 Soulever le bras en broche jusqu à ce qu il s enclenche à la position OFF élevée 3 Soulever le devant du bac à glaçons et le retirer 4 Replacer le bac à glaçons en le poussant complètement sinon le distributeur ne fonctionnera pas 5 Pour remettre la production de glaçons en marche appuyer sur le bras en broche pour l abaisser à la position ON S ass...

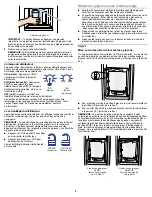
Страница 15: ... pour acier inoxydable affresh Commander la pièce numéro W10355016 Au Canada commander la pièce numéro W10355016B Lingettes pour acier inoxydable affresh Commander la pièce numéro W10355049 Au Canada commander la pièce numéro W10355049B Nettoyant pour appareil ménager et cuisine affresh Commander la pièce numéro W10355010 Au Canada commander la pièce numéro W10355010B Filtre à eau Commander la piè...

Страница 16: ...naturel ou du gaz de pétrole liquéfié 6 Dommages causés par accident mésusage abus incendie inondations catastrophe naturelle ou l utilisation de produits non approuvés par Whirlpool 7 Réparations aux pièces ou systèmes dans le but de rectifier un dommage ou des défauts résultant d une réparation altération ou modification non autorisée faite à l appareil 8 Défauts d apparence notamment les éraflu...

Отзывы: