background image

10

Manual Cooking

To Use:

1. Place food on the turntable, and close the door.

2. Touch COOK TIME, then enter a length of time to cook.

If cooking with 100% power, skip Step 3.

3. Touch COOK POWER, then enter the desired power level 

using the appropriate number pad

or

Touch COOK POWER repeatedly to select the desired power 
level. See “Microwave Cooking Power” chart.

4. Touch START.

The display will count down the cook time.

When the cycle ends, “END” will appear in the display, and 
the end-of-cycle tones will sound, followed by reminder 
tones.

5. Touch CANCEL OFF or open the door to clear the display 

and/or stop reminder tones.

The cook time and power may be changed after touching START 
without interrupting cooking.

To Change Cook Time: Touch COOK TIME. The countdown will 
freeze for a few seconds. Enter the new cook time and touch 
START or wait a few seconds for the countdown to resume.

To Change Cook Power: Touch COOK POWER repeatedly to 
scroll through the cook power levels. Touch START.

Cooking in Stages (or steps)

The microwave oven can be set for manual cooking at different 
cooking powers for various lengths of time, up to 3 stages.

To Cook in Stages:

1. Place food on the turntable, and close the door.

2. Touch COOK TIME, then enter length of time to cook for the 

first stage.

If cooking with 100% power, skip Step 3.

3. Touch COOK POWER, then enter the desired power level for 

the first stage. See “Microwave Cooking Power” chart.

4. Repeat steps 2 and 3 for the second and third stages.

5. Touch START.

The display will count down each of the cook times. The 
display will switch briefly to “STEP 1,” “STEP 2” or “STEP 3” 
every 30 seconds during their respective stages.

When the cycle ends, “END” will appear in the display, and 
the end-of-cycle tones will sound, followed by reminder 
tones.

6. Touch CANCEL OFF or open the door to clear the display 

and/or stop reminder tones.

The cook time and cooking power of the operating stage can be 
changed after touching START without interrupting cooking.

To Change Cook Time: Touch COOK TIME. The countdown will 
freeze for a few seconds. Enter the new cook time and touch 
START or wait a few seconds for the countdown to resume.

To Change Cook Power: Touch COOK POWER repeatedly to 
scroll through the cook power levels. Touch START.

Doneness

Doneness may be adjusted to more done, less done, or back to 
normal doneness (default) for all automatic cooking functions 
except Popcorn. During programming, before touching START, 
touch COOK TIME once for MORE, twice for LESS or 3 times for 
NORMAL.

Quick Touch Cooking (sensor and non-sensor)

A sensor in the microwave oven detects humidity released from 
the food and automatically sets a cooking time.

Before using, make sure the microwave oven has been plugged 
in for at least 2 minutes, the room temperature is not above 95ºF 
(35ºC) and the outside of the container and the microwave oven 
cavity are dry.

POPCORN

The Popcorn program senses bag sizes 1.75-3.5 oz (50-99 g). 
For bag sizes not listed in this section, follow directions on 
package.

Pop only one package at a time.

Do not use regular paper bags or glassware.

Do not try to pop unpopped kernels.

Use fresh bags of popcorn for optimal results.

Cooking results may vary by brand and fat content.

If using a microwave popcorn popper, follow manufacturer’s 
instructions.

If popcorn volume is less than expected, try placing a 
microwave-safe dish upside down on the turntable, placing a 
fresh popcorn bag on the dish, and then starting the cycle.

NOTE: The Popcorn times are programmed to run 15 seconds 
longer than the actual pop time. During this 15-second period, 
the magnetron is off, and the microwave oven is cooling. This 
allows the microwave oven to pop another bag of popcorn 
immediately following the cycle.

To Use Popcorn:

1. Place popcorn bag on the turntable, and close the door.

2. Touch POPCORN

The cycle will start automatically. “SENSES 1.75-3.5 OZ” will 
appear briefly in the display, followed by “SENSING” for the 
remainder of the cycle. Estimated remaining pop time will not 
be displayed.

Doneness cannot be adjusted for Popcorn.

When the cycle ends, “END” will appear in the display, and 
the end-of-cycle tones will sound, followed by reminder 
tones.

3. Touch CANCEL OFF or open the door to clear the display 

and/or stop reminder tones.

Содержание WMH11015

Страница 1: ... 6777 or visit our website at www whirlpool ca ENSEMBLE FOUR À MICRO ONDES HOTTE Guided utilisation etd entretien Au Canada pour assistance installation ou service composez le 1 800 807 6777 ou visitez notre site web à www whirlpool ca Table of Contents Table des matières 2 W10112530 Model Modèle WMH11015 ...

Страница 2: ...écifications électriques 21 PIÈCES ET CARACTÉRISTIQUES 21 Plateau rotatif 21 Grille de cuisson 22 TABLEAU DE COMMANDE DU FOUR À MICRO ONDES 22 Affichage 22 Start mise en marche 23 Cancel Off annulation arrêt 23 Add 30 Seconds ajouter 30 secondes 23 Horloge 23 Signaux sonores 23 Minuterie 23 Control Lock verrouillage des commandes 24 Ventilateur d évacuation 24 Lampe de la table de cuisson 24 Mode ...

Страница 3: ... or dry food It is not designed for industrial or laboratory use As with any appliance close supervision is necessary when used by children Do not operate the microwave oven if it has a damaged cord or plug if it is not working properly or if it has been damaged or dropped The microwave oven should be serviced only by qualified service personnel Call an authorized service company for examination r...

Страница 4: ...ENERGY a Do not attempt to operate this oven with the door open since open door operation can result in harmful exposure to microwave energy It is important not to defeat or tamper with the safety interlocks b Do not place any object between the oven front face and the door or allow soil or cleaner residue to accumulate on sealing surfaces c Do not operate the oven if it is damaged It is particula...

Страница 5: ...tra cavity space for cooking 2 or more containers at the same time Insert the rack securely into the rack supports on the side walls of the microwave oven See Assistance or Service section to reorder rack When not using the rack for cooking remove it from the microwave oven Damage to the microwave oven could result if someone unintentionally turns it on Rack will become hot Always use oven mitts o...

Страница 6: ... set the language Start The START pad begins any function If it is not touched within 5 seconds after touching a pad PRESS START will scroll in the display as a reminder If START pad is not touched within 2 minutes after touching a pad the display will return to the time of day mode and the programmed function will be canceled If cooking is interrupted by opening the door touching START will resum...

Страница 7: ... down the control panel pads to avoid unintended use of the microwave oven When the control is locked only the Vent Fan and Light pads will function If any other control pad is touched LOCKED will appear in the display and the invalid entry tones will sound To Lock Unlock Control The microwave oven must be in standby mode Touch and hold CANCEL OFF for 3 seconds until 2 tones sound and a padlock ic...

Страница 8: ...an larger pieces and uniformly shaped foods cook more evenly than irregularly shaped food Starting Temperature Room temperature foods will heat faster than refrigerated foods and refrigerated foods will heat faster than frozen foods Composition and Density Foods high in fat and sugar will reach a higher temperature and will heat faster than other foods Heavy dense foods such as meat and potatoes r...

Страница 9: ...e the following chart as a general guide for the suggested cooking power of specific foods MATERIAL RECOMMENDATIONS Aluminum Foil Metal See Aluminum Foil and Metal section Browning Dish Bottom must be at least 3 16 5 mm above the turntable Follow manufacturer s recommendations Ceramic Glass Glass Acceptable for use China Earthenware Follow manufacturer s recommendations Melamine Follow manufacture...

Страница 10: ...tdown will freeze for a few seconds Enter the new cook time and touch START or wait a few seconds for the countdown to resume To Change Cook Power Touch COOK POWER repeatedly to scroll through the cook power levels Touch START Doneness Doneness may be adjusted to more done less done or back to normal doneness default for all automatic cooking functions except Popcorn During programming before touc...

Страница 11: ...he end of cycle tones will sound followed by reminder tones 3 Touch CANCEL OFF or open the door to clear the display and or stop reminder tones FROZEN ENTREE sensor and non sensor The Frozen Entree program cooks 10 or 20 oz 283 or 567 g entrées as a sensor function or cooks 40 or 60 oz 1 1 or 1 7 kg entrées as a non sensor function Remove from package Loosen cover on 3 sides If entrée is not in mi...

Страница 12: ... and or stop reminder tones To Reheat Manually Follow directions in Manual Cooking section and use 70 cooking power See Microwave Cooking Power chart FOOD PAD QUANTITY INSTRUCTIONS Bacon 1 1 6 slices average thickness Follow directions on the package Canned Vegetables 2 1 4 cups 250 mL 1 L Place in microwave safe container Cover with plastic wrap and vent Stir and let stand 2 3 minutes after cooki...

Страница 13: ...display and the end of cycle tones will sound followed by reminder tones 6 Touch CANCEL OFF or open the door to clear the display and or stop reminder tones To Defrost Manually Follow directions in Manual Cooking section and use 30 cooking power See Microwave Cooking Power chart WarmHold Hot cooked food can be kept warm in the microwave oven The Warm Hold function uses 10 cook power Warm Hold can ...

Страница 14: ...Inlet Cover To avoid arcing and microwave oven damage the microwave inlet cover see Parts and Features should be kept clean Wipe with wet cloth MICROWAVE OVEN DOOR AND EXTERIOR The area where the microwave oven door and frame touch when closed should be kept clean Mild nonabrasive soaps and detergents Rinse with clean water and dry with soft lint free cloth Glass cleaner and paper towels or nonabr...

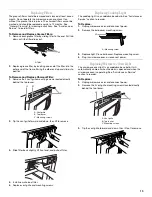
Страница 15: ...remove 3 Slide filter back slightly lift front end and pull out filter 4 Install new charcoal filter 5 Replace vent grille and mounting screws ReplacingCooktopLight The cooktop light is a candelabra base bulb See Assistance or Service section to reorder To Replace 1 Unplug microwave oven or disconnect power 2 Remove the bulb cover mounting screw A Mounting screw 3 Replace light Close bulb cover Re...

Страница 16: ...ply switches the magnetron on and off Microwave oven door looks wavy This is normal and will not affect performance Turntable will not operate Has the tape been removed from turntable hub See Turntable section Is the turntable properly in place Make sure turntable is correct side up and is sitting securely on the turntable support Is the turntable support operating properly Remove turntable Remove...

Страница 17: ...tions below When calling please know the purchase date and the complete model and serial number of your appliance This information will help us to better respond to your request If you need replacement parts If you need to order replacement parts we recommend that you use only FSP replacement parts FSP replacement parts will fit right and work right because they are made with the same precision us...

Страница 18: ... appliance is used in a country other than the country in which it was purchased DISCLAIMER OF IMPLIED WARRANTIES LIMITATION OF REMEDIES CUSTOMER S SOLE AND EXCLUSIVE REMEDY UNDER THIS LIMITED WARRANTY SHALL BE PRODUCT REPAIR AS PROVIDED HEREIN IMPLIED WARRANTIES INCLUDING WARRANTIES OF MERCHANTABILITY OR FITNESS FOR A PARTICULAR PURPOSE ARE LIMITED TO ONE YEAR OR THE SHORTEST PERIOD ALLOWED BY LA...

Страница 19: ... coquille et les récipients fermés par exemple les bocaux en verre fermés peuvent exploser et on ne doit pas les faire chauffer dans le four à micro ondes Utiliser le four à micro ondes uniquement pour les applications auxquelles il est destiné telles qu elles sont décrites dans ce manuel Ne pas utiliser de vapeurs ou de produits chimiques corrosifs dans le four à micro ondes Ce type de four est s...

Страница 20: ...Lorsque vous flambez des aliments sous la hotte mettre le ventilateur en marche Nettoyer avec soin le filtre du ventilateur de la hotte Des agents de nettoyage corrosifs tels que les produits de nettoyage de four à base de soude peuvent endommager le filtre Ne pas couvrir ni obstruer toute ouverture sur le four à micro ondes Ne pas remiser ce four à micro ondes à l extérieur Ne pas utiliser le fou...

Страница 21: ...S DE LIAISON À LA TERRE CONSERVEZ CES INSTRUCTIONS Pour tout appareil ménager connecté par un cordon de courant électrique Il faut que le four à micro ondes soit relié à la terre En cas de court circuit électrique la liaison à la terre réduit le risque de choc électrique car le courant électrique dispose d un itinéraire direct d acheminement à la terre Le four à micro ondes est doté d un cordon de...

Страница 22: ...ur deux niveaux Ne pas utiliser d ustensile ou de plat de cuisson en métal ou un plat de brunissage avec la grille Ne pas laisser un contenant d aliments sur la grille toucher le sommet ou les parois du four à micro ondes Enlever la grille avant utilisation de la fonction Popcorn maïs éclaté Ne pas faire cuire des aliments directement sur la grille Toujours utiliser un contenant pour micro ondes L...

Страница 23: ...ourt Fin du compte à rebours de la minuterie Deux signaux sonores Fin d étape pour la cuisson par étapes Verrouillage des commandes activé Entrée ou sortie d une caractéristique dissimulée Signaux de rappel émis à intervalles de 1 minute après le signal sonore de fin de programme Trois signaux sonores Entrée invalide Quatre signaux sonores Fin de programme Désactivation activation des signaux sono...

Страница 24: ...ble de sélectionner des fonctions sans activer le générateur de micro ondes magnétron La lampe du four à micro ondes s allume le ventilateur fonctionne et le plateau rotatif tourne si activé L icône DEMO s affiche alors que le four à micro ondes est éteint l icône clignotera pendant toute fonction Après 5 minutes d inactivité un message de rappel défile sur l afficheur lorsqu on appuie sur une tou...

Страница 25: ...s pommes de terre jaunes d oeufs foies de poulet hot dogs et saucisses Percer en plusieurs endroits pour laisser échapper la vapeur Protection Utiliser du papier d aluminium en petits morceaux pour protéger les parties minces d aliments de forme irrégulière les os et des aliments tels que les ailes et pilons de poulet et les queues de poisson Voir en premier Papier d aluminium et métal Temps de re...

Страница 26: ... le niveau de puissance désiré Voir le tableau Puissance de cuisson pour micro ondes 4 Appuyer sur START mise en marche L afficheur procède à un compte à rebours de la durée de cuisson À la fin du programme END fin apparaît sur l afficheur et les signaux de fin de programme sont émis suivis de signaux de rappel 5 Appuyer sur CANCEL OFF annulation arrêt ou ouvrir la porte pour effacer l affichage e...

Страница 27: ...hé depuis au moins 2 minutes que la température de la pièce n est pas supérieure à 95 F 35 C et que l extérieur du contenant et la cavité du four à micro ondes sont secs POPCORN maïs éclaté Le programme pour maïs éclaté est conçu pour des sachets de 1 75 à 3 5 oz 50 à 99 g Pour des sachets dont les dimensions ne figurent pas dans cette section suivre les indications de l emballage Ne préparer qu u...

Страница 28: ... rappel 3 Appuyer sur CANCEL OFF annulation arrêt ou ouvrir la porte pour effacer l affichage et ou arrêter les signaux de rappel FROZEN ENTREE plats surgelés avec ou sans capteur Le programme Plats surgelés cuit 10 ou 20 oz 283 ou 567 g avec fonctionnement du capteur ou des plats de 40 ou 60 oz 1 1 ou 1 7 kg sans fonctionnement du capteur Sortir le plat de l emballage Dégager l opercule sur 3 côt...

Страница 29: ... moment en appuyant sur COOK TIME durée de cuisson ALIMENT TOU CHE QUANTITÉ INSTRUCTIONS Bacon 1 1 à 6 tranches d épaisseur moyenne Suivre les instructions qui figurent sur l emballage Légumes en conserve 2 1 à 4 tasses 250 mL à 1 L Les placer dans un contenant pour micro ondes Recouvrir d une pellicule de plastique et laisser une ouverture d échappement de l air Remuer et laisser reposer 2 à 3 mi...

Страница 30: ...lation automatique comporte 3 catégories viande volaille et poisson Il ne doit pas être utilisé pour un aliment laissé à l extérieur du congélateur pendant plus de 20 minutes et pour les plats cuisinés surgelés Utiliser le tableau suivant comme guide Utilisation du mode de décongélation automatique 1 Déballer les aliments les placer sur le plateau rotatif et fermer la porte 2 Appuyer sur DEFROST d...

Страница 31: ... vaisselle sale parce que les aliments peuvent se prendre dans les filtres REMARQUE Une certaine décoloration des filtres peut se produire après leur nettoyage au lave vaisselle Ceci est normal et n affectera pas le rendement des filtres à graisse CAVITÉ DU FOUR À MICRO ONDES Pour éviter d endommager la cavité du four à micro ondes ne pas utiliser de tampons à récurer savonneux de nettoyants abras...

Страница 32: ...ion d arcs et endommager le four Ne pas utiliser de tampons à récurer savonneux nettoyants abrasifs tampons en laine d acier chiffons de lavage rugueux ou certains essuie tout recyclés Savon ou détergent non abrasif doux et chiffon brosse à dents ou coton tige Rincer à l eau propre et sécher avec un chiffon doux sans charpie Remplacementdesfiltres Les filtres à graisse devraient être enlevés et ne...

Страница 33: ... Remplacementdelalampedufouràmicro ondes La lampe du four à micro ondes est une ampoule à culot candélabre Elle s allume automatiquement à l ouverture de la porte et durant le fonctionnement du four à micro ondes Voir la section Assistance ou service pour passer une nouvelle commande Remplacement 1 Débrancher le four à micro ondes ou déconnecter la source de courant électrique 2 Enlever les 2 vis ...

Страница 34: ...t du plateau rotatif fonctionne t il correctement Retirer le plateau rotatif Retirer et nettoyer le support du plateau rotatif et les roulettes Réinstaller le support du plateau rotatif Réinstaller le plateau rotatif Placer une tasse 250 mL d eau sur le plateau rotatif puis remettre le four à micro ondes en marche S il ne fonctionne toujours pas faire un appel de service Voir la section Assistance...

Страница 35: ... besoin de pièces de rechange Si vous avez besoin de commander des pièces de rechange nous vous recommandons d employer uniquement des pièces de rechange FSP Les pièces de rechange FSP conviendront et fonctionneront bien parce qu elles sont fabriquées avec la même précision utilisée dans la fabrication de chaque nouvel appareil WHIRLPOOL Pour obtenir des pièces de rechange FSP dans votre région no...

Страница 36: ... RECOURS DU CLIENT DANS LE CADRE DE LA PRÉSENTE GARANTIE LIMITÉE CONSISTE EN LA RÉPARATION PRÉVUE CI DESSUS LES GARANTIES IMPLICITES Y COMPRIS LES GARANTIES APPLICABLES DE QUALITÉ MARCHANDE ET D APTITUDE À UN USAGE PARTICULIER SONT LIMITÉES À UN AN OU À LA PLUS COURTE PÉRIODE AUTORISÉE PAR LA LOI WHIRLPOOL N ASSUME AUCUNE RESPONSABILITÉ POUR LES DOMMAGES FORTUITS OU INDIRECTS CERTAINES JURIDICTION...

Отзывы: