background image

5

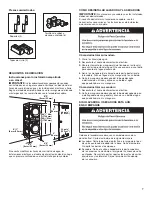
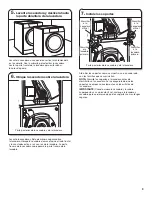
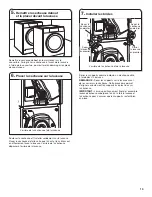
7.


Install brackets

Fasten the brackets as shown, one on each side, with the 

screws provided.


NOTE:

 Fasten the brackets to the washer before fastening  

to the dryer. This ensures the brackets align correctly with  

the holes in the dryer.

IMPORTANT:

 When moving the stacked washer/dryer into  

its final location, hold onto both the washer and the dryer  

to ensure the brackets remain secure.

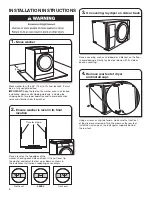
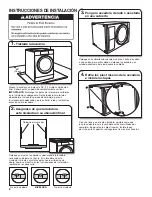
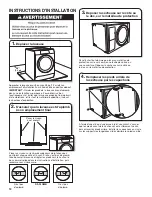
5.


Stand dryer up and slide to front  

of washer

Lift the dryer back to an upright position, keeping it on the 

covering. Use the covering to slide the dryer to the front of  

the washer to avoid damaging the rubber feet.

6.


Place dryer on washer

Lift the dryer up and set it securely on top of the washer.  

Position the dryer so the front and sides are flush with those  

of the washer. The rear of the dryer will overhang the rear  

of the washer. 

Rear of dryer and washer

Rear of dryer and 

washer

Rear of dryer and washer

Fasten 

to  

washer 

first.

Fasten 

to  

washer 

first.

Fasten 

to dryer 

last.

Fasten 

to dryer 

last.

Содержание W11050563

Страница 1: ...nstrucciones de instalación Instructions d installation Bracket Stack Kit Juego para lavadora y secadora de soporte Ensemble superposé de support For use only with 24 610 mm front load washers and dryers Para uso sólo con lavadoras y secadoras de 24 610 mm de carga frontal Pour utilisation avec laveuses et sécheuses de 24 610 mm à chargement par l avant seulement Kit Number W11050563 Número de jue...

Страница 2: ...a 7 Si su lavadora o secadora está aún en su empaque 7 INSTRUCCIONES DE INSTALACIÓN 8 Table des matières SÉCURITÉ DE L ENSEMBLE SUPERPOSÉ 10 EXIGENCES D INSTALLATION 10 Outillage et pièces 10 Exigences d emplacement 11 Désinstallation de la laveuse et de la sécheuse 11 Si la laveuse ou la sécheuse est encore dans son emballage 11 INSTRUCTIONS D INSTALLATION 12 INSTALLATION REQUIREMENTS TOOLS AND P...

Страница 3: ...nstalling Your Washer 1 Turn off the water faucet s 2 Unplug the power supply cord 3 Slowly loosen the fill hose s at the faucet s to relieve the water pressure Use a sponge or towel to absorb the released water 4 Remove the fill hose s from the back of the washer Drain water in the hose s into a bucket 5 Remove the drain hose from the wall floor drain pipe or utility sink and drain any water in t...

Страница 4: ...on the top edges of the washer checking each side and front If it is not level tip the washer and adjust the feet up or down as shown in the Installation Instructions repeating as necessary Not Level LEVEL Not Level 3 On covering lay dryer on side or back Place a covering such as cardboard or a blanket on the floor to avoid damage Gently lay the dryer down with its side or back on covering 4 Remov...

Страница 5: ... dryer up and slide to front of washer Lift the dryer back to an upright position keeping it on the covering Use the covering to slide the dryer to the front of the washer to avoid damaging the rubber feet 6 Place dryer on washer Lift the dryer up and set it securely on top of the washer Position the dryer so the front and sides are flush with those of the washer The rear of the dryer will overhan...

Страница 6: ...ajes de seguridad ADVERTENCIA PELIGRO Este es el símbolo de alerta de seguridad Este símbolo le llama la atención sobre peligros potenciales que pueden ocasionar la muerte o una lesión a usted y a los demás Todos los mensajes de seguridad irán a continuación del símbolo de advertencia de seguridad y de la palabra PELIGRO o ADVERTENCIA Estas palabras significan SEGURIDAD DEL JUEGO PARA LAVADORA Y S...

Страница 7: ...ciones de Instalación que vinieron con su modelo Cómo desinstalar su lavadora 1 Cierre las llave s de agua 2 Desenchufe el cable de alimentación eléctrica 3 Afloje lentamente las manguera s de llenado en las llave s para aliviar la presión del agua Use una esponja o una toalla para absorber el agua derramada 4 Retire las manguera s de llenado de la parte posterior de la lavadora Drene el agua de l...

Страница 8: ...vadora revisando cada lado y el frente Si la lavadora no está nivelada inclínela y ajuste las patas hacia arriba o hacia abajo como se muestra en las Instrucciones de instalación repitiendo si es necesario No está nivelada NIVELADA No está nivelada 48 1 2 m 3 Ponga la secadora de lado o acostada en una cubierta Coloque una cubierta sobre el piso como un trozo de cartón o una cobija para evitar dañ...

Страница 9: ...e la lavadora Parte posterior de la secadora y de la lavadora 7 Instale los soportes Atornillar los soportes como se muestra uno en cada lado con los tornillos que se suministran NOTA Atornille los soportes a la lavadora antes de atornillarlos a la secadora Así se asegurará de que los soportes se alineen correctamente con los orificios de la secadora IMPORTANTE Cuando mueva la secadora y lavadora ...

Страница 10: ...TION OUTILLAGE ET PIÈCES Rassembler les outils et pièces nécessaires avant de commencer l installation Outillage nécessaire Tournevis Phillips Clé à molette de 1 25 mm Niveau Pince ou pince articulée pour tuyaux d alimentation et de vidange Seau Mètre ruban ...

Страница 11: ...s avec l appareil au sujet des outils nécessaires Désinstallation de la laveuse 1 Fermer les robinet s d arrivée d eau 2 Débrancher le cordon d alimentation électrique 3 Desserrer doucement les raccord s des tuyau x d alimentation sur les robinet s pour libérer la pression de l eau Utiliser une éponge ou une serviette pour absorber l eau libérée 4 Déconnecter les tuyau x d arrivée d eau de l arriè...

Страница 12: ...éplacer la laveuse Approcher la laveuse jusqu à environ 48 po 1 2 m de son emplacement d installation final Elle doit être en position debout IMPORTANT Garder les pieds de la laveuse bien d aplomb dans une installation superposée Pour obtenir un bon fonctionnement et éviter que la laveuse produise trop de bruit et de vibrations retirer tout le matériel d expédition incluant les boulons d expéditio...

Страница 13: ...re de la laveuse L arrière de la sécheuse et de la laveuse 7 Installer les brides Serrer les supports comme indiqué un de chaque côté à l aide des vis incluses REMARQUE Serrer les supports sur la laveuse avant de les serrer sur la sécheuse Cette procédure permet d aligner correctement les supports avec les trous sur la sécheuse IMPORTANT Lors du positionnement final de l ensemble laveuse sécheuse ...

Страница 14: ...14 NOTES ...

Страница 15: ...15 NOTES ...

Страница 16: ...17 TM 2017 Whirlpool All rights reserved Used under license in Canada TM 2017 Whirlpool Todos los derechos reservados Usada en Canadá bajo licencia TM 2017 Whirlpool Tous droits réservés Emploi sous licence au Canada ...

Отзывы: