background image

5

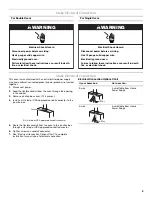
Make Electrical Connection

Make Electrical Connection

This oven is manufactured with a neutral (white) power supply 
wire and a cabinet-connected green (or bare) ground wire twisted 
together.

1. Disconnect power.

2. Feed the flexible conduit from the oven through the opening 

in the cabinet. 

3. Remove junction box cover, if it is present.

4. Install a UL listed or CSA approved conduit connector to the 

junction box.

5. Route the flexible conduit from the oven to the junction box 

through a UL listed or CSA approved conduit connector.

6. Tighten screws on conduit connector.

7. See “Electrical Connection Options Chart” to complete 

installation for your type of electrical connection.

Electrical Connection Options Chart

For Double Ovens

For Single Ovens

WARNING

Electrical Shock Hazard

Disconnect power before servicing.

Use 8 gauge solid copper wire.

Electrically ground oven.

Failure to follow these instructions can result in death, 
fire, or electrical shock.

WARNING

Electrical Shock Hazard

Disconnect power before servicing.

Use 12 gauge solid copper wire.

Electrically ground oven.

Failure to follow these instructions can result in death, 
fire, or electrical shock.

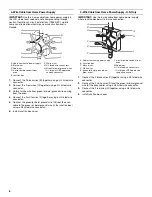
A. UL listed or CSA approved conduit connector

A

If your home has:

Go to section:

4-wire

4-wire Cable from Home 
Power Supply

3-wire

3-wire Cable from Home 
Power Supply

½"

(1.3 cm)

½"

(1.3 cm)

Содержание W10203506A

Страница 1: ...ately You can be killed or seriously injured if you don t follow All safety messages will tell you what the potential hazard is tell you how to reduce the chance of injury and tell you what can happen if the instructions are not followed Your safety and the safety of others are very important We have provided many important safety messages in this manual and on your appliance Always read and obey ...

Страница 2: ...um clearance with oven Recessed installation area must provide complete enclosure around the recessed portion of the oven Grounded electrical supply is required See Electrical Requirements section Electrical supply junction box should be located in the upper right corner 4 10 2 cm below the upper cut out surface of the cabinet Oven support surface must be solid level and flush with bottom of cabin...

Страница 3: ...otection Association One Batterymarch Park Quincy MA 02269 CSA International 8501 East Pleasant Valley Road Cleveland OH 44131 5575 Electrical Connection To properly install your oven you must determine the type of electrical connection you will be using and follow the instructions provided for it here Oven must be connected to the proper electrical voltage and frequency as specified on the model ...

Страница 4: ...edure Aluminum copper connection must conform with local codes and industry accepted wiring practices INSTALLATION INSTRUCTIONS Prepare Built In Oven 1 Decide on the final location for the oven Locate existing wiring to avoid drilling into or severing wiring during installation 2 To avoid floor damage set the oven onto cardboard prior to installation Do not use handle or any portion of the front f...

Страница 5: ...7 See Electrical Connection Options Chart to complete installation for your type of electrical connection Electrical Connection Options Chart For Double Ovens For Single Ovens WARNING Electrical Shock Hazard Disconnect power before servicing Use 8 gauge solid copper wire Electrically ground oven Failure to follow these instructions can result in death fire or electrical shock WARNING Electrical Sh...

Страница 6: ... cover 3 Wire Cable from Home Power Supply U S Only IMPORTANT Use the 3 wire cable from home power supply where local codes permit a 3 wire connection 1 Connect the 2 black wires C together using a UL listed wire connector 2 Connect the 2 white wires D and the green or bare ground wire of the oven cable using a UL listed wire connector 3 Connect the 2 red wires G together using a UL listed wire co...

Страница 7: ...ten screws 4 Replace oven racks 5 Grasp sides of the door and align slots in door with the hinge arms 6 Slightly pull the door open as you slide the door down onto the hinge arms The sliding action of the door will disengage the latches on the hinge arms 7 Gently push the door downward until the door rests evenly on the hinges 8 Close door 9 Repeat for lower oven door 10 Reconnect power 11 Display...

Страница 8: ...es not operate check the following Household fuse is intact and tight or circuit breaker has not tripped Electrical supply is connected See Troubleshooting section in the Use and Care Guide 4 When oven has been on for 5 minutes feel for heat If you do not feel heat or if an F followed by a number appears in the display turn off the oven and contact a qualified technician 5 Press CANCEL If you need...

Отзывы: