background image

7

Coil Elements and Burner Bowls

(on some models)

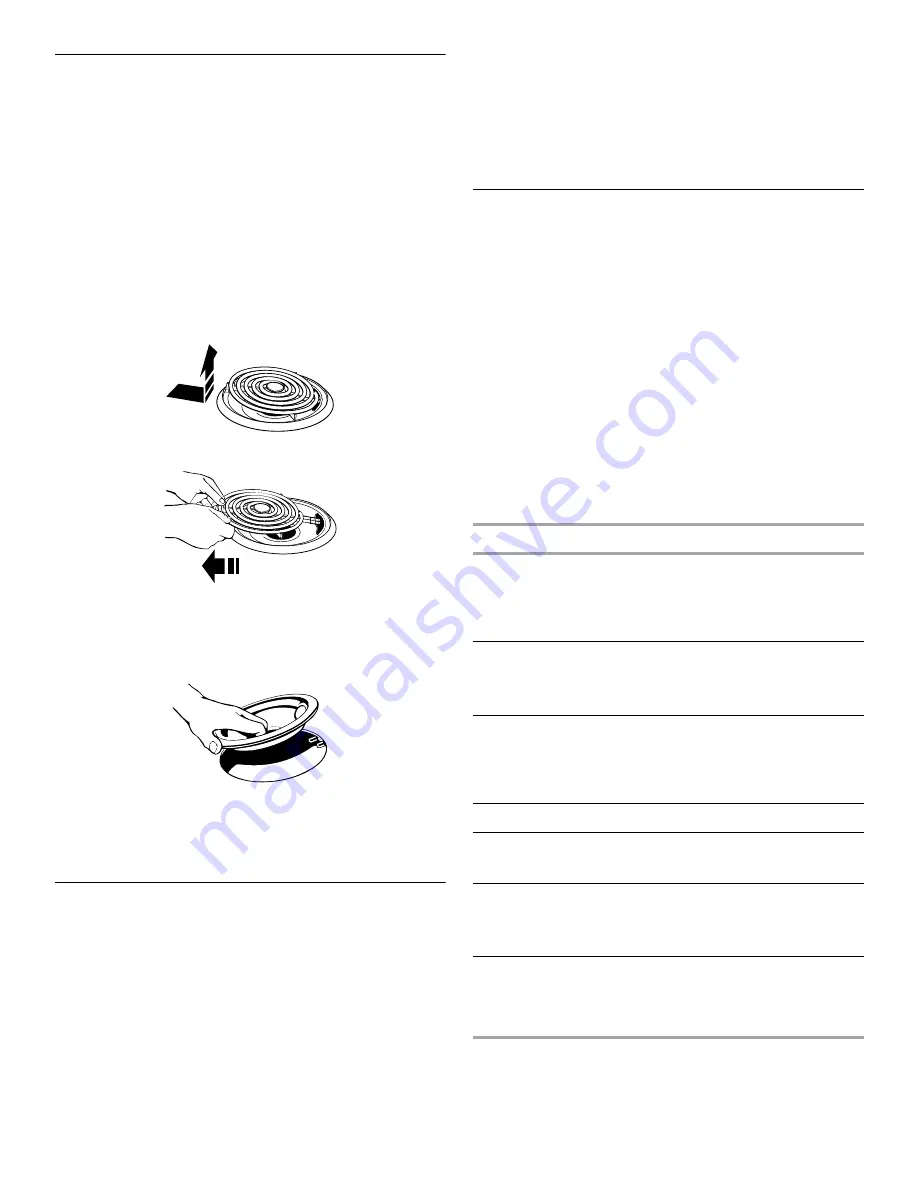
Coil elements should be level for optimal cooking results. Burner 
bowls, when clean, reflect heat back to the cookware. They also 
help catch spills.

Cookware should not extend more than 1" (2.5 cm) over the coil 
element. If cookware is uneven or too large, it can produce 
excess heat causing the burner bowl to change color. For more 
information, see the “General Cleaning” section.

NOTE: Before removing or replacing coil elements and burner 
bowls, make sure they are cool and the control knobs are in the 
Off position.

To Remove:

1. Push in the edge of coil element toward the receptacle. Then 

lift it just enough to clear the burner bowl.

2. Pull the coil element straight away from the receptacle.

3. Lift out the burner bowl.

To Replace:

1. Line up openings in the burner bowl with the coil element 

receptacle.

2. Holding the coil element as level as possible, slowly push coil 

element terminal into the receptacle.

3. When the terminal is pushed into the receptacle as far as it 

will go, push down the edge of the coil element opposite the 
receptacle.

Home Canning

When canning for long periods, alternate the use of surface 
cooking areas, elements or surface burners between batches. 
This allows time for the most recently used areas to cool.

Center the canner on the grate or largest surface cooking 
area or element. Canners should not extend more than 
1" (2.5 cm) outside the cooking area.

Do not place canner on 2 surface cooking areas, elements or 
surface burners at the same time.

On ceramic glass models, use only flat-bottomed canners.

On coil element models, the installation of a Canning Unit Kit 
is recommended. If a kit is not installed, the life of the coil 
element will be shortened. See “Assistance or Service” for 
ordering instructions.

For more information, contact your local U.S. Government 
Agricultural Department Extension Office. Companies that 
manufacture home canning products can also offer 
assistance.

Cookware

IMPORTANT: Do not leave empty cookware on a hot surface 
cooking area, element or surface burner.

Ideal cookware should have a flat bottom, straight sides and a 
well-fitting lid, and the material should be of medium-to-heavy 
thickness.

Rough finishes may scratch the cooktop. Aluminum and copper 
may be used as a core or base in cookware. However, when used 
as a base they can leave permanent marks on the cooktop or 
grates.

Cookware material is a factor in how quickly and evenly heat is 
transferred, which affects cooking results. A nonstick finish has 
the same characteristics as its base material. For example, 
aluminum cookware with a nonstick finish will take on the 
properties of aluminum.

Cookware with nonstick surfaces should not be used under the 
broiler.

Use the following chart as a guide for cookware material 
characteristics.

COOKWARE

CHARACTERISTICS

Aluminum

Heats quickly and evenly.

Suitable for all types of cooking.

Medium or heavy thickness is best for 
most cooking tasks.

Cast iron

Heats slowly and evenly.

Good for browning and frying.

Maintains heat for slow cooking.

Ceramic or 
Ceramic glass

Follow manufacturer’s instructions.

Heats slowly, but unevenly.

Ideal results on low to medium heat 
settings.

Copper

Heats very quickly and evenly.

Earthenware

Follow manufacturer’s instructions.

Use on low heat settings.

Porcelain 
enamel-on-
steel or cast 
iron

See stainless steel or cast iron.

Stainless steel

Heats quickly, but unevenly.

A core or base of aluminum or copper 
on stainless steel provides even 
heating.

Содержание TEP315KW1

Страница 1: ...erformance parts accessories or service call 1 800 253 1301 or visit our website at www estateappliances com Table of Contents 2 9761865 To the installer Please leave this instruction book with the unit To the consumer Please read and keep this book for future reference ...

Страница 2: ...Bowls 7 Home Canning 7 Cookware 7 OVEN USE 8 Aluminum Foil 8 Positioning Racks and Bakeware 8 Bakeware 8 Meat Thermometer 9 Oven Vent 9 Oven Temperature Control 9 Baking and Roasting 10 Broiling 10 RANGE CARE 11 Self Cleaning Cycle 11 General Cleaning 11 Oven Light 13 Oven Door 13 Storage Drawer 14 TROUBLESHOOTING 14 ASSISTANCE OR SERVICE 15 WARRANTY 16 ...

Страница 3: ...instructions instructions DANGER WARNING Tip Over Hazard A child or adult can tip the range and be killed Connect anti tip bracket to rear range foot Reconnect the anti tip bracket if the range is moved See the installation instructions for details Failure to follow these instructions can result in death or serious burns to children and adults Anti Tip Bracket Making sure the anti tip bracket is i...

Страница 4: ...hese pans or bowls during cooking may subject wiring or components underneath to damage Protective Liners Do not use aluminum foil to line surface unit drip bowls or oven bottoms except as suggested in the manual Improper installation of these liners may result in a risk of electric shock or fire Glazed Cooking Utensils Only certain types of glass glass ceramic ceramic earthenware or other glazed ...

Страница 5: ...rner control F Surface heating indicator light G Right rear burner control H Right front burner control A Surface cooking area B Anti tip bracket C Door stop clip D Model and serial number plate behind left side of storage drawer E Storage drawer F Control panel G Hot surface indicator light on some models H Automatic oven light switch on some models I Door gasket J Broil element K Bake element L ...

Страница 6: ... containers on the cooktop They could leave aluminum marks that cannot be removed completely Do not allow objects that could melt such as plastic or aluminum foil to touch any part of the entire cooktop Do not use the cooktop as a cutting board Use cookware about the same size as the surface cooking area Cookware should not extend more than 1 2 5 cm outside the area Use flat bottomed cookware for ...

Страница 7: ...ommended If a kit is not installed the life of the coil element will be shortened See Assistance or Service for ordering instructions For more information contact your local U S Government Agricultural Department Extension Office Companies that manufacture home canning products can also offer assistance Cookware IMPORTANT Do not leave empty cookware on a hot surface cooking area element or surface...

Страница 8: ...nd bakeware and oven walls Use the following chart as a guide Bakeware The bakeware material affects cooking results Follow manufacturer s recommendations and use the bakeware size recommended in the recipe Use the following chart as a guide FOOD RACK POSITION S Frozen pies large roasts turkeys angel food cakes 1 or 2 Bundt cakes most quick breads yeast breads casseroles meats 2 Cookies biscuits m...

Страница 9: ...t can be changed in Fahrenheit or Celsius A minus sign means the oven will be cooler by the displayed amount The absence of a minus sign means the oven will be warmer by the displayed amount Use the following chart as a guide To Adjust Oven Temperature Calibration 1 Press and hold CLOCK until the oven display shows the current calibration for example 00 if not yet adjusted or about 5 seconds 2 Pre...

Страница 10: ...n cuts of fish poultry or meat may not need to be turned After broiling remove the pan from the oven when removing the food Drippings will bake on the pan if left in the heated oven making cleaning more difficult Before broiling position rack according to Broiling Chart It is not necessary to preheat the oven before putting food in unless recommended in the recipe Position food on grid in the broi...

Страница 11: ...ed clean times are 2 hours 30 minutes for light soil and between 3 hours 30 minutes to 4 hours 30 minutes for average to heavy soil Once the oven has completely cooled remove ash with a damp cloth Do not wipe down any of the inside surfaces until the oven has completely cooled down Applying a cool damp cloth to the inner door glass before it has cooled completely could result in the glass breaking...

Страница 12: ...s cooktop has cooled down Rub creme into surface with a damp paper towel or soft cloth Continue rubbing until white film disappears The marks will not totally disappear but after many cleanings they will become less noticeable Tiny scratches and abrasions Cooktop Polishing Creme Rub creme into surface with a damp paper towel or soft cloth Continue rubbing until white film disappears Scratches and ...

Страница 13: ... socket 4 Replace bulb then bulb cover by turning clockwise 5 Plug in range or reconnect power OvenDoor For normal range use it is not suggested to remove the oven door However if removal is necessary make sure the oven is off and cool Then follow these instructions The oven door is heavy Before Removing 1 Use a putty knife or screwdriver and insert it at the bottom corner of the door stop clip 2 ...

Страница 14: ...esults not what expected Is the proper cookware being used See Cookware section Is the control knob set to the proper heat level See Cooktop Controls section Is the appliance level Level the appliance See the Installation Instructions On coil element models is the element inserted properly See Coil Elements and Burner Bowls section Oven will not operate On some models is the electronic clock timer...

Страница 15: ... dealers repair parts distributors and service companies Whirlpool designated service technicians are trained to fulfill the product warranty and provide after warranty service anywhere in the United States To locate the Whirlpool designated service company in your area you can also look in your telephone directory Yellow Pages For further assistance If you need further assistance you can write to...

Страница 16: ...r as recommended in the Use Care Guide 6 Repairs to parts or systems resulting from unauthorized modifications made to the appliance 7 Replacement parts or repair labor costs for units operated outside the United States 8 Any repair labor costs during the limited warranty period WHIRLPOOL CORPORATION SHALL NOT BE LIABLE FOR INCIDENTAL OR CONSEQUENTIAL DAMAGES Some states do not allow the exclusion...

Отзывы: