background image

12

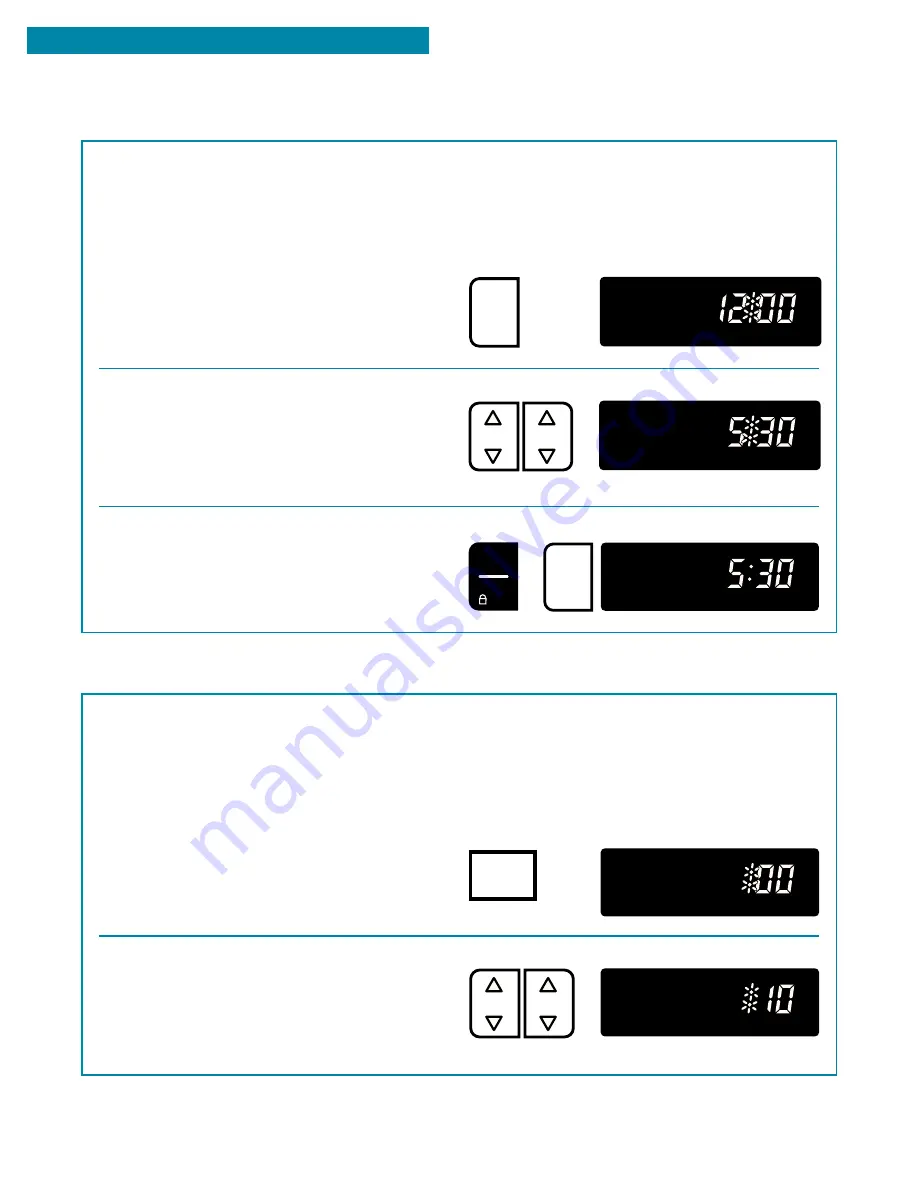
USING YOUR RANGE

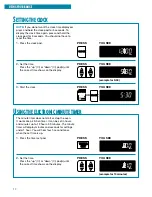
NOTE:


If you do not want the clock time displayed,

press and hold the clock pad for 5 seconds. To
display the clock time again, press and hold the
clock pad for 5 seconds. You should not have to
reset the time.

1.

 Press the clock pad.

2.

Set the time.

Press the “up” (

) or “down” (

) pad(s) until

the correct time shows on the display.

3.

Start the clock.

S

ETTING


THE


CLOCK

PRESS

YOU SEE

TIME

CLOCK

TIME

(example for 5:30)

HR 

MIN 

PRESS

YOU SEE

START

ENTER

5 SEC

CLOCK

PRESS

YOU SEE

U

SING


THE


ELECTRONIC


MINUTE


TIMER

The minute timer does not start or stop the oven.
It works like a kitchen timer. It can be set in hours
and minutes up to 12 hours, 59 minutes. The minute
timer will display minutes and seconds for settings
under 1 hour. You will hear four 1-second tones
when the set time is up.

1.

Press the timer set pad.

2.

Set the time.

Press the “up” (

) or “down” (

) pad(s) until

the correct time shows on the display.

TIMER

TIMER

SET

PRESS

YOU SEE

HR 

MIN 

TIMER

(example for 10 minutes)

PRESS

YOU SEE

OR

Содержание SF385PEE W/N

Страница 1: ...nge 26 Troubleshooting 32 Requesting Assistance or Service 34 Index 35 Warranty 36 1 800 253 1301 Call our Consumer Assistance Center with questions or comments TO THE INSTALLER PLEASE LEAVE THIS INSTRUCTION BOOK WITH THE UNIT TO THE CONSUMER PLEASE READ AND KEEP THIS BOOK FOR FUTURE REFERENCE 4 65 Cubic Foot Oven MODEL SF385PEE PART NO 3196292 Rev C ...

Страница 2: ...loped this Use and Care Guide It is full of valuable information about how to operate and maintain your appliance properly and safely Please read it carefully Also complete and mail the Product Registration Card provided with your appliance The card helps us notify you about any new information on your appliance Please record your model s information Whenever you call to request service for your a...

Страница 3: ... word DANGER or WARNING These words mean wDANGER wWARNING All safety messages will identify the hazard tell you how to reduce the chance of injury and tell you what can happen if the instructions are not followed wWARNING Tip Over Hazard A child or adult can tip the range and be killed Connect anti tip bracket to rear range foot Reconnect the anti tip bracket if the range is moved See the installa...

Страница 4: ... Maintenance Keep range area clear and free from combustible materials gasoline and other flammable vapors and liquids Storage in or on the Range Flammable materials should not be stored in an oven or near surface units Do Not Use Water on Grease Fires Smother fire or flame or use dry chemical or foam type extinguisher Use Only Dry Potholders Moist or damp potholders on hot surfaces may result in ...

Страница 5: ...h to cause burns During and after use do not touch or let clothing or other flammable materials contact heating elements or interior surfaces of oven until they have had sufficient time to cool Other surfaces of the appliance may become hot enough to cause burns among these surfaces are oven vent openings and surfaces near these openings oven doors and windows of oven doors IMPORTANT SAFETY INSTRU...

Страница 6: ...age drawer Storage drawer p 22 Left front control knob Right front control knob Right rear control knob Left rear control knob Oven control pp 11 19 24 25 Control panel pp 7 26 Automatic oven light switch p 31 Surface burner marker shows which burner you are setting CONTROLPANEL PARTS AND FEATURES This section contains captioned pictures of your range Use them to learn where all parts and features...

Страница 7: ...arking Make sure the burner has lit To stop the clicking sound after the burner lights turn the control knob to the cook setting you want The control knob has 3 cook settings HIGH MED and LOW However you can set the control knob anywhere between HIGH and LOW NOTE All four electric ignitors will click at the same time However the burner with the control knob turned to LIGHT is the one that will ign...

Страница 8: ...Hold a lit match near a burner and turn the control knob to the LIGHT position After the burner lights turn the control knob to the setting you want Home canning information The large diameter of most water bath or pressure canners combined with high heat settings for long periods of time can cause damage to the cooktop To protect your range For best results use a canner which can be centered over...

Страница 9: ...rack is loaded with food tilting the rack could cause the food to spill To avoid spilling do not try to pull out the rack when removing large amounts of food Using insulated bakeware ovenproof glassware and dark metal pans When baking with insulated cookie sheets or baking pans place them in the bottom third of the oven You may need to in crease the recommended baking times so test for doneness be...

Страница 10: ...hes of space around each pan and between pans and oven walls For best baking results bake 1 sheet of cookies at a time using rack 3 If baking with 2 cookie sheets use racks 2 and 4 Increase baking time if necessary Where to place pans WHEN YOU HAVE 1 pan 2 pans 3 or 4 pans PLACE In center of the oven rack Side by side or slightly staggered In opposite corners on each oven rack Stagger pans so no p...

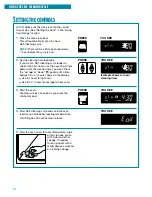
Страница 11: ...t down the control panel command pads The control lock comes in handy when you want to prevent others from using the oven NOTES You can only use the control lock when the oven is not in use or the control has not been set Set the control lock when cleaning the control panel to prevent yourself from accidentally turning on the oven The control lock will stay on even after a power failure To lock th...

Страница 12: ... CLOCK TIME example for 5 30 HR MIN PRESS YOU SEE START ENTER 5 SEC CLOCK PRESS YOU SEE USINGTHEELECTRONICMINUTETIMER The minute timer does not start or stop the oven It works like a kitchen timer It can be set in hours and minutes up to 12 hours 59 minutes The minute timer will display minutes and seconds for settings under 1 hour You will hear four 1 second tones when the set time is up 1 Press ...

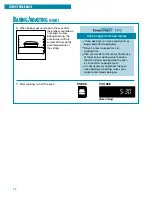
Страница 13: ...cancel the minute timer Press the timer off pad USINGTHEELECTRONICMINUTETIMER CONT START ENTER 5 SEC TIMER PRESS YOU SEE display counts down TIMER YOU SEE PRESS YOU SEE TIMER OFF time of day PRESS YOU SEE TIMER OFF time of day STARTING CANCELINGAFUNCTION After setting a function you must press the start enter pad to start the function The off cancel pad will cancel any function except for the cloc...

Страница 14: ...han 350 F Press to raise the tempera ture or to lower the temperature in 5 F amounts Use these pads until the desired temperature shows on the small display 4 When roasting put your food in the oven You do not have to preheat the oven when roasting unless your recipe recommends it BAKING ROASTING Rear Front PRESS YOU SEE BAKE BAKE PRESS YOU SEE example for bake at 375 F TEMP BAKE Roasting meats an...

Страница 15: ... a precise temperature range for the best cooking results The preheat and set temperatures may be different at the end of the countdown This is normal NOTES When the oven temperature is greater than 170 F no preheating time will be shown on the display You can change the temperature setting any time after pressing the start enter pad You do not have to press the start enter pad again The preheatin...

Страница 16: ...at the setting 7 After cooking turn off the oven Save energy and save money Oven peeking can make cooking times longer and affect food quality Rely on a timer to keep track of cooking time Plan your meals for the most efficient use of the oven by cooking more than one food at a time or baking while the oven is still hot after cooking a meal It is not necessary to preheat the oven when broiling or ...

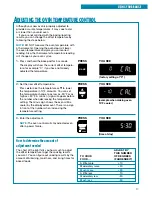
Страница 17: ... the temperature change to as low as 30 F or as high as 30 F A minus sign will appear before the number when decreasing the temperature setting The minus sign shows the oven will be cooler by the displayed amount There is no sign in front of the number when increasing the temperature setting 3 Enter the adjustment NOTE The oven control will stay adjusted even after a power failure How to determine...

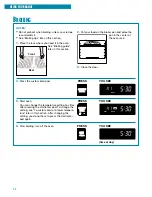
Страница 18: ...ange the temperature setting any time after pressing the start enter pad To change the setting see To custom broil at a lower tempera ture later in this section After changing the setting you do not have to press the start enter pad again 6 After broiling turn off the oven OFF CANCEL time of day PRESS YOU SEE START ENTER 5 SEC CUSTOM BROIL HEAT BROIL ON BROIL PRESS YOU SEE PRESS YOU SEE 2 Put your...

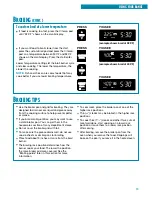
Страница 19: ...he higher rack positions To cook thick 11 2 steaks and other thick cuts of meat well done start cooking on a lower rack position or move them to a lower rack position after searing After broiling remove the broiler pan from the oven when you remove the food Drippings will bake on the pan if you leave it in the heated oven To custom broil at a lower temperature If food is cooking too fast press the...

Страница 20: ...E MINUTES SIDE 2 7 8 8 9 9 10 6 7 10 11 4 5 3 4 8 9 18 20 11 16 4 5 7 9 N A MEAT Steak 1 thick medium rare medium well done Ground Meat Patties 3 4 thick well done Pork Chops 1 thick Ham Slice 1 2 thick precooked Frankfurters Lamb Chops 1 thick Chicken bone in pieces boneless breasts Fish fillets 1 4 1 2 thick steaks 3 4 1 thick Lobster Tails 6 8 oz RACK POSITION 4 4 4 4 4 4 3 4 4 3 SIDE 1 14 15 1...

Страница 21: ...when touching items left near oven vent Failure to do so can result in burns USING YOUR RANGE Oven vent Making sure the anti tip bracket is installed Slide range forward Look for the anti tip bracket securely attached to floor Slide range back so rear range foot is under anti tip bracket THEANTI TIPBRACKET The range will not tip during normal use However the range can tip if you apply too much for...

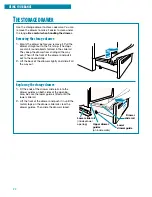
Страница 22: ... lift the front of the drawer and pull it out to the second stop 2 Lift the back of the drawer slightly and slide it all the way out Replacing the storage drawer 1 Fit the ends of the drawer slide rails into the drawer guides on both sides of the opening Also be sure the lower guide is fitted onto the lower slide rail 2 Lift the front of the drawer and push it in until the metal stops on the drawe...

Страница 23: ...ce smoke during the Self Cleaning cycle Wipe up food spills containing sugar as soon as possible after the oven cools down When sugar is heated to a high temperature in the Self Cleaning cycle the high temperature can cause the sugar to burn and react with the porcelain This can cause staining and etching or pitting Remove the oven racks from the oven if you want them to remain shiny You can clean...

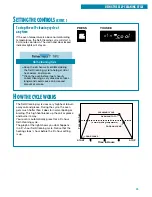
Страница 24: ...etween 21 2 41 2 hours shows on the display Use 21 2 hours for light soil Use 31 2 41 2 hours for average to heavy soil 3 Start the oven The door will lock as soon as you press the start enter pad 4 After Self Cleaning cycle ends and the oven reaches normal baking roasting temperatures LOCK D goes off and the door unlocks 5 After the oven cools to room temperature wipe off any residue or ash with ...

Страница 25: ...ing or broiling This high heat breaks up the soil or grease and burns it away Your oven is automatically preset for a 31 2 hour Self Cleaning cycle The graph at the right shows you what happens in a 31 2 hour Self Cleaning cycle Notice that the heating stops 1 2 hour before the 31 2 hour setting is up 875 F 468 C CLEANING CYCLE OVEN SHUT OFF DOOR UNLOCKS DOOR LOCKS normal broiling temperature STAR...

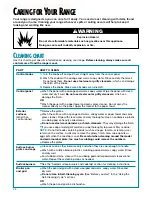
Страница 26: ...stic scrubbing pad on heavily soiled areas Do not use steel wool abrasives or harsh cleansers They may damage the finish If you use soap or detergent solutions wipe thoroughly to prevent filmy residue NOTE Do not let foods containing acids such as vinegar tomato or lemon juice remain on the surface Acids may remove the glossy finish Also wipe up milk or egg spills when the cooktop is cool Be caref...

Страница 27: ...uring the Self Cleaning cycle NOTE If you leave your racks in the oven during the Self Cleaning cycle they will lose their original color and become harder to slide If you need to apply a small amount of vegetable oil to the side rungs to make the racks easier to slide Wash with a paper towel and spray glass cleaner or a nonabrasive plastic scrubbing pad and warm soapy water Wipe with clean water ...

Страница 28: ... properly You must keep this area free of any soil and protect it from boilovers or spillovers Always keep the burner cap in place whenever a surface burner is in use Let the cooktop cool before cleaning Do not use oven cleaners bleach or rust removers Do not obstruct the flow of combustion and ventilation air Be careful not to allow moisture to collect in the control areas Moisture can cause the ...

Страница 29: ... After cleaning the gas tube opening and ports replace the burner cap To replace the burner cap make sure the alignment pins on the burner cap are properly aligned with the burner base 6 Turn on the burner to see if it will light If the burner does not light after you have cleaned it contact an authorized service technician Do not service the sealed burner yourself REMOVINGTHEOVENDOOR For normal u...

Страница 30: ...des with your fingers on the front of the door and your thumbs on the inside surface 2 Rest the hinge hanger so that it is flat at the bottom of the hinge hanger on the bottom of the front frame slot 3 Position the door with the hinge hanger slots almost parallel to the front frame 4 Push up and in until the hinge hanger slots become fastened to the range Lower the door and rotate it slightly from...

Страница 31: ...ight 1 Unplug range or disconnect power 2 Remove the glass bulb cover in the back of the oven by turning it counterclockwise 3 Remove the light bulb from its socket Replace the bulb with a 40 watt appliance bulb THEOVENLIGHT LIGHT 4 Replace the light bulb cover by turning it clockwise 5 Plug in range or reconnect power NOTE The oven light will not work during the Self Cleaning cycle ...

Страница 32: ...efer to the proper instructions The main or regulator gas shutoff valve is in the off position See the Installation Instructions The ignitor is broken Contact an authorized service technician to replace it You have blown a household fuse or tripped a circuit breaker The air gas mixture is incorrect Contact an authorized service technician to check the air gas mixture or see the Installation Instru...

Страница 33: ... pan The flame size does not fit the cookware being used When broiling you have not completely closed the oven door The flow of combustion and or ventilation air to the range is blocked Make sure nothing is blocking the middle front of the backguard The range is not level See the Installation Instructions COOKINGRESULTS PROBLEM Cooking results are not what you expected DISPLAYMESSAGES PROBLEM The ...

Страница 34: ...l fit right and work right because they are made to the same exacting specifications used to build every new WHIRLPOOL appliance To locate FSP replacement parts in your area call our Consumer Assistance Center telephone number or your nearest authorized service center FORFURTHERASSISTANCE If you need further assistance you can write to Whirlpool with any questions or concerns at Whirlpool Brand Ho...

Страница 35: ...12 Control lock 11 Display 11 Minute timer 12 Starting 13 FEATURES 6 MODEL AND SERIAL NUMBER 2 TOPIC PAGE OVEN Door 29 OVEN LIGHT 31 OVEN TEMPERATURE Adjusting 17 Setting 14 18 OVEN VENT 21 PANS 9 PARTS 6 RACKS 9 10 ROASTING Pans 10 Racks 9 10 Setting cycle 14 Tips 14 SAFETY 3 5 SELF CLEANING CYCLE Before you start 23 How the cycle works 25 Setting the controls 24 Tips 25 SERVICE 34 STORAGE DRAWER...

Страница 36: ...T BE LIABLE FOR INCIDENTAL OR CONSEQUENTIAL DAMAGES Some states do not allow the exclusion or limitation of incidental or consequential damages so this exclusion or limitation may not apply to you This warranty gives you specific legal rights and you may also have other rights which vary from state to state Outside the United States a different warranty may apply For details please contact your au...

Отзывы: