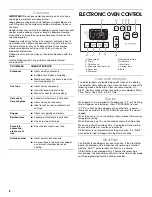
background image

9

Off/Cancel

The Off/Cancel pad stops any function except the Clock, Timer 
and Control Lock.

The cooling fan may continue to operate after an oven function 
has been canceled, depending on oven temperature.

Clock

This is a 12-hour clock and does not show a.m. or p.m.

To Set:

Before setting, make sure the oven and Timer are off.

1. Press CLOCK.

2. Press the TEMP/TIME “up” or “down” arrow pad to set the 

time of day.

3. Press START/ENTER or CLOCK.

Tones

Tones are audible signals, indicating the following:

One tone

Valid pad press

Oven is preheated (long tone)

Function has been entered

Reminder, repeating each minute after the end-of-cycle tones

Three tones

Invalid pad press

Four tones

End of cycle

Fahrenheit and Celsius

The temperature is preset at Fahrenheit, but can be changed to 
Celsius on some models.

To Change: Press and hold CUSTOM BROIL for 5 seconds. A 
tone will sound, and “°C” will appear on the display. Repeat to 
change back to Fahrenheit. To exit mode, press OFF/CANCEL.

Timer

The Timer can be set in hours or minutes up to 12 hours and 
59 minutes and counts down the set time. 

NOTE: The Timer does not start or stop the oven.

To Set:

1. Press TIMER CANCEL*.

The timer oven indicator light will light up. If no action is taken 
after 1 minute, the display will return to the time of day mode.

2. Press the TEMP/TIME “up” or “down” arrow pad to set the 

length of time.

3. Press START/ENTER.

When the set time ends, four 1-second tones will sound.

4. Press TIMER CANCEL* anytime to cancel the timer and/or 

stop reminder tones. To cancel the timer during the 
countdown, press TIMER CANCEL* twice.

The time can be reset during the countdown by repeating the 
above steps. To display the time of day when the timer is 
counting down, press CLOCK.

Control Lock

The Control Lock shuts down the control panel pads to avoid 
unintended use of the oven.

When the control is locked, only the Clock and Timer pads will 
function.

To Lock/Unlock Control: Before locking, make sure the oven 
and Timer are off. Touch and hold START/ENTER for 5 seconds. 
A single tone will sound, and “LOC” and “LOCK’D” (on some 
models) will appear on the display. “LOC” will also appear 
whenever any command pad is pressed while the control is 
locked. 

Repeat to unlock. “LOC” and “LOCK’D” (on some models) will 
disappear from the display.

Oven Temperature Control

IMPORTANT: Do not use a thermometer to measure oven 
temperature because opening the oven door and element or 
burner cycling may give incorrect readings.

The oven provides accurate temperatures; however, it may cook 
faster or slower than your previous oven, so the temperature 
calibration can be adjusted.

A minus sign means the oven will be cooler by the displayed 
amount. The absence of a sign means the oven will be warmer by 
the displayed amount. Use the following chart as a guide.

To Adjust Oven Temperature Calibration:

1. Press and hold BAKE for 5 seconds until the oven display 

shows the current calibration, for example “00.”

2. Press the TEMP/TIME “up” or “down” arrow pad to increase 

or to decrease the temperature in 10°F (5°C) amounts. The 
adjustment can be set between 30°F (15°C) and 
-30°F (-15°C).

NOTE: All temperature adjustments will be displayed in 
Fahrenheit.

3. Press START/ENTER.

ADJUSTMENT °F

COOKS FOOD

10°F (5°C)

...a little more

20°F (10°C)

...moderately more

30°F (15°C)

...much more

-10°F (-5°C)

...a little less

-20°F (-10°C)

...moderately less

-30°F (-15°C)

...much less

Содержание Roper FES325RQ2

Страница 1: ...ce parts accessories or service call 1 800 44 ROPER 1 800 447 6737 or visit our website at www roperappliances com Table of Contents 2 W10017690 To the installer Please leave this instruction book with the unit To the consumer Please read and keep this book for future reference ...

Страница 2: ...art Enter 8 Off Cancel 9 Clock 9 Tones 9 Fahrenheit and Celsius 9 Timer 9 Control Lock 9 Oven Temperature Control 9 OVEN USE 10 Aluminum Foil 10 Positioning Racks and Bakeware 10 Bakeware 11 Meat Thermometer 11 Oven Vent 11 Baking and Roasting 12 Broiling and Custom Broiling 12 Timed Cooking 13 RANGE CARE 14 Self Cleaning Cycle on some models 14 General Cleaning 15 Oven Light 16 Oven Door 17 Stora...

Страница 3: ...instructions instructions DANGER WARNING Tip Over Hazard A child or adult can tip the range and be killed Connect anti tip bracket to rear range foot Reconnect the anti tip bracket if the range is moved See the installation instructions for details Failure to follow these instructions can result in death or serious burns to children and adults Anti Tip Bracket Making sure the anti tip bracket is i...

Страница 4: ...ese pans or bowls during cooking may subject wiring or components underneath to damage Protective Liners Do not use aluminum foil to line surface unit drip bowls or oven bottoms except as suggested in the manual Improper installation of these liners may result in a risk of electric shock or fire Glazed Cooking Utensils Only certain types of glass glass ceramic ceramic earthenware or other glazed u...

Страница 5: ...ear control knob F Lo power indicator on some models G Right front control knob A B C D E F G A Surface cooking area or element B Anti tip bracket C Door stop clip D Model and serial number plate behind left side of storage drawer E Storage drawer F Control panel G Hot surface indicator light on ceramic glass models H Automatic oven light switch on some models I Gasket J Broil element not shown K ...

Страница 6: ... foods containing sugar in any form clean up all spills and soils as soon as possible Allow the cooktop to cool down slightly Then while wearing oven mitts remove the spills while the surface is still warm If sugary spills are allowed to cool down they can adhere to the cooktop and can cause pitting and permanent marks Do not slide cookware or bakeware across the cooktop Aluminum or copper bottoms...

Страница 7: ...ement straight away from the receptacle 3 Lift out the burner bowl To Replace 1 Line up openings in the burner bowl with the coil element receptacle 2 Holding the coil element as level as possible slowly push the coil element terminal into the receptacle 3 When the terminal is pushed into the receptacle as far as it will go push down the edge of the coil element opposite the receptacle Lift upCook...

Страница 8: ...lock if needed When the oven is in use the display shows preheat time or oven temperature setting When the oven is not in use the display shows the time of day When using Start Time Cook Time the display will show either hours and minutes or minutes and seconds If Start Enter is not pressed after setting a function the Start oven indicator light will begin flashing after 5 seconds Start Enter The ...

Страница 9: ...CEL twice The time can be reset during the countdown by repeating the above steps To display the time of day when the timer is counting down press CLOCK ControlLock The Control Lock shuts down the control panel pads to avoid unintended use of the oven When the control is locked only the Clock and Timer pads will function To Lock Unlock Control Before locking make sure the oven and Timer are off To...

Страница 10: ...iven off Exposure to the fumes may result in death to certain birds Always move birds to another closed and well ventilated room AluminumFoil IMPORTANT Do not line the oven bottom with any type of foil liners or cookware because permanent damage will occur to the oven bottom finish Do not cover entire rack with foil because air must be able to move freely for best cooking results To catch spills p...

Страница 11: ...rn near the oven vent On coil element models the element can be used when the oven is in use as long as the cookware does not extend more than 1 3 cm over the element FOOD RACK POSITION S Frozen pies large roasts turkeys angel food cakes 1 or 2 Bundt cakes most quick breads yeast breads casseroles meats 2 Cookies biscuits muffins cakes nonfrozen pies 2 or 3 NUMBEROF PAN S POSITION ON RACK 1 Center...

Страница 12: ...ing time ends to put food in the oven is suggested when baking foods with leavening ingredients such as yeast baking powder baking soda and eggs BroilingandCustomBroiling Broiling uses direct radiant heat to cook food Changing the temperature when Custom Broiling allows more precise control when cooking The lower the temperature the slower the cooking Thicker cuts and unevenly shaped pieces of mea...

Страница 13: ...the time When the time ends the oven will shut off automatically and End will appear on the display 6 Press OFF CANCEL or open the oven door to clear the display To Set a Delayed Cook Time Before setting make sure the clock is set to the correct time of day See Clock section 1 Press BAKE 2 Set the temperature optional Press the TEMP TIME up or down arrow pads to enter a temperature other than the ...

Страница 14: ...y melt Remove all items from the storage drawer How the Cycle Works IMPORTANT The heating and cooling of porcelain on steel in the oven may result in discoloring loss of gloss hairline cracks and popping sounds The Self Cleaning cycle uses very high temperatures burning soil to a powdery ash The oven is preset for a 3 hour 30 minute clean cycle but the time can be changed Suggested clean times are...

Страница 15: ...still warm You may want to wear oven mitts while cleaning the cooktop Cooktop Polishing Creme and clean damp paper towel Clean as soon as cooktop has cooled down Rub creme into surface with a damp paper towel or soft cloth Continue rubbing until white film disappears Heavy soil dark streaks specks and discoloration Cooktop Polishing Creme or nonabrasive cleanser Rub product into soil with a damp p...

Страница 16: ...models Cleaning Method Chrome only Mildly abrasive cleanser Scrub with wet scouring pad Solution of cup 125 mL ammonia to 1 gal 3 75 L water Soak for 20 minutes then scrub with scouring or steel wool pad Oven cleaner Follow product label instructions Porcelain enamel only Dishwasher Do not clean in the Self Cleaning cycle STORAGE DRAWER on some models Make sure drawer is cool and empty before clea...

Страница 17: ...ot repeat the removal and installation procedures StorageDrawer The storage drawer can be removed Before removing make sure drawer is cool and empty To Remove 1 Pull the storage drawer straight back past the drawer stop notch and the end of the side rails 2 Lift up the back of the drawer and pull the drawer out To Replace 1 Lift up the back of the drawer and place it inside the range in its fully ...

Страница 18: ...ol Lock set See Control Lock section Oven temperature too high or too low Does the oven temperature calibration need adjustment See Oven Temperature Control section On some models does the cooling fan run during BAKE BROIL or CLEAN It is normal for the fan to automatically run when the oven is in use This helps cool the electronic control Oven indicator lights flash Do the oven indicator lights fl...

Страница 19: ...ignated service center Call the Customer eXperience Center toll free at 1 800 44 ROPER 1 800 447 6737 Our consultants provide assistance with Features and specifications on our full line of appliances Installation information Use and maintenance procedures Accessory and repair parts sales Specialized customer assistance Spanish speaking hearing impaired limited vision etc Referrals to local dealer...

Страница 20: ... WARRANTY SHALL BE PRODUCT REPAIR AS PROVIDED HEREIN IMPLIED WARRANTIES INCLUDING WARRANTIES OF MERCHANTABILITY OR FITNESS FOR A PARTICULAR PURPOSE ARE LIMITED TO ONE YEAR OR THE SHORTEST PERIOD ALLOWED BY LAW WHIRLPOOL SHALL NOT BE LIABLE FOR INCIDENTAL OR CONSEQUENTIAL DAMAGES SOME STATES AND PROVINCES DO NOT ALLOW THE EXCLUSION OR LIMITATION OF INCIDENTAL OR CONSEQUENTIAL DAMAGES OR LIMITATIONS...

Отзывы: