background image

Содержание RF350BXD

Страница 1: ...e 7 Using Your Range 8 Using the Self Cleaning Cycle 23 Caring for Your Range 27 Troubleshooting 32 Requesting Assistance or Service 34 Index 35 Warranty 36 1 800 253 I 301 Call us with questions or comments SELF CLEANING ELECTRIC RANGE PART NO 3189075 Rev A MODELS RF350BXD 31 45 RF360BXD RF365PXD ...

Страница 2: ...control 14 Broiling 15 Broiling tips 17 Energy saving tips 17 Using the MEALTIMERTM clock 18 The oven vent 20 The storage drawer 20 The lower panel 21 The anti tip bracket 22 Optional door panel pat 22 Using the Self Cleaning Cycle 23 Before you start 23 Setting the controls 24 Special tips 26 How the cycle works 26 Caring for Your Range 27 Surface units and reflector bowls 27 Lift up cooktop 29 C...

Страница 3: ...appliance The card helps us notify you about any new information on your appliance Please record your model s information Whenever you call to request service for Model Number your appliance you need to know your complete model number and serial number Serial Number You can find this information on the model Purchase Date and serial number plate see diagram on page 7 for location of plate Please a...

Страница 4: ...al supply and grounded 0 Qiib Ndll c i s t l Do not touch surface units areas near units heating elements or l WARNING To reduce the risk of interior surfaces of oven Surface tipping the appliance the appli units and heating elements may be ante must be secured by a hot even though they are dark in properly installed anti tip bracket color Areas near surface units and To check if the bracket is in...

Страница 5: ...be sure glass cooking utensils are safe for use on the range Only certain types of glass glass ceramic ceramic earthen ware or other glazed utensils are suitable for cooktops without breaking due to the sudden change in temperature l Never leave surface units unat tended at high heat settings A boilover could result and cause smoking and greasy spillovers that could ignite l Do not store flammable...

Страница 6: ...ven cleaners No commercial oven cleaner or oven liner protective coating of any kind should be used in or around any part of the oven l Before self cleaning the oven remove broiler pan broiler grid oven racks and other utensils Do not use your oven to clean mis cellaneous parts unless you are instructed to do so in this Use and Care Guide l Do not soak removable heating elements in water The eleme...

Страница 7: ...odel and serial number plate y Lock lever P 24 Optional anti tip floor bracket H for information on wall mounted anti tip bracket see p 22 Lower panel Model RF350BXD not shown P 21 Removable storage drawer Models RF360BXD and RF365PXD P 20 w not available on all models Automatic oven light I Broil element P 15 Bake element P 3 Control panel Manual oven Surface selector light switch unit Start time...

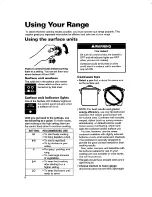
Страница 8: ... on a higher setting l To keep food warm until ready to serve Fire Hazard Be sure all control knobs are turned to OFF and all indicator lights are OFF when you are not cooking Someone could be burned or a fire could start if a surface unit is acciden tally left ON Cookware tips l Select a pan that is about the same size as the surface unit NOTE For best results and greater energy efficiency use on...

Страница 9: ...e unit for best results Also use a canner pan which can be centered over the surface unit and which does not extend more than one inch outside surface unit area Large diameter canners pans if not properly centered trap heat and can cause damage to the cooktop l Do not place canner on two surface units at the same time Too much heat will build up and will damage the cooktop l Start with hot water T...

Страница 10: ... location before turning oven on Be sure the rack s is level l If rack s must be moved while oven is hot use pot holders or oven mitts to protect hands Failure to follow the above precautions could result in personal injury For best air circulation Hot air must circulate around the pans in the Use the following as a guide to oven for even heat to reach all parts of the determine where to place the...

Страница 11: ...d than the dish holding the food l Do not cover the entire rack with aluminum foil It will reduce air circulation and cause poor cooking results l Do not line oven bottom or entire oven rack with foil or other liners Poor baking will result Electrical Shock and Fire Hazard Do not allow foil to touch the heating elements Failure to follow this precaution could result in electrical shock or fire haz...

Страница 12: ...inutes up to an hour You will hear a buzzer when the set time is up NOTE Do not push in the knob when setting the Minute Timer or when stopping the buzzer Pushing in and turning the Minute Timer Knob changes the clock setting 2 Without pushing it in turn the knob back to the setting you want When the time is up a buzzer will sound To stop the buzzer turn the Minute Timer hand to OFF 12 ...

Страница 13: ... goes off NOTE Do not preheat oven when roast ing or cooking items such as casseroles 3 Put food in oven During baking roasting the elements will turn on and off to keep the oven tempera ture at the setting The OVEN HEATING Indicator Light will turn on and off with the elements NOTE The top element helps heat during baking roasting but does not turn red 4 After cooking turn off oven Turn both the ...

Страница 14: ...ver Locking Tooth To lower Notches 2 Loosen the locking screws inside the control knob Note the position of the notches 3 To lower the temperature hold knob handle firmly and move the tooth a notch counterclockwise Each notch equals about 5 F 2 5 4 To raise the temperature hold knob handle firmly and move the tooth a notch clockwise Each notch equals about 5 F 2 5 5 Tighten the locking screws and ...

Страница 15: ...away from the broil element See Broiling rack position chart on page 16 2 Put food on broiler pan and place in center of oven rack 3 Position door Close the door to the Broil Stop position open about 4 inches lo cm The door will stay open by itself 4 Set Oven Selector and Oven Temperature Control Knob to BROIL The OVEN HEATING Indicator Light will come on 5 When broiling is done turn off oven Turn...

Страница 16: ...eratures Broiling rack position chart RACK POSITION TYPE OF FOOD FROM BOlTOM DONENESS 4 Hamburger patties and thin steaks thick or less 3 Quickly searing food rare and medium steaks medium patties ham slices fish steaks frankfurters 2 Well done steaks and patties lamb chops split chicken pork steaks and chops whole fish 1 Not used for broiling 16 ...

Страница 17: ... energy when using your cooking product l Use pans with flat bottoms straight sides and tight fitting lids l Match the pan to the surface unit size l Cook with a minimum of liquid or fat to help shorten cooking time l Preheat pans only when recommended and for the shortest time possible l Stat t food on higher heat settings then set surface unit control on LO or OFF to finish cooking Use retained ...

Страница 18: ...sult To delay start and stop automatically 1 Position the oven rack s properly and place the food in the oven want the oven to shut off 4 Set the Oven Selector to TIMED BAKE and set the Oven Tem perature Control Knob to the baking roasting temperature you want The oven will now start and stop auto matically The OVEN HEATING Indicator Light will come on when the start time is reached 5 After baking...

Страница 19: ... To avoid sickness and food waste when using the MEALTIMEFF control l Do not let most UNFROZEN food stand for more than two hours before cooking starts l Do not allow food to remain in oven for more than two hours after the end of cooking cycle Failure to follow the above could result in 1sickness NOTE Do not use foods that will spoil while waiting for cooking to start Such foods are dishes with m...

Страница 20: ...odels RF365PXD and RF360BXD You can remove the storage drawer to make it easier to clean under the range and to check for installation of the anti tip floor bracket if you have one Use care when handling the drawer Removing the storage drawer Replacing the storage drawer wer lide rail 1 Empty drawer of any pots and pans before removing drawer Pull drawer straight out to the first stop Lift front a...

Страница 21: ...eck for installation of the anti tip floor bracket if you have one Removing the lower panel 1 Pull out bottom of panel 2 Slightly swing out and lift panel to remove from top clips Replacing the lower panel 1 Place notches in top of panel over the top clips 2 Swing down and push bottom of panel to secure bottom clips 21 ...

Страница 22: ...loor bracket l Look to see if the anti tip bracket is attached to floor with screws l Make sure one rear leveling leg is posi tioned under the anti tip bracket l See Installation Instructions for further details Cable attached to rear of control panel Wall bracket l Look to see if the anti tip bracket is attached with screws to the wall behind the control panel l Make sure the cable on the back of...

Страница 23: ...oose soil or grease This will help reduce smoke during the Self Cleaning cycle l Remove the oven racks from the oven if you want them to remain shiny You can clean the oven racks in the Self Cleaning cycle but they will become harder to slide See page 30 If you clean racks in the Self Cleaning cycle place them on the 2nd and 4th rack guides Guides are counted from bottom to top l Heat and odors ar...

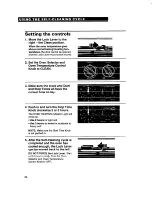
Страница 24: ...p Times all have the correct time of day 4 Push in and turn the Stop Time Knob clockwise 2 or 3 hours The OVEN HEATING Indicator Light will come on l Use 2 hours for light soil l Use 3 hours or more for moderate to heavy soil NOTE Make sure the Start Time Knob is not pushed in 5 After the Self Cleaning cycle is completed and the oven has cooled enough the Lock Lever can be moved back to the left D...

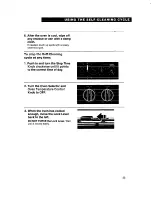
Страница 25: ...a damp cloth If needed touch up spots with a soapy steel wool pad 2 Turn the Oven Selector and Oven Temperature Control Knob to OFF 3 When the oven has cooled enough move the Lock Lever back to the left DO NOT FORCE the Lock Lever Wait until it moves easily 25 ...

Страница 26: ...enough or you may not have prepared the oven properly Set the Self Cleaning cycle longer the next time and hand clean areas noted on page 23 How the cycle works The Self Cleaning cycle uses very high heat to burn away soil and grease During the cycle the oven gets much hotter than it does for normal baking or broiling This high heat breaks up the soil or grease and burns it away You can adjust the...

Страница 27: ...ck or burns Surface units and reflector bowls NOTE If your model does not include element hold down clips please disregard reference to element hold down clips in the following instructions Removing 1 Make sure all surface units are off and cool before removing surface units and reflector bowls 3 Pull the surface unit straight away from the receptacle 4 Lift out the reflector bowl See Cleaning cha...

Страница 28: ...as far as it will go push down the edge of the surface unit opposite the receptacle The element hold down clip will keep the surface unit from moving around NOTE Reflector bowls reflect heat back to the utensils on the surface units They also help catch spills When they are kept clean they reflect heat better and look new longer If a reflector bowl gets discolored some of your utensils may not be ...

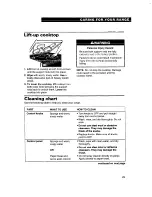
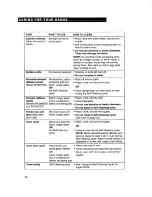
Страница 29: ...e could result to the porcelain and the cooktop frame Cleaning chart Use the following table to help you clean your range PART WHAT TO USE HOW TO CLEAN Control knobs Sponge and warm soapy water l Turn knobs to OFF and pull straight away from control panel l Wash rinse and dry thoroughly Do not soak Control panel Sponge and warm soapy water OR Paper towel and spray glass cleaner l Do not use steel ...

Страница 30: ...eflector Warm soapy water l Wash rinse and dry well bowls and a nonabrasive l Clean frequently Models RF360BXD plastic scrubbing pad l Do not use abrasive or harsh cleansers and RF350BXD l Do not place in Self Cleaning oven Broiler pan and grid clean after each use Oven racks Steel wool pad and l Wash rinse and dry thoroughly warm soapy water l Do not clean in Self Cleaning cycle See note on page ...

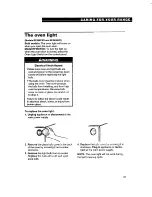
Страница 31: ...b from breaking and from high oven temperatures Because bulb cover is made of glass be careful not to drop it Failure to follow the above could result in electrical shook burns or injury from broken alass To replace the oven light 1 Unplug appliance or disconnect at the main power supply 2 Remove the glass bulb cover in the back of the oven by screwing it out counter clockwise 3 Remove the light b...

Страница 32: ...ayed start time Wait for the start time to be reached or cancel and reset the control l You have not turned the Oven Temperature Control Knob to a temperature setting The surface units will not operate l You have not set the MEALTIMER clock correctly See Using the MEALTIMERTM clock on page 18 l You have not set the MEALTIMER clocks Stop or Start Time Knobs to the correct time of day If a delay sta...

Страница 33: ...tructions l The oven temperature seems too low or too high See Adjusting the oven temperature control on page 14 to adjust oven temperature l You did not preheat the oven before baking if called for in recipe l You are using a recipe that has never been tested or is not from a reliable source l You are using a pan that is not the correct type or size Refer to a reliable cookbook or recipe for reco...

Страница 34: ... WASHING MACHINES L YAIOR SERVICE 6 REPAlR DRYERS SERVICE 6 REPAlR See WhIrlpool Appliances or See Whirlpool Appliances or Aulbrlzed Whklpaol Servlca Aulhorlzed WhIrlpool Servla Ganp e xYZ Selviec Co Garrplstmz Setvies Co 3 If you need FSP replacement parts FSP is a registered trademark of Whirlpool Corporation for quality parts Look for this symbol of quality whenever you need a replacement part ...

Страница 35: ...OKWARE Canning 9 Tips 8 ENERGY SAVING TIPS 17 FEATURES 7 LIFT UP COOKTOP 29 LIGHT 31 LOCK LEVER 24 25 LOWER PANEL 21 TOPIC PAGE MEALTIMERTM CLOCK 18 Delaying start and stop automatically 18 Starting now and stopping automatically 19 MINUTE TIMER 12 MODEL AND SERIAL NUMBER 3 OPTIONAL DOOR PANEL PAC 22 OVEN TEMPERATURE Adjusting 14 Setting 13 15 18 19 OVEN VENT 20 PANS 8 9 PARTS 7 RACKS 10 ROASTING ...

Страница 36: ...ystems caused by unauthorized modifications made to the appliance z 95 WHIRLPOOL CORPORATION SHALL NOT BE LIABLE FOR INCIDENTAL OR CONSE QUENTIAL DAMAGES Some states do not allow the exclusion or limitation of incidental or consequential damages so this exclusion or limitation may not apply to you This warranty gives you specific legal rights and you may also have other rights which vary from stat...

Отзывы: