background image

7

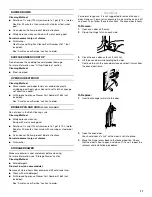
Lift-up Cooktop

(on some models)

The lift-up cooktop provides easy access for cleaning beneath. 
Do not drop the cooktop. Damage could occur to the finish and 
the cooktop frame. For more information, see the “General 
Cleaning” section.

To Lift:

Lift the cooktop by both front corners until the supports lock into 
place.

To Replace:

1. Lift the cooktop from both sides while pressing the support 

rods back to unlock them.

2. Slowly lower the cooktop into place.

Home Canning

When canning for long periods, alternate the use of elements 
between batches. This allows time for the most recently used 
areas to cool.

Center the canner on the element. Canners should not extend 
more than ½" (1.3 cm) beyond the element.

Do not place canner on 2 elements at the same time.

For more information, contact your local agricultural 
department. Companies that manufacture home canning 
products can also offer assistance.

Cookware

IMPORTANT: Do not leave empty cookware on a hot surface 
cooking area, element or surface burner.

Ideal cookware should have a flat bottom, straight sides and a 
well-fitting lid, and the material should be of medium-to-heavy 
thickness.

Rough finishes may scratch the cooktop or grates. Aluminum and 
copper may be used as a core or base in cookware. However, 
when used as a base they can leave permanent marks on the 
cooktop or grates.

Cookware material is a factor in how quickly and evenly heat is 
transferred, which affects cooking results. A nonstick finish has 
the same characteristics as its base material. For example, 
aluminum cookware with a nonstick finish will take on the 
properties of aluminum.

Cookware with nonstick surfaces should not be used under the 
broiler.

Use the following chart as a guide for cookware material 
characteristics.

COOKWARE

CHARACTERISTICS

Aluminum

Heats quickly and evenly.

Suitable for all types of cooking.

Medium or heavy thickness is best for 
most cooking tasks.

Cast iron

Heats slowly and evenly.

Good for browning and frying.

Maintains heat for slow cooking.

Ceramic or 
Ceramic glass

Follow manufacturer’s instructions.

Heats slowly, but unevenly.

Ideal results on low to medium heat 
settings.

Copper

Heats very quickly and evenly.

Earthenware

Follow manufacturer’s instructions.

Use on low heat settings.

Porcelain 
enamel-on-
steel or cast 
iron

See stainless steel or cast iron.

Stainless steel

Heats quickly, but unevenly.

A core or base of aluminum or copper 
on stainless steel provides even 
heating.

Содержание RF110AXS

Страница 1: ...operation performance parts accessories or service call 1 800 253 1301 or visit our website at www whirlpool com Table of Contents 2 W10162203A To the installer Please leave this instruction book with the unit To the consumer Please read and keep this book for future reference ...

Страница 2: ...r Bowls 6 Lift up Cooktop 7 Home Canning 7 Cookware 7 OVEN USE 8 Oven Temperature Control 8 Aluminum Foil 8 Positioning Racks and Bakeware 8 Bakeware 8 Meat Thermometer 9 Oven Vent 9 Baking and Roasting 9 Broiling 9 RANGE CARE 10 General Cleaning 10 Oven Door 11 Storage Drawer 12 TROUBLESHOOTING 13 ASSISTANCE OR SERVICE 14 WARRANTY 16 ...

Страница 3: ...pliance Always read and obey all safety messages This is the safety alert symbol This symbol alerts you to potential hazards that can kill or hurt you and others All safety messages will follow the safety alert symbol and either the word DANGER or WARNING These words mean follow instructions instructions DANGER WARNING Tip Over Hazard A child or adult can tip the range and be killed Connect anti t...

Страница 4: ...ese pans or bowls during cooking may subject wiring or components underneath to damage Protective Liners Do not use aluminum foil to line surface unit drip bowls or oven bottoms except as suggested in the manual Improper installation of these liners may result in a risk of electric shock or fire Glazed Cooking Utensils Only certain types of glass glass ceramic ceramic earthenware or other glazed u...

Страница 5: ...trol knob B Left rear control knob C Surface heating indicator light D Oven temperature control knob E Oven heating indicator light F Right rear control knob G Right front control knob H Surface area locator A Oven vent B Surface burner C Anti tip bracket D Door stop clip E Model and serial number plate behind left side of storage drawer F Storage drawer G Control panel H Broil element not shown I...

Страница 6: ...s are in the Off position To Remove 1 Push in the edge of coil element toward the receptacle Then lift it enough to clear the burner bowl 2 Pull the coil element straight away from the receptacle 3 Lift out the burner bowl To Replace 1 Line up openings in the burner bowl with the coil element receptacle 2 Holding the coil element as level as possible slowly push the coil element terminal into the ...

Страница 7: ...heavy thickness Rough finishes may scratch the cooktop or grates Aluminum and copper may be used as a core or base in cookware However when used as a base they can leave permanent marks on the cooktop or grates Cookware material is a factor in how quickly and evenly heat is transferred which affects cooking results A nonstick finish has the same characteristics as its base material For example alu...

Страница 8: ...stration and chart as a guide BAKEWARE Hot air must be able to circulate around food to cook evenly so allow 2 5 cm of space around bakeware and oven walls Use the following chart as a guide Bakeware The bakeware material affects cooking results Follow manufacturer s recommendations and use the bakeware size recommended in the recipe Use the following chart as a guide FOOD RACK POSITION S Frozen p...

Страница 9: ...ure The OVEN HEATING light will turn on and off with the element 3 Turn oven control knob to OFF when finished Broiling Broiling uses direct radiant heat to cook food Changing the temperature when broiling allows more precise control The lower the temperature the slower the cooking Thicker cuts and unevenly shaped pieces of meat fish and poultry may cook better at lower broiling temperatures For b...

Страница 10: ...eel wool abrasive cleansers or oven cleaner Do not soak knobs When replacing knobs make sure knobs are in the OFF position On some models do not remove seals under knobs Cleaning Method Soap and water or dishwasher Pull knobs straight away from control panel to remove CONTROL PANEL Do not use abrasive cleaners steel wool pads gritty washcloths or some paper towels Damge may occur Cleaning Method G...

Страница 11: ...inutes then scrub with scouring or steel wool pad Oven cleaner Follow product label instructions Porcelain enamel only not chrome Dishwasher STORAGE DRAWER Make sure drawer is cool and empty before cleaning For more information see Storage Drawer section Cleaning Method Mild detergent Drawer Liner on some models Remove all stored items from drawer and lift out drawer liner Clean with mild detergen...

Страница 12: ...ce it inside the range in its fully forward position 2 Lift up the front of the drawer to a level position 3 Slowly push the drawer into the range until the drawer side rails engage with the gap in the drawer glides 4 Once the drawer is fully engaged on both sides slide the drawer back into the closed position NOTE When you are removing and replacing the storage drawer a slight push may be needed ...

Страница 13: ...evel the appliance See the Installation Instructions On coil element models is the element inserted properly See Coil Elements and Burner Bowls section Oven indicator lights flash Do the OVEN HEATING indicator lights flash See Assistance or Service section Oven cooking results not what expected Is the appliance level Level the appliance See the Installation Instructions Is the proper temperature s...

Страница 14: ... dealers repair parts distributors and service companies Whirlpool designated service technicians are trained to fulfill the product warranty and provide after warranty service anywhere in the United States To locate the Whirlpool designated service company in your area you can also look in your telephone directory Yellow Pages For further assistance If you need further assistance you can write to...

Страница 15: ...15 Notes ...
Страница 16: ...ice if your major appliance is located in a remote area where service by an authorized Whirlpool servicer is not available 10 The removal and reinstallation of your major appliance if it is installed in an inaccessible location or is not installed in accordance with published installation instructions 11 Major appliances with original model serial numbers that have been removed altered or cannot b...

Отзывы: