background image

7

1.

Door Safety Lock System

2.

Oven Window

3.

Roller ring

4.

Shaft

5.

Control Panel

6.

Oven Air Vent

7.

Glass Tray

8.

Grill Heater

9.

Metal Rack

PART NAMES

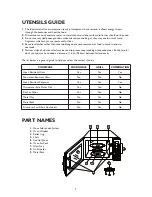
1.

The ideal material for a microwave utensil is transparent to microwave, it allows energy to pass
through the container and heat the food.

2.

Microwave can not penetrate metal, so metal utensils or dishes with metallic trim should not be used.

3.

Do not use recycled paper products when microwave cooking, as they may contain small metal
fragments which may cause sparks and/or fires.

4.

Round/oval dishes rather than square/oblong ones are recommend, as food in corners tends to
overcook.

5.

Narrow strips of aluminum foil may be used to prevent overcooking of exposed areas. But be careful
don’t use too much and keep a distance of 1 inch (2.54cm) between foil and cavity.

The list below is a general guide to help you select the correct utensils.

UTENSILS GUIDE

COOKWARE

MICROWAVE

GRILL

COMBINATION

Heat–Resistant Glass

Yes

Yes

Yes

Non Heat–Resistant Glass

No

No

No

Heat–Resistant Ceramics

Yes

Yes

Yes

Microwave–Safe Plastic Dish

Yes

No

No

Kitchen Paper

Yes

No

No

Metal Tray

No

Yes

No

Metal Rack

No

Yes

No

Aluminum Foil & Foil Containers

No

Yes

No

Содержание MWO 611

Страница 1: ...ng Istruzioni per l uso Brugsanvisning Bruksanvisning Käyttöohje Manual de utilização Instrucciones para el uso Instrukcje użytkowania Használati utasítás ИнструкциЯ за употреба Návod k použití Návod na použitie Instruc iuni de utilizare Инструкции по эксплуатации MWO 611 ...

Страница 2: ...ENGLISH Instructions for use Page 3 FRANÇAIS Mode d emploi Page 12 3 ...

Страница 3: ...since open door operation can result in harmful exposure to microwave energy It is important not to defeat or tamper with the safety interlocks 2 Do not place any object between the oven front face and the door or allow soil or cleaner residue to accumulate on sealing surfaces 3 Do not operate the oven if it is damaged It is particularly important that the oven door close properly and that there i...

Страница 4: ...y or on the door If there is any damage do not operate the oven and contact qualified service personnel 3 This microwave oven must be placed on a flat stable surface to hold its weight and the heaviest food likely to be cooked in the oven 4 Do not place the oven where heat moisture or high humidity are generated or near combustible materials 5 For correct operation the oven must have sufficient ai...

Страница 5: ... the following measures 1 Clean door and sealing surface of the oven 2 Reorient the receiving antenna of radio or television 3 Relocate the microwave oven with respect to the receiver 4 Move the microwave oven away from the receiver 5 Plug the microwave oven into a different outlet so that microwave oven and receiver are on different branch circuits IMPORTANT SAFETY INSTRUCTIONS When using electri...

Страница 6: ...they are suitable for use in microwave oven 16 WARNING It is hazardous for anyone other than a trained person to carry out any service or repair operation which involves the removal of any cover which gives protection against exposure to microwave energy 17 This product is a Group 2 Class B ISM equipment The definition of Group 2 which contains all ISM Industrial Scientific and Medical equipment i...

Страница 7: ... which may cause sparks and or fires 4 Round oval dishes rather than square oblong ones are recommend as food in corners tends to overcook 5 Narrow strips of aluminum foil may be used to prevent overcooking of exposed areas But be careful don t use too much and keep a distance of 1 inch 2 54cm between foil and cavity The list below is a general guide to help you select the correct utensils UTENSIL...

Страница 8: ... allowable weight by weight defrost EXPRESS To start the oven quickly at full microwave power you can press this button a number of times to indicate cooking time POWER LEVEL Press this button a number of times to set cooking power level PRESET Delay start control allows you to put food into the oven and program it to start cooking at a later time MEMORY Use this button to set a multistage cooking...

Страница 9: ...oes or au gratin COMBINATION 2 55 time for microwave cooking 45 time for grill cooking Useful for cooking pudding omelets baked potatoes and poultry Suppose you want to set the oven to COMBINATION 2 For 25 Minutes 1 Touch COMBI 2 button 2 Touch 10 MIN button 2 times and 1 MIN button 5 times 3 Touch START button MULTI STAGE COOKING The oven can be programmed to do several consecutive functions The ...

Страница 10: ...he oven to QUICK DEFROST for 5 minutes and 30 seconds 1 Touch QUICK DEFROST button 2 Touch 1 min button 5 times and 10 sec button 3 times 3 Touch START button SETTING TIMER To set the minute timer do the following 1 Touch MICROWAVE button 2 Use number buttons to input needed time 3 Touch POWER LEVEL button 6 times and the display will show 0 4 Touch START button NOTE This additional feature is use...

Страница 11: ...crowave oven is operated under high humidity condition And it is normal 7 It is occasionally necessary to remove the glass tray for cleaning Wash the tray in warm sudsy water or in a dishwasher 8 The roller ring and oven floor should be cleaned regularly to avoid excessive noise Simply wipe the bottom surface of the oven with mild detergent The roller ring may be washed in mild sudsy water or dish...

Страница 12: ... four avec la porte ouverte l énergie des micro ondes pourraient provoquer des brûlures Il est important de ne pas endommager le système de verrouillage 2 Ne placez aucun objet entre l avant du four et la porte et ne laissez aucun résidu d aliment ou de produit nettoyant s accumuler sur les surfaces assurant l étanchéité 3 N utilisez pas le four s il est endommagé Il est particulièrement important...

Страница 13: ...aut quelconque n actionnez PAS votre four et faites appel à un technicien du Service Après vente 3 Cet appareil doit être installé sur une surface plane et stable en mesure de supporter son poids et celui de l aliment le plus lourd qu il est possible de cuire dans le four 4 Évitez d installer le four à proximité d une source de chaleur dans un endroit particulièrement humide ou encore à proximité ...

Страница 14: ...u téléviseur et d autres appareils similaires Ces interférences peuvent être supprimées ou réduites en appliquant les mesures correctrices suivantes 1 Nettoyez la porte et la surface d étanchéité du four 2 Réorientez l antenne de réception de la radio ou du téléviseur de manière à obtenir un bon signal 3 Repositionnez le four par rapport à l antenne de réception 4 Éloignez le four de l antenne de ...

Страница 15: ...de retirer les plats du four 15 Vérifiez que les ustensiles de cuisson sont adaptés pour la cuisson au micro ondes 16 AVERTISSEMENT Il est dangereux pour quiconque n est pas un technicien spécialisé d assurer le service après vente ou d effectuer des opérations impliquant le démontage des panneaux de protection contre l exposition à l énergie des micro ondes 17 Ce produit est un appareil ISM du gr...

Страница 16: ...son 4 Utilisez de préférence des plats ronds ovales plutôt que carrés oblongs car les aliements tendent à cuire trop dans les angles 5 Des bandes d aluminium peuvent être utilisées pour éviter de trop cuire les zones les plus exposées Veillez toutefois à ne pas en utiliser une trop grande quantité et à respecter une distance de 2 54 cm entre la feuille et la cavité du four Le tableau ci dessus vou...

Страница 17: ...ar poids EXPRESS Cette fonction permet de démarrer le four à la puissance maximale des micro ondes Appuyez sur cette touche à plusieurs reprises pour afficher le temps de cuisson POWER LEVEL Appuyez à plusieurs reprises sur cette touche pour régler le niveau de puissance des micro ondes PRESET La fonction Départ différé vous permet de placer les aliments dans le four et de programmer leur cuisson ...

Страница 18: ...N 2 55 du temps de cuisson avec les micro ondes 45 du temps de cuisson au gril Sélectionnez cette fonction pour cuire des puddings des omelettes des pommes de terre au four et de la volaille Supposons que vous souhaitiez utiliser la fonction COMBINATION 2 pendant 25 minutes 1 Appuyez sur la touche COMBI 2 2 Appuyez sur la touche 10 MIN à 2 reprises puis sur la touche 1 MIN à 5 reprises 3 Appuyez s...

Страница 19: ... et 30 secondes 1 Appuyez sur la touche QUICK DEFROST 2 Appuyez sur la touche 1 min à 5 reprises et sur la touche 10 sec à 3 reprises 3 Appuyez sur la touche START RÉGLAGE DU MINUTEUR Pour régler le minuteur procédez comme suit 1 Appuyez sur la touche MICROWAVE 2 Entrez la durée souhaitée à l aide des touches chiffrées 3 Appuyez 6 fois sur la touche POWER LEVEL et l affichage visualisera 0 4 Appuy...

Страница 20: ...mule à l intérieur ou autour de l extérieur de la porte du four essuyez à l aide d un chiffon doux Ce phénomène peut se produire lorsque le four fonctionne dans des conditions d humidité élevée Il ne s agit pas d une anomalie de fonctionnement 7 Il est nécessaire de nettoyer de temps à autre le plateau en verre Lavez le plateau dans un peu d eau chaude savonneuse ou au lave vaisselle 8 Nettoyez ré...

Страница 21: ......

Страница 22: ...11 ...

Страница 23: ...10 ...

Страница 24: ...9 ...

Страница 25: ...8 ...

Страница 26: ...7 ...

Страница 27: ...6 ...

Страница 28: ...5 ...

Страница 29: ...4 ...

Страница 30: ...3 ...

Страница 31: ...3 FRANÇAIS Mode d emploi Page 12 ENGLISH Instructions for use Page 3 ...

Страница 32: ...Whirlpool is a registered trademark of Whirlpool USA Copyright Whirlpool Europe s r l 2009 All rights reserved http www whirlpool eu 5019 305 02000 F AE GB n 10 09 ...

Отзывы: