background image

Содержание MT4110SP

Страница 1: ...MICROWAVE OVENS ens Compactors Room Au Conditioners Dehumidlflers Automallc Washers Clothes Dryers Freezers Refrigerator Freezers Ice Makers Dishwashers ...

Страница 2: ...led on a floor that page 20 of the range Use and Care will hold the weight Guide or the Installation Instructions l installed in a weTI ventilated area pro tected from the weather l properly connected to the correct gas l properly connected to the correct supply see Installation Instructions electric supply and grounding see Proper use You must be sure your range is l used only for jobs expected o...

Страница 3: ... Day Clock 6 MinuteTimer 7 To Stop or Interrupt an Operation 6 Full Power Cooking 6 Variable Power Cooking 9 ToChangeorEraseanOperation 12 Automatic Defrosting 14 Variable Power Defrosting 14 To Recall an Operation 16 ProgrammedOvenCooking 16 Temperature Probe 19 DelayStartCooking 23 Care and Cleaning of Your Microwave Oven 24 How to Change the Oven Light Bulb 24 Servicing Your Microwave Oven 24 ...

Страница 4: ...l Corporation Microwave Oven Registration Dept 2000 U S 33 North Benton Harbor Michigan 49022 tf you move or are not the original owner of this range you must by law renew the registration Send the following inFormation to the address given above 1 Your name and address 3 The model and serial number 01 your range Saf tey Precautions Your new range has been built aud Precautions To Avoid Possible E...

Страница 5: ...ube cool removes moisture from the range during a cooking ope ration and prolongs the life of the range Vents for the Eye Level range are located across the top of the range They shoui be kept clean and unobstructed at ail times The Eye Level range is equipped with a special concealed fan that auto matically turns on when the temper ature of range parts begin to rise The fan will stay on until the...

Страница 6: ...HOW TO USE YOUR MICROWAVE OVEN Time Readout Display Indicator Lights defrost cook 1 cook 2 timer probe Numbered Pads Function Pads Defrost reset power level cook 1 cook 2 probe timer start time clock start stop Operating Instructions General Information When Oven is First Plugged Ln 0O OO will flash in the Time Readout 0O OO will flash whenever the oven is Display when the oven is first plugged un...

Страница 7: ...k I operating instructions I enter function 2 enter time 3enter power IevelIo 91 Function Pads Defrost Oven auto matically cycles on and off to gently thaw frozen foods See page 14 R t Cancels or erases an entry Time of day will appear in display Oven must be off to cancel an entry See page 12 Power Level Select a Variable power setting O 9 for a cook or defrost operation See page 9 Cook 1 and Coo...

Страница 8: ...y learning how each feature operates you will find that you will save time and avoid frus tration later So sit down next to your oven and review the next few pages Practice setting each feature as you read the operating instructions You will be surpris ed to see how easy this oven is to operate Why not treat yourself to a hot beverage as you study Heat water for tea or coffee in the oven as you pr...

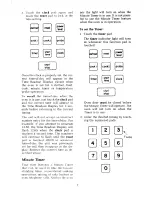
Страница 9: ...l continue to flash until the reset pad 1s touched 0O OO or whatever time of day the unit was previously set for will then reappear in the dis play Reenter the correct time as de scribed above Minute Timer Your oven features a Iiinutt Timer that can be usud to time micro vavc standing times conventional cooking operalions mixing of cakr batters or even tclcphonr r alls Ncithcr the OL II nor the li...

Страница 10: ... To resume the operation close the door and touch the start stop pad If food is removed from the oven before time lapses on the Time Readout Display touch the reset pad once lo clear the display of the timing The correct time of day will reappear in the display Full Power Cooking Setting the oven to cook at full power is a very simple 3 step operation Just enter the function cook l next enter the ...

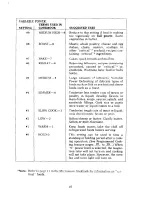
Страница 11: ...etting is reduced from 9 medium high to l warm power or on time is automatically reduced and the speed of cooking slows down As you have learned in conventional cooking the type of food and method of cooking determine the heat setting For example when you bring water to a boil for cooking rice or macaroni you select a high heat setting How ever once the water comes to a boil and you have added the...

Страница 12: ... foods such as fish or seafood and dense foods such as a roast Tenderize less tender cuts of meats or poultry in liquid develop flavors in main dishes soups sauces salads and sandwich fillings Cook rice or pasta once water or liquid comes to a boil Tenderize tough cuts of meat in liquid cook dried lentils beans or peas Soften cheese or butter Clarify butter Soften or melt chocolate Keep foods warm...

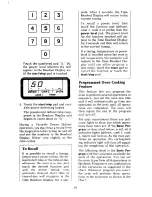
Страница 13: ... pads For example if you wish to reheat leftovers for 1 minutes touch the numbered pads 1 3 0 in sequence 1 30 will appear in the Readout Display kc I cook2 I r I tlmar 3 Touch the power level pad Hi will appear in the Readout Display 4 Enter the power level by touching one of the numbered pads between l warm and U9 medium high For example reheat a small dish of leftover vegetables on power level ...

Страница 14: ... Readout Display flicker very slightly as the tube cycles To erase an entry just touch the reset pad and reenter the correct opera tion The oven must be off before changing or erasing an operation If the oven has been programmed for several operations such as the Basic Program see page 17 it is possible to make a change without erasing the entire program The oven must be off to make the change To ...

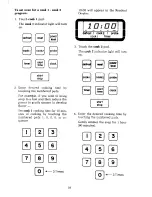
Страница 15: ... Readout Display will begin counting down at the new timing of 2 oo To change a Power Level setting 1 Touch the function pad you wish to change 2 Touch the power level pad 3 Enter the new power level by touching one of the numbered pads 4 Touch the start stop pad To change from a Variable Power setting O to U9 up to Full Power or high touch the reset pad to erase the entire program and begin again...

Страница 16: ...ll appear in the Readout To set the oven to Defrost 1 Touch the defrost pad Display The defrost indicator light will turn on defrost I cook2 I probe 0O OO will appear in the Time Readout Display 3 Touch the start stop pad and de frosting begins Variable Power Defrosting 2 Enter the desired defrost time by touching the numbered pads For example if you wish to defrost l lb of ground beef for 5 minut...

Страница 17: ...ble Power Defrosting as well Note that defrost times found in the Microwave Cookbook will increase as the power level is decreased To set the oven for Variable Power Defrosting 1 Touch the defrost pad The defrost indicator light will turn on 5 00 will appear in the Readout Display 3 Touch the power level pad 2 Enter desired defrost time by touching the numbered pads For example if you wish to defr...

Страница 18: ...ds and then will return to the current timing If a timing temperature or power level is recalled when the oven is not in operation the numbers will remain in the Time Readout Dis play until you either program a new entry touch the reset pad to cancel the function or touch the start stop pad Programmed Oven Cooking Feature This feature lets you program the oven to perform several operations in sequ...

Страница 19: ...r Variable Power Cooking 3 Select 1 power level and a Touch power level pad keep food warm until you are b Enter power level ready to serve Food is more palatable if kept warm no long er than 1 hour Operation 4 I Touch timer pad I Use to time standing or rest Timer 2 Enter desired timing period after a cook or defrost 3 Now touch start stop pad operation and the Programmed Cooking Operation begins...

Страница 20: ... and then reduce the power to gently simmer to develop flavor Set cook 1 cooking time for 10 min utes of cooking by touching the numbered pads 1 0 0 0 in se quence cl 0 3 Times 10 00 will appear in the Readout Display 3 Touch the cook 2 pad The cook 2 indicator light will turn on T 4 Enter the desired cooking time by touching the numbered pads Gently simmer the soup for 1 hour 60 minutes cl 0 3 Ti...

Страница 21: ... power level for cwk 2 bv Temperature Probe Feature The Temperature Probe takes the guesswork out of microwave cooking times During cooking the probe auto matically senses the internal temper ature of the food When the probe senses that the food has reached the preset temperature the oven auto matically turns off touching one of the numbered pads The Temperature Probe can be used when cooking rehe...

Страница 22: ... tip end of the probe into the thickest part of the thigh be tween the thigh and breast area Do not let the tip end touch a bone To use the Temperature Probe 1 Insert tip end of probe into food as described above Be sure probe is securely inserted into food If probe should fall out of food it will sense the tempera ture of the air rather than the food This will cause food to over cook and possibly...

Страница 23: ...mperature of the food reaches lOOoF Once food reaches lOOoF the display will change from 100 to 100 thus indi cating that the food has reached 100 The display will then begin to increase in 50increments as the temperature of the food in creases If the oven is turned off or the oven door is opened during the cooking operation the Readout Display will show the preset tem perature of the food Once th...

Страница 24: ... a dry utensil or time of day will not reappear in the operate the oven when the probe is in Time Readout Display until the probe a dry utensil is disconnected from the receptacle After cooking remove the probe from the wall receptacle Then use a pot Clean the probe in warm soapy water Do not clean it in the dishwasher TEMPERATURE SETTING 100 105 110 115O 120 125 130 135 140 145 I SUGGESTED USES W...

Страница 25: ...2 hours before you wish cooking to be gin At the preselected time of day the oven will automatically turn on and perform the functions you have selected earlier in the day Be sure the Time Of Day Clock is operating and set at the correct time before us ing the Delay Start feature 3 Touch the start time pad 0O OO will appear in the Time Readout Display Highly perishable food such as dairy products ...

Страница 26: ...not operate the oven if the glass shelf is not in place Do not allow soil to build up around the door seal Clean the exterior of the oven with a mild detergent or a liquid window cleaner To prevent scratching of the finish never use harsh or abrasive cleaning agents on any surface of the oven Do not lean on the oven door while cleaning the oven How to Change the Oven Light Bulb Be sure to disconne...

Страница 27: ...r amounts of food book The voltage in your area are placed in the oven than called may have fluctuated below the nor for in the recipe cooking time will ma1 operating voltage range This increase is referred to as a brown out If If a problem still exists do not at the oven is operating on the same tempt to service the oven yourself circuit with another appliance Call an authorized serviceman or the...

Страница 28: ...NOTES 26 ...

Страница 29: ...NOTES 27 ...

Страница 30: ...NOTES 28 ...

Страница 31: ...neces sary recommend a qualified service company in your area 30 If you need service Whirlpool has a nationwide network of franchised TECH CARE Service Com panies TECH CARE service technicians are trained to fulfill the product warranty and provide after warranty service any where in the United States To locate TECH CARE service in your area call our CCCL LINE service assistance telephone number s...

Страница 32: ...your world a little easier Part N0 678071 MB 126 013 99 Printed in U S A rmallc Washers Clothes Dryers Freezers Relrlgerator Freezers Ice Makers Dishwashers Bwlt In Ovens and Surlace Unlls Ranges Microwave Ov ...

Отзывы: