background image

3

continued on next page

M

ICROWAVE

O

VEN

S

AFETY

As with any appliance, close supervision is 
necessary when used by children.

Do not operate the microwave oven if it has a
damaged cord or plug, if it is not working properly,
or if it has been damaged or dropped.

The microwave oven should be serviced only by
qualified service personnel. Call an authorized
service company for examination, repair or 
adjustment.

Do not cover or block any openings on the 
microwave oven.

Do not store the microwave oven outdoors. Do
not use the microwave oven near water – for 
example, near a kitchen sink, in a wet basement,
or near a swimming pool, and the like.

Do not immerse cord or plug in water. 

Keep cord away from heated surfaces. 

Do not let cord hang over edge of table or
counter.

See door surface cleaning instructions in the
“Caring for Your Microwave Oven” section.

IMPORTANT SAFETY INSTRUCTIONS

When using electrical appliances basic safety precautions should be followed, including the following:

WARNING:

To reduce the risk of burns, 

electric shock, fire, injury to persons or exposure 
to excessive microwave energy:

Read all instructions before using the 
microwave oven.

Read and follow the specific “PRECAUTIONS TO
AVOID POSSIBLE EXPOSURE TO EXCESSIVE
MICROWAVE ENERGY” found in this section.

The microwave oven must be grounded. Connect
only to properly grounded outlet. See “GROUND-
ING INSTRUCTIONS” found in the “Installation 
Instructions” section.

Install or locate the microwave oven only in
accordance with the installation instructions.

Some products such as whole eggs and sealed
containers – for example, closed glass jars – 
may explode and should not be heated in the 
microwave oven.

Use the microwave oven only for its intended use
as described in this manual. Do not use corrosive
chemicals or vapors in the microwave oven. This
type of oven is specifically designed to heat,
cook, or dry food. It is not designed for industrial
or laboratory use.

SAVE THESE INSTRUCTIONS

Your safety and the safety of others are very important.

w

DANGER

w

WARNING

You can be killed or seriously injured if you don't
immediately follow instructions.

You can be killed or seriously injured if you don't
follow instructions.

All safety messages will tell you what the potential hazard is, tell you how to reduce the chance of injury, 
and tell you what can happen if the instructions are not followed.

We have provided many important safety messages in this manual and on your appliance. Always read and 
obey all safety messages.

This is the safety alert symbol.

This symbol alerts you to potential hazards that can kill or hurt you and others.

All safety messages will follow the safety alert symbol and either the word “DANGER” or
“WARNING.” These words mean:

Содержание MT3105SH

Страница 1: ...135SH 11 Setting the clock 12 Using the minute timer 12 Using Your Microwave Oven 13 Cooking at high cook power 13 Cooking at different cook powers 13 Cooking with more than one cook cycle 14 Using AUTO DEFROST 15 Defrosting tips 15 Using JET START 16 Using Warm Hold option 16 Sensor cooking 17 Using SENSOR COOK 17 Sensor cooking chart 17 Using SENSOR REHEAT 18 Sensor reheating chart 18 Using SENS...

Страница 2: ...al number label plate see the diagram in the Getting to Know section Please also record the purchase date of your appliance and your dealer s name address and telephone number Keep this book and the sales slip together in a safe place for future reference It is important for you to save your sales receipt showing the date of purchase Proof of purchase will assure you of in warranty service OurCons...

Страница 3: ...nd in this section The microwave oven must be grounded Connect only to properly grounded outlet See GROUND ING INSTRUCTIONS found in the Installation Instructions section Install or locate the microwave oven only in accordance with the installation instructions Some products such as whole eggs and sealed containers for example closed glass jars may explode and should not be heated in the microwave...

Страница 4: ...wave energy It is important not to defeat or tamper with the safety interlocks b Do not place any object between the oven front face and the door or allow soil or cleaner residue to accumulate on sealing surfaces c Do not operate the oven if it is damaged It is particularly important that the oven door close properly and that there is no damage to the 1 door bent 2 hinges and latches broken or loo...

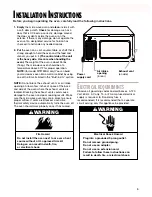
Страница 5: ... exhaust vents or air intake openings Allow a few inches of space at the back and side of the oven where the exhaust vents are located Blocking the exhaust vents could cause damage to the oven and poor cooking results Make sure the microwave oven legs are in place to ensure proper airflow If vents are blocked a sensitive thermal safety device automatically turns the oven off The oven should work p...

Страница 6: ... grounding plug can result in a risk of electric shock Consult a qualified electrician or serviceman if the grounding instructions are not completely understood or if doubt exists as to whether the microwave oven is properly grounded Do not use an extension cord If the power supply cord is too short have a qualified electrician or serviceman install an outlet near the microwave oven For a permanen...

Страница 7: ...receiver away from the microwave oven Plugging the microwave oven into a different outlet so that the microwave oven and receiver are on different branch circuits TESTING YOUR MICROWAVE OVEN To test the oven put about 1 cup 250 mL of cold water in a glass container in the oven Close the door Make sure it latches Cook at 100 power for 2 minutes When the time is up the water should be heated HOW YOU...

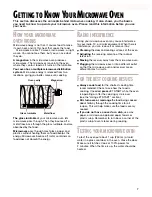
Страница 8: ...Do not use newspaper or other printed paper in the oven Do not dry flowers fruit herbs wood paper gourds or clothes in the oven Do not start a microwave oven when it is empty Product life may be shortened If you practice programming the oven put a container of water in the oven It is normal for the oven door to look wavy after the oven has been running for a while Do not try to melt paraffin wax i...

Страница 9: ...a screen to allow you to view food as it cooks 3 Glass Turntable This turntable turns food as it cooks for more even cooking It must be in the oven during operation for best cooking results The turntable is sunken into the cavity floor to give you more cooking space and better cooking results 4 Removable Turntable Support under turntable 5 Control Panel Press buttons on this panel to perform all f...

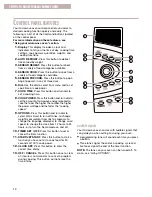
Страница 10: ...on and turn dial to set the amount of microwave energy released to cook the food The higher the number the higher the power wattage and the faster the cooking speed 9 OPTIONS Press this button and turn dial to select Warm Hold to turn off tones to change weight measurement from lbs to kilograms to change the language displayed to change scroll speed to change the clock from 12 hours to 24 hours or...

Страница 11: ...ANCEL NOTE Before setting a function press OFF CANCEL to make sure no other function is on Usingthechildlock The Child Lock locks the control panel so children cannot use the microwave when you do not want them to To lock the control panel Press and hold OFF CANCEL until LOCKED appears on display approximately 4 seconds One tone will sound To unlock the control panel Press and hold OFF CANCEL unti...

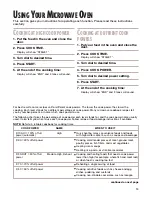
Страница 12: ...2 Turn dial to desired hour 3 Press CLOCK SET again 4 Turn dial to desired minutes 5 Press CLOCK SET or START USING THE MINUTE TIMER You can use your microwave oven as a kitchen timer Use the minute timer for timing up to 90 minutes 1 Press TIMER SET OFF 2 Turn dial to desired time 3 Press START or TIMER SET OFF or allow the timer to start automatically after a short delay 4 At the end of the set ...

Страница 13: ... Quick heating many convenience foods and foods with high water content such as soups and beverages Cooking small tender pieces of meat ground meat poultry pieces fish fillets and most vegetables Heating cream soups Heating rice pasta or stirrable casseroles Cooking and heating foods that need a cook power lower than high for example whole fish and meat loaf or when food is cooking too fast Reheat...

Страница 14: ...te 2 tones sound and the next cycle s will count down 6 At the end of the cooking time The display will show END and 3 tones will sound NOTES You can set your chosen cook functions in any order However when you use AUTO DEFROST it must be the first cycle Cooking with more than one cook cycle will not work with SENSOR AUTO COOK or SENSOR REHEAT functions NAME Medium Medium Low Defrost Low COOK POWE...

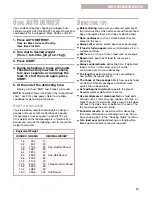
Страница 15: ...y are placed in the oven Always slit or pierce plastic pouches or packaging If food is foil wrapped remove foil and place it in a suitable container Slit the skins if any of frozen food such as sausage Bend plastic pouches of food to ensure even defrosting Always underestimate defrosting time If defrosted food is still icy in the center return it to the microwave oven for more defrosting The lengt...

Страница 16: ...king time Display will show END and 3 tones will sound USING WARM HOLD OPTION Warm Hold keeps hot cooked food warm in your microwave oven NOTES Food cooked should be covered during Warm Hold Pastry items pies turnovers etc should be uncovered during Warm Hold Complete meals kept warm on a dinner plate should be covered during Warm Hold Do not use more than 1 complete Warm Hold cycle The quality of...

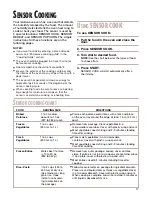
Страница 17: ...l start automatically after a short delay SENSOR COOKING CHART DIRECTIONS Pierce each potato several times with a fork and place on the oven tray around the edge at least 1 inch 2 5 cm apart Remove from package Place vegetables in a microwavable container Cover with plastic wrap and vent Most vegetables need stirring and 2 3 minutes standing time after cooking Place moist vegetables in a microwava...

Страница 18: ...ic wrap Vent cover for well done meat Place the food around the sides of a microwave safe container Season and add 1 4 to 1 2 cup 63 to 125 mL liquid wine water salsa etc if desired Cover with plastic wrap vented Break eggs into a 4 cup 1 L measuring cup or 1 quart casserole Add 1 tablespoon 15 mL milk or water per egg and beat Cover with plastic wrap vented When cooking is complete remove from ov...

Страница 19: ...will determine popping time based on the size of the package DIRECTIONS Follow package directions Use a popcorn package which is made especially for microwave cooking Do not try to pop unpopped kernels Pop only 1 package at a time Do not leave the microwave oven unattended while popping popcorn If you are using a microwave popcorn popper follow manufacturer s instructions How well your popcorn coo...

Страница 20: ...ou can use any covering that lets microwaves pass through See Getting to Know Your Microwave Oven for materials that microwaves will pass through If you are using the Sensor function be sure to vent Releasingpressureinfoods Several foods for example baked potatoes sausages egg yolks and some fruits are tightly covered by a skin or membrane Steam can build up under the membrane during cooking causi...

Страница 21: ...gyoushouldnotdoinyourmicrowaveoven Do not do canning of foods in the oven Closed glass jars may explode resulting in damage to the oven Do not use the microwave oven to sterilize objects baby bottles etc It is difficult to keep the oven at the high temperature needed for safe sterilization CARING FOR YOUR MICROWAVE OVEN To make sure your microwave oven looks good and works well for a long time you...

Страница 22: ...ditional time to allow it to finish cooking This frees the oven for other cooking Steam is normally produced during cooking The microwave oven has been designed to vent this steam out the vents Yes Pop packaged microwave popcorn following manufacturer s guidelines or use the preset SENSOR POPCORN button Do not use regular paper bags Use the listening test by stopping the oven as soon as the poppin...

Страница 23: ...orrect side up and is sitting securely on center shaft The support is not operating correctly Remove turntable check that the turntable support is properly in place and restart oven If turntable support does not move call a designated service technician for repair Cooking without the turntable can give you poor results The oven door is not closed completely You have set the controls as a kitchen t...

Страница 24: ...epair parts distributors Whirlpool designated service technicians are trained to fulfill the product warranty and provide after warranty service anywhere in the United States To locate the Whirlpool designated service company in your area you can also look in your telephone directory Yellow Pages REQUESTING ASSISTANCE OR SERVICE To avoid unnecessary service calls please check the Troubleshooting s...

Страница 25: ...ve oven is installed over an approved Whirlpool oven using an approved built in kit See the Built In kits section for a list of approved built in kits D Damage to your microwave oven caused by accident misuse fire flood acts of God or use of products not approved by Whirlpool Corporation E Any labor costs during limited warranty F Repairs to parts or systems resulting from unauthorized modificatio...

Страница 26: ...r el temporizador 12 Cómo usar su horno de microondas 13 Cocción a intensidad alta 13 Cocción a distintas intensidades 13 Cómo cocinar con más de un ciclo de cocción 14 Cómo usar AUTO DEFROST descongelación automática 15 Consejos para la descongelación 15 Cómo usar JET START cocción JET 16 Cómo usar la opción Warm Hold mantener caliente 16 Cocción con SENSOR COOK cocción con sensor 17 Cómo utiliza...

Страница 27: ...nformación en la placa con el número de modelo y serie ver el diagrama en la sección Características del horno de microondas para localizar la placa Por favor registre la fecha de compra de su aparato electrodoméstico y el nombre domicilio y número de teléfono de su distribuidor Guarde este manual y el recibo de compra juntos en un lugar seguro para referencia en el futuro Es importante que usted ...

Страница 28: ... electrodoméstico es necesario supervisar de cerca si lo usan los niños No opere el horno de microondas si el cable o el enchufe están dañados si el horno no funciona correctamente o si se ha dañado o caído El horno de microondas debe ser revisado y reparado sólo por personal técnico calificado Llame una compañía de servicio autorizada para el examen reparación y ajuste No cubra o bloquee ninguna ...

Страница 29: ...s Preste cuidadosa atención al horno si usa papel plástico u otro material combustible dentro del horno para facilitar la cocción Quite las ataduras de alambre de las bolsas de papel o plástico antes de ponerlas en el horno Si algún elemento se prende fuego dentro del horno mantenga la puerta cerrada apague el horno y desenchúfelo o corte la corriente con los fusibles o el disyuntor No use la cavi...

Страница 30: ...atrás y al lado del horno donde están las aberturas para toma de aire El bloqueo de las aberturas de toma de aire o la ventilación puede resultar en daños al horno y mala cocción Asegúrese de que las patas del horno de microondas están colocadas correctamente para permitir la circulación de aire Si las ventilaciones están bloqueadas un dispositivo termosensible de seguridad hará que el horno se ap...

Страница 31: ...o incorrecto de la conexión a tierra puede resultar en riesgo de electrocución Consulte con un electricista o técnico calificado si las instrucciones para conexión a tierra no se entienden bien o si hay alguna duda con respecto a la correcta conexión a tierra del horno de microondas No use un cable de extensión Si el cable es muy corto haga que un electricista o técnico calificado instale un tomac...

Страница 32: ...s circuitos eléctricos CÓMO OBTENER LOS ÓPTIMOS RESULTADOS DE COCCIÓN Siempre cocine los alimentos por el tiempo más corto recomendado Verifique que los alimentos se estén cocinando Si es necesario toque JET START cocción JET mientras el horno está funcionando o después del ciclo de cocción Vea la sección Cómo usar JET START Revuelva rote o redistribuya los alimentos que se están cocinando a la mi...

Страница 33: ...ergía eléctrica o el voltaje de salida sea menor de 110 voltios Haga que un electricista calificado compruebe su sistema eléctrico CÓMO PROBAR SU VAJILLA O SUS UTENSILIOS DE COCINA Pruebe la vajilla de mesa o de cocina antes de usarla Para saber si un plato se puede usar en forma segura colóquelo dentro del horno junto a una taza 250 mL con agua Cocine a 100 de intensidad durante un minuto Si el p...

Страница 34: ...deja giratoria de vidrio Esta bandeja giratoria hace girar los alimentos mientras se cocinan para que la cocción sea pareja Debe estar en el horno durante el funcionamiento para óptimos resultados en la cocción La bandeja giratoria está empotrada en una cavidad en el piso para darle más espacio para cocinar y obtener los mejores resultados en la cocción 4 Soporte de la bandeja giratoria debajo de ...

Страница 35: ...de cocción Toque este botón y luego gire el botón selector para programar la cantidad de energía de microondas liberada para cocinar los alimentos Cuanto más alto es el número más alta es la potencia y más rápida es la velocidad de cocción 9 OPTIONS Toque este botón y luego gire el botón selector para elegir Warm Hold mantener caliente para apagar las señales audibles para cambiar el sistema de pe...

Страница 36: ...ICAS DEL PANEL DE CONTROLES CONTINÚA Interrupcióndelacocción Usted puede detener el horno durante el ciclo abriendo la puerta El horno deja de calentar y el ventilador se detiene pero la luz queda encendida Para volver a comenzar la cocción cierre la puerta y Toque START Si usted no desea continuar con la cocción Cierre la puerta y la luz se apaga O Toque OFF CANCEL NOTA Antes de programar la func...

Страница 37: ...l temporizador arrancará automáticamente 4 Al final de la cuenta regresiva El temporizador contará hasta cero en forma regresiva la pantalla mostrará TIMER END y se escucharán cinco señales audibles NOTA En cualquier momento que desee cancelar al temporizador toque TIMER SET OFF COLOR Negro Negro Negro Blanco Blanco Blanco PARA INSTALACIÓN ENCIMA DEL MODELO DE HORNO RBS245PD RBS275PD GBS277PD RBS3...

Страница 38: ...recetas de libros de cocina para microondas le dicen qué intensidad utilizar por número porcentaje o nombre El siguiente cuadro le da el porcentaje de intensidad de cocción que corresponde a cada número del botón y el nombre de la intensidad de cocción generalmente utilizado También le dice cuándo usar cada intensidad de cocción Siga las instrucciones de la receta o paquete de alimentos si dispone...

Страница 39: ...P 40 40 de intensidad total P 30 DEF 30 de intensidad total P 20 20 de intensidad total P 10 WRM 10 de intensidad total CUANDO USAR Cocinar jamón ave entera y cazuelas Derretir chocolate Cocción lenta de estofados Calentar pasteles Descongelar alimentos tales como panes pescado carnes aves y comida precocida Ablandar mantequilla queso y helado Mantener alimentos tibios Quitar el frío a las frutas ...

Страница 40: ... usar la tabla siguiente para convertir el peso a decimales CONSEJOS PARA LA DESCONGELACIÓN Antes de comenzar asegúrese de que ha quitado todas las ataduras de alambre revestido que vienen con frecuencia en las bolsas de alimentos congelados y reemplácelas con hilo o bandas elásticas Abra los recipientes como serían las cajas antes de ponerlos en el horno Siempre corte o perfore las bolsas o paque...

Страница 41: ...uede utilizar el botón selector para aumentar o reducir el tiempo de cocción durante una programación manual 1 Cerciórese que hay alimentos en el horno 2 Toque JET START cada toque adicional agregará 30 segundos al tiempo de cocción hasta un total de 10 minutos 3 Al final del tiempo de cocción Habrá tres señales audibles y la pantalla mostrará END CÓMO USAR LA OPCIÓN WARM HOLD MANTENER CALIENTE La...

Страница 42: ...e pueden seleccionarse consultar el gráfico que aparece a continuación 4 Toque START Después de un breve retraso SENSOR COOK se inicia automáticamente GRÁFICO PARA COCCIÓN CON SENSORCOOK INSTRUCCIONES Trinche con un tenedor cada papa varias veces y colóquelas en la bandeja del horno alrededor del borde separadas entre sí cuando menos 1 pulgada 2 5cm Sáquelas del paquete Coloque las verduras en un ...

Страница 43: ...entilación Abra los huevos en una taza de medir de 4 tazas 1 L o en una cacerola de 1 cuarto 95 L Agregue una cucharada sopera 15 mL de agua o leche por cada huevo y bata los huevos Cúbralo con película de plástico y deje un espacio de ventilación Cuando se termine la cocción sáquelos del horno revuélvalos y deje reposar durante 1 a 2 minutos Siga las instrucciones en el paquete GRÁFICO PARA COCCI...

Страница 44: ... para horno de microondas con un sólo toque NOTAS Cocine un paquete a la vez solamente Siga las instrucciones del fabricante si usa un tostador de palomitas de maíz para horno de microondas 1 Coloque la bolsa en el centro de la bandeja giratoria y cierre la puerta 2 Toque SENSOR POPCORN 3 Toque START o permita que el programa se inicie automáticamente después de un breve retraso NOTA Basándose en ...

Страница 45: ...r la humedad de los alimentos Todas las tapas que permiten pasar las microondas son adecuadas Para más información acerca de los materiales que permiten el paso de las microondas ver la sección Conozca su horno de microondas Si utiliza la función Sensor cerciórese que dispone de ventilación Liberacióndelapresióndelosalimentos Muchos alimentos por ejemplo papas al horno salchichas yemas de huevo y ...

Страница 46: ...becocinarensuhornode microondas No envase alimentos en el horno Los frascos de vidrio cerrados pueden explotar resultando en daños al horno No use el horno de microondas para esterilizar objetos mamaderas etc Es difícil mantener la temperatura alta requerida para una esterilización segura EL CUIDADO DE SU HORNO DE MICROONDAS Para asegurarse que su horno de microondas luzca bien y funcione bien por...

Страница 47: ...cados del horno y quedar tapados por un tiempo adicional para permitir que la cocción se complete Esto libera el horno para cocinar otras cosas El vapor se produce normalmente durante la cocción El horno de microondas ha sido diseñado para ventilar el vapor por las rendijas Sí Haga palomitas de maíz pre empaquetadas siguiendo las instrucciones del fabricante o use el botón preprogramado SENSOR POP...

Страница 48: ...entral El soporte no está funcionando correctamente Saque la bandeja giratoria verifique si el soporte de la bandeja giratoria está en el lugar correcto y ponga a funcionar el horno nuevamente Si el soporte de la bandeja no se mueve llame a un técnico designado para que lo repare Si cocina sin la bandeja los resultados serán muy pobres La puerta del horno no está completamente cerrada Usted progra...

Страница 49: ... de repuesto locales Los técnicos designados de servicio Whirlpool están entrenados para cumplir con la garantía del producto y brindar servicio después del vencimiento de la garantía en cualquier sitio de los Estados Unidos Para ubicar la compañía de servicio Whirlpool designada en su área puede usted consultar la sección de Páginas Amarillas de su directorio telefónico CÓMO PEDIR AYUDA O SERVICI...

Страница 50: ...25 NOTAS ...

Страница 51: ...26 NOTAS ...

Страница 52: ... utilizando un juego de accesorios para empotrar autorizado Ver la sección Juegos de accesorios para empotrar para consultar la lista de juegos de accesorios para empotrar autorizados D Daños a su horno de microondas causados por accidente mal uso incendio inundación catástrofes naturales o uso de productos no autorizados por Whirlpool Corporation E Cualquier costo de mano de obra durante la garan...

Отзывы: