background image

5

I

NSTALLATION

I

NSTRUCTIONS

Before you begin operating the oven, carefully read the following instructions.

1. Empty the microwave oven and clean inside it with

a soft, damp cloth. Check for damage such as a
door that isn’t lined up correctly, damage around
the door, or dents inside the oven or on the
exterior. If there is any damage, do not operate the
oven until a designated service technician has
checked it and made any needed repairs.

2. Put the oven on a cart, counter, table, or shelf that is

strong enough to hold the oven and the food and
utensils you put in it. (The control side of the unit
is the heavy side. Use care when handling the
oven.) 
The weight of the oven is about 35 lbs 
(16 kg). The microwave oven should be at a 
temperature above 50°F (10°C) for proper operation.

NOTE: You can build your microwave oven into a
wall or cabinet by using one of the trim kits listed in
the “Built-in kits” section.

NOTE: Do not block the exhaust vents or air intake
openings. Allow a few inches of space at the back
and side of the oven where the exhaust vents are 
located. Blocking the exhaust vents could cause 
damage to the oven and poor cooking results. Make
sure the microwave oven legs are in place to ensure
proper airflow. If vents are blocked, a sensitive
thermal safety device automatically turns the oven off.
The oven should work properly once it has cooled.

w

WARNING

Fire Hazard

Do not install the oven next to or over a heat
source without a UL approved trim kit.

Doing so can result in death, fire, 
or electrical shock.

Observe all governing codes and ordinances. A 120
Volt, 60 Hz, AC only, 15- or 20-amp fused electrical
supply is required. (A time-delay fuse is 
recommended.) It is recommended that a separate
circuit serving only this appliance be provided.

w

WARNING

Electrical Shock Hazard

Plug into a grounded 3 prong outlet.

Do not remove ground prong.

Do not use an adapter.

Do not use an extension cord.

Failure to follow these instructions can 
result in death, fire, or electrical shock.

E

LECTRICAL REQUIREMENTS

Air intake 
opening 
(in rear)

Power 
supply cord

Exhaust vent 
(on side)

Содержание MT2110SJ

Страница 1: ...ures 9 Control panel features 10 Using OPTIONS 11 Built in kits 11 Setting the clock 12 Using the minute timer 12 Using Your Microwave Oven 13 Cooking at high cook power 13 Cooking at different cook powers 13 Cooking with more than one cook cycle 14 Auto cooking 15 Auto cooking charts 15 Using AUTO DEFROST 17 Defrosting tips 17 Using JET START 18 Using WARM HOLD 18 Cooking Guide 19 Caring for Your...

Страница 2: ...mber label plate see the diagram in the Getting to Know Your Microwave Oven section Please also record the purchase date of your appliance and your dealer s name address and telephone number Keep this book and the sales slip together in a safe place for future reference It is important for you to save your sales receipt showing the date of purchase Proof of purchase will assure you of in warranty ...

Страница 3: ...nd in this section The microwave oven must be grounded Connect only to properly grounded outlet See GROUND ING INSTRUCTIONS found in the Installation Instructions section Install or locate the microwave oven only in accordance with the installation instructions Some products such as whole eggs and sealed containers for example closed glass jars may explode and should not be heated in the microwave...

Страница 4: ...wave energy It is important not to defeat or tamper with the safety interlocks b Do not place any object between the oven front face and the door or allow soil or cleaner residue to accumulate on sealing surfaces c Do not operate the oven if it is damaged It is particularly important that the oven door close properly and that there is no damage to the 1 door bent 2 hinges and latches broken or loo...

Страница 5: ...ents or air intake openings Allow a few inches of space at the back and side of the oven where the exhaust vents are located Blocking the exhaust vents could cause damage to the oven and poor cooking results Make sure the microwave oven legs are in place to ensure proper airflow If vents are blocked a sensitive thermal safety device automatically turns the oven off The oven should work properly on...

Страница 6: ... grounding plug can result in a risk of electric shock Consult a qualified electrician or serviceman if the grounding instructions are not completely understood or if doubt exists as to whether the microwave oven is properly grounded Do not use an extension cord If the power supply cord is too short have a qualified electrician or serviceman install an outlet near the microwave oven For a permanen...

Страница 7: ...e radio or television Moving the receiver away from the microwave oven Plugging the microwave oven into a different outlet so that the microwave oven and receiver are on different branch circuits TESTING YOUR MICROWAVE OVEN To test the oven put 1 cup 250 mL of cold water in a glass container in the oven Close the door Make sure it latches Cook at 100 power for 2 minutes When the time is up the wat...

Страница 8: ...o not use newspaper or other printed paper in the oven Do not dry flowers fruit herbs wood paper gourds or clothes in the oven Do not start a microwave oven when it is empty Product life may be shortened If you practice programming the oven put a container of water in the oven It is normal for the oven door to look wavy after the oven has been running for a while Do not try to melt paraffin wax in...

Страница 9: ... a screen to allow you to view food as it cooks 3 Glass Turntable This turntable turns food as it cooks for more even cooking It must be in the oven during operation for best cooking results The turntable is sunken into the cavity floor to give you more cooking space and better cooking results 4 Removable Turntable Support under turntable 5 Control Panel Touch pads on this panel to perform all fun...

Страница 10: ...is pad to set a cooking time 10 COOK POWER Touch this pad to set the amount of microwave energy released to cook the food The higher the number the higher the power wattage and the faster the cooking speed 11 WARM HOLD Touch this pad to keep hot cooked food warm in your microwave oven You can use WARM HOLD by itself or to automatically follow a cooking cycle 12 JET START START Touch this pad to st...

Страница 11: ...e the door and the light goes off OR Touch OFF CANCEL NOTE Before setting a function touch OFF CANCEL to make sure no other function is on Usingthechildlock The Child Lock locks the control panel so children cannot use the microwave when you do not want them to To lock the control panel Touch and hold OFF CANCEL until LOCKED appears on display approximately 4 seconds One tone will sound To unlock ...

Страница 12: ...Touch number pads for time of day For example For 7 00 touch 7 0 0 3 Touch CLOCK SET USING THE MINUTE TIMER You can use your microwave oven as a kitchen timer Use the minute timer for timing up to 90 minutes 1 Touch TIMER 2 Touch number pads for desired time For example for 10 minutes touch 1 0 0 0 3 Touch START or TIMER or allow the timer to start automatically after a short delay 4 At the end of...

Страница 13: ...l power P60 60 of full power WHEN TO USE IT Quick heating many convenience foods and foods with high water content such as soups and beverages Cooking small tender pieces of meat ground meat poultry pieces fish fillets and most vegetables Heating cream soups Heating rice pasta or stirrable casseroles Cooking and heating foods that need a cook power lower than high for example whole fish and meat l...

Страница 14: ... power for each additional cycle 5 Touch START After the first cycle is complete 2 tones sound and the next cycle s will count down 6 At the end of the cooking time Display will show END and 3 tones will sound NOTE You can set your chosen cook functions in any order However when you use AUTO DEFROST it must be the first cycle NAME Medium Medium Low Defrost Low COOK POWER P50 50 of full power P40 4...

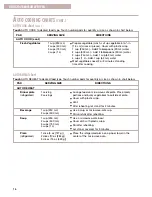
Страница 15: ... SERVING SIZE 3 5 oz 99 g 3 0 oz 85 g 1 75 oz 50 g PAD AUTO COOK Baked Potatoes Frozen Entree Frozen Vegetables SERVING SIZE 1 10 13 oz 284 369 g 2 16 20 oz 454 567 g 3 24 30 oz 680 851 g 4 32 40 oz 9 1 13 kg 10 oz 284 g 1 cup 250 mL 2 cups 500 mL 3 cups 750 mL 4 cups 1 L DIRECTIONS Pierce potato several times with fork Place in center of the oven on paper towel After cooking let stand for 5 minut...

Страница 16: ...ice 5 oz 127 g 2 slices 10 oz 284 g 3 slices 15 oz 425 g PAD AUTO REHEAT Dinner plate refrigerated Beverage Soup Pizza refrigerated PAD AUTO COOK cont Fresh Vegetables SERVING SIZE 1 cup 250 mL 2 cups 500 mL 3 cups 750 mL 4 cups 1 L DIRECTIONS Prepare vegetable wash cut up vegetable into 1 2 in 1 3 cm slices or pieces Cover with plastic wrap 1 cup 250 mL Add 2 tablespoons 30 mL water 2 cups 500 mL...

Страница 17: ... or packaging If food is foil wrapped remove foil and place it in a suitable container Slit the skins if any of frozen food such as sausage Bend plastic pouches of food to ensure even defrosting Always underestimate defrosting time If defrosted food is still icy in the center return it to the microwave oven for more defrosting The length of defrosting time varies according to how solidly the food ...

Страница 18: ...how END and 3 tones will sound USING WARMHOLD Warm Hold keeps hot cooked food warm in your microwave oven NOTES Food cooked should be covered during Warm Hold Pastry items pies turnovers etc should be uncovered during Warm Hold Complete meals kept warm on a dinner plate should be covered during Warm Hold Do not use more than 1 complete Warm Hold cycle The quality of some foods will suffer with ext...

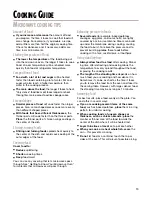
Страница 19: ...ing times Keep food moist You can use any covering that lets microwaves pass through See Getting to Know Your Microwave Oven for materials that microwaves will pass through Releasingpressureinfoods Several foods for example baked potatoes sausages egg yolks and some fruits are tightly covered by a skin or membrane Steam can build up under the membrane during cooking causing the food to burst To re...

Страница 20: ...ingyoushouldnotdoinyourmicrowaveoven Do not do canning of foods in the oven Closed glass jars may explode resulting in damage to the oven Do not use the microwave oven to sterilize objects baby bottles etc It is difficult to keep the oven at the high temperature needed for sterilization CARING FOR YOUR MICROWAVE OVEN To make sure your microwave oven looks good and works well for a long time you sh...

Страница 21: ...r additional time to allow it to finish cooking This frees the oven for other cooking Steam is normally produced during cooking The microwave oven has been designed to vent this steam out the vents Yes Pop packaged microwave popcorn following manufacturer s guidelines or use the preset POPCORN pad Do not use regular paper bags Use the listening test by stopping the oven as soon as the popping slow...

Страница 22: ...e up and is sitting securely on center shaft The support is not operating correctly Remove turntable check that the turntable support is properly in place and restart oven If turntable support does not move call a designated service technician for repair Cooking without the turntable can give you poor results The oven door is not closed completely You have set the controls as a kitchen timer Touch...

Страница 23: ...ributors Whirlpool designated service technicians are trained to fulfill the product warranty and provide after warranty service anywhere in the United States To locate the Whirlpool designated service company in your area you can also look in your telephone directory Yellow Pages REQUESTING ASSISTANCE OR SERVICE To avoid unnecessary service calls please check the Troubleshooting section It may sa...

Страница 24: ... over an approved Whirlpool oven using an approved built in kit See the Built In kits section for a list of approved built in kits D Damage to your microwave oven caused by accident alteration misuse abuse fire flood acts of God or use of products not approved by Whirlpool Corporation E Any labor costs during limited warranty F Repairs to parts or systems resulting from unauthorized modifications ...

Отзывы: