background image

9

Fahrenheit and Celsius

The temperature is preset at Fahrenheit, but can be changed to 
Celsius.

To Change: Press and hold CUSTOM BROIL for 5 seconds. A 
tone will sound, and “°C” will appear on the display. Repeat to 
change back to Fahrenheit. To exit mode, press CANCEL or 
OFF/CANCEL.

Timer

The Timer can be set in hours or minutes up to 12 hours and 
59 minutes, and counts down the set time. The Timer does not 
start or stop the oven.

To Set:

1. Press TIMER SET or TIMER CANCEL*. The timer indicator 

light will light up on some models. Depending on your model, 
if no action is taken after 1 minute or 5 minutes, the display 
will return to the time of day mode.

2. Depending on your model, press the HR or MIN or TIME/

TEMP “up” or “down” arrow pads to set the length of time to 
cook.

3. Press TIMER SET or START/ENTER. When the set time ends, 

end-of-cycle tones will sound, then, if enabled, reminder 
tones will sound every minute on some models.

4. Press TIMER OFF or TIMER CANCEL* anytime to cancel the 

Timer and reminder tones.

Remember, do not press the CANCEL or OFF/CANCEL pad 
because the oven will turn off.

To display the time of day for 5 seconds when the timer is 
counting down, press CLOCK.

Control Lock

The Control Lock shuts down the control panel pads to prevent 
unintended use of the oven.

When the control is locked, only the clock, oven light (on some 
models) and timer pads will function.

To Lock/Unlock Control: Before locking, make sure the oven 
and Timer are off. Press and hold START or START/ENTER for 
5 seconds. A single tone will sound, and “Loc” will appear on the 
display.

Repeat to unlock. “Loc” will disappear from the display.

Oven Temperature Control

IMPORTANT: Do not use a thermometer to measure oven 
temperature because opening the oven door may cause burner 
cycling to give incorrect readings.

The oven provides accurate temperatures; however, it may cook 
faster or slower than your previous oven, so the temperature 
calibration can be adjusted. It can be changed in Fahrenheit or 
Celsius.

A minus sign means the oven will be cooler by the displayed 
amount. The absence of a sign means the oven will be warmer by 
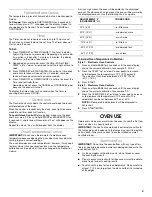
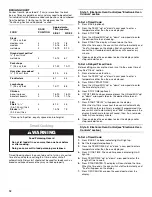
the displayed amount. Use the following chart as a guide.

To Adjust Oven Temperature Calibration:

Style 1 - Electronic Oven Controls

1. Press and hold BAKE for 5 seconds until the oven display 

shows the current calibration, for example “0°F CAL.”

2. Press the TEMP “up” or “down” arrow pad(s) to increase 

or to decrease the temperature in 10°F (5°C) amounts. 
The adjustment can be set between 30°F (15°C) and 
-30°F (-15°C).

3. Press START.

Style 2 - Electronic Oven Controls

1. Press and hold BAKE for 5 seconds until the oven display 

shows the current calibration, for example “00.”

2. Press the TEMP/TIME “up” or “down” arrow pad to increase 

or to decrease the temperature in 10°F amounts. The 
adjustment can be set between 30°F and -30°F.

NOTE: All temperature adjustments will be displayed in 
Fahrenheit.

3. Press START/ENTER.

OVEN USE

Odors and smoke are normal when the oven is used the first few 
times, or when it is heavily soiled.

IMPORTANT: The health of some birds is extremely sensitive to 
the fumes given off. Exposure to the fumes may result in death to 
certain birds. Always move birds to another closed and well 
ventilated room.

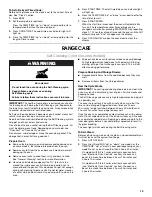
Aluminum Foil

IMPORTANT: Do not line the oven bottom with any type of foil, 
liners or cookware because permanent damage will occur to the 
oven bottom finish.

On those models with bottom vents, do not block or cover 
the oven bottom vents.

Do not cover entire rack with foil because air must be able to 
move freely for best cooking results.

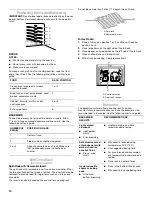
To catch spills, place foil on rack below dish. Make sure foil is 
at least 1" (2.5 cm) larger than the dish and that it is turned up 
at the edges.

ADJUSTMENT °F
(ADJUSTMENT °C)

COOKS FOOD

10°F (5°C)

...a little more

20°F (10°C)

...moderately more

30°F (15°C)

...much more

-10°F (-5°C)

...a little less

-20°F (-10°C)

...moderately less

-30°F (-15°C)

...much less

Содержание IGS365RS0

Страница 1: ...sistance 1 800 461 5681 for installation and service call 1 800 807 6777 or visit our website at www ikea com CUISINIÈRE À GAZ Guided utilisationetd entretien Au Canada pour assistance composez le 1 800 461 5681 pour installation ou service le 1 800 807 6777 ou visitez notre site web à www ikea com Table of Contents Table des matières 2 9761891 ...

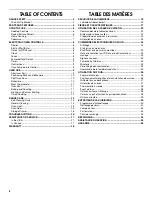
Страница 2: ...t 20 PIÈCES ET CARACTÉRISTIQUES 21 UTILISATION DE LA TABLE DE CUISSON 22 Commandes de la table de cuisson 22 Brûleurs de surface scellés 22 Préparation de conserves à la maison 23 Ustensiles de cuisson 23 COMMANDES ÉLECTRONIQUES DU FOUR 24 Affichage 24 Start mise en marche ou Start Enter mise en marche entrée 25 Cancel annulation ou Off Cancel arrêt annulation 25 Horloge 25 Signaux sonores 25 Fahr...

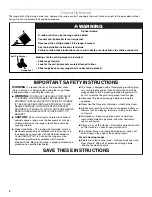
Страница 3: ...l injury or death Do not store or use gasoline or other flammable vapors and liquids in the vicinity of this or any other appliance WHAT TO DO IF YOU SMELL GAS Do not try to light any appliance Do not touch any electrical switch Do not use any phone in your building Immediately call your gas supplier from a neighbor s phone Follow the gas supplier s instructions If you cannot reach your gas suppli...

Страница 4: ...ms of interest to children in cabinets above a range or on the backguard of a range children climbing on the range to reach items could be seriously injured Proper Installation The range when installed must be electrically grounded in accordance with local codes or in the absence of local codes with the National Electrical Code ANSI NFPA70 In Canada the range must be electrically grounded in accor...

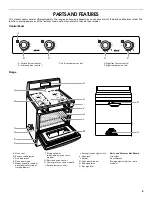
Страница 5: ...ront burner control E Right rear burner control B C D A E A Oven vent B Surface cooking area C Anti tip bracket D Oven door hinge E Model and serial number plate behind left side of storage drawer F Storage drawer warming drawer on some models G Electronic oven control H Center grate on some models I Surface burner control J Automatic oven light switch K Oven rack L Gasket M Oven door window N Sel...

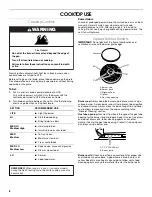
Страница 6: ...inely remove and clean the caps according to the General Cleaning section Gas tube opening Gas must flow freely throughout the gas tube opening for the burner to light properly Keep this area free of soil and do not allow spills food cleaning agents or any other material to enter the gas tube opening Protect it from spillovers by always using a burner cap Burner ports Check burner flames occasiona...

Страница 7: ...rnment Agricultural Department Extension Office In Canada contact Agriculture Canada Companies that manufacture home canning products can also offer assistance Cookware IMPORTANT Do not leave empty cookware on a hot surface cooking area element or surface burner Ideal cookware should have a flat bottom straight sides and a well fitting lid and the material should be of medium to heavy thickness Ro...

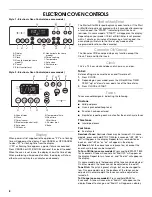
Страница 8: ... or START Tones Tones are audible signals indicating the following One tone Valid pad press Oven is preheated long tone Function has been entered Reminder repeating each minute after the end of cycle tones Three tones Invalid pad press Four tones End of cycle Reminder Tones Reminder tones may be turned off On some models press and hold STOP TIME for 5 seconds rEP OFF or off will appear in the disp...

Страница 9: ...er it may cook faster or slower than your previous oven so the temperature calibration can be adjusted It can be changed in Fahrenheit or Celsius A minus sign means the oven will be cooler by the displayed amount The absence of a sign means the oven will be warmer by the displayed amount Use the following chart as a guide To Adjust Oven Temperature Calibration Style 1 Electronic Oven Controls 1 Pr...

Страница 10: ... on the left side of the full rack 4 Place shallow dishes on the split rack 5 When finished cooking slowly remove items Bakeware The bakeware material affects cooking results Follow manufacturer s recommendations and use the bakeware size recommended in the recipe Use the following chart as a guide FOOD RACK POSITION Frozen pies large roasts turkeys angel food cakes 1 or 2 Bundt cakes most quick b...

Страница 11: ...r the temperature showing on the display and the actual oven temperature to differ due to the cycling of the elements Waiting an additional 10 minutes after the preheat conditioning time ends to put food in the oven is suggested when baking foods with leavening ingredients such as yeast baking powder baking soda and eggs BroilingandCustomBroiling Broiling uses direct radiant heat to cook food Chan...

Страница 12: ...MIN up or down arrow pads to enter the desired time to end cooking 7 Press START DELAY will appear on the display When the start time is reached the oven will automatically turn on When the stop time is reached if programmed the oven will shut off automatically and End will appear on the display End of cycle tones will sound then if on reminder tones will sound every minute 8 Open and close the ov...

Страница 13: ... inside oven cavity frame being certain not to move or bend the gasket This area does not get hot enough during self cleaning to remove soil Do not let water cleaner etc enter slots on door frame Use a damp cloth to clean this area Wipe out any loose soil to reduce smoke and avoid damage At high temperatures foods react with porcelain Staining etching pitting or faint white spots can result This w...

Страница 14: ... and tomato should be cleaned as soon as the entire appliance is cool These spills may affect the finish Glass cleaner mild liquid cleaner or nonabrasive scrubbing pad Gently clean around the model and serial number plate because scrubbing may remove numbers STAINLESS STEEL on some models Do not use soap filled scouring pads abrasive cleaners Cooktop Polishing Creme steel wool pads gritty washclot...

Страница 15: ... bulb counterclockwise to remove from socket 4 Replace bulb and bulb cover by turning clockwise 5 Plug in range or reconnect power OvenDoor For normal range use it is not suggested to remove the oven door However if removal is necessary make sure the oven is off and cool Then follow these instructions The oven door is heavy Before Removing 1 Use a putty knife or screwdriver and insert it at the bo...

Страница 16: ... noises Is the burner wet Let it dry Excessive heat around cookware on cooktop Is the cookware the proper size Use cookware about the same size as the surface cooking area element or surface burner Cookware should not extend more than 1 2 5 cm outside the cooking area Cooktop cooking results not what expected Is the proper cookware being used See Cookware section Is the control knob set to the pro...

Страница 17: ...ce center IntheU S A Call the Whirlpool Customer eXperience Center toll free 1 800 253 1301 Our consultants provide assistance with Features and specifications on our full line of appliances Installation information Use and maintenance procedures Accessory and repair parts sales Specialized customer assistance Spanish speaking hearing impaired limited vision etc Referrals to local dealers repair p...

Страница 18: ... provinces do not allow the exclusion or limitation of incidental or consequential damages so this exclusion or limitation may not apply to you This warranty gives you specific legal rights and you may also have other rights which may vary from state to state or province to province Outside the 50 United States and Canada this warranty does not apply If you need service first see the Troubleshooti...

Страница 19: ...ures graves à vous et à d autres Tous les messages de sécurité suivront le symbole d alerte de sécurité et le mot DANGER ou AVERTISSEMENT Ces mots signifient AVERTISSEMENT Pour votre sécurité les renseignements dans ce manuel doivent être observés pour réduire au minimum les risques d incendie ou d explosion ou pour éviter des dommages au produit des blessures ou un décès Ne pas entreposer ni util...

Страница 20: ...BASCULEMENT MISE EN GARDE Ne pas remiser dans des armoires au dessus de la cuisinière ou sur le dosseret d une cuisinière des objets que des enfants pourraient vouloir atteindre Les enfants pourraient se brûler ou se blesser en grimpant sur la cuisinière Installation appropriée La cuisinière lorsqu elle est correctement installée doit être reliée à la terre conformément aux codes électriques locau...

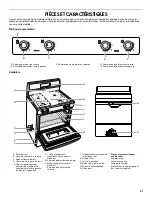
Страница 21: ... B C D A E A Évent du four B Zone de cuisson à la surface C Bride antibasculement D Charnière de la porte du four E Plaque signalétique des numéros de modèle et de série derrière le côté gauche du tiroir de rangement F Tiroir de rangement tiroir réchaud sur certains modèles G Commande électronique du four H Grille centrale sur certains modèles I Commande de brûleur de surface J Interrupteur automa...

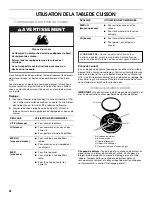
Страница 22: ...hapeau de brûleur Toujours garder le chapeau du brûleur en place lorsqu un brûleur de surface est utilisé Un chapeau de brûleur propre empêche un mauvais allumage et une flamme inégale Toujours nettoyer le chapeau de brûleur après un renversement et enlever et nettoyer régulièrement les chapeaux conformément à la section Nettoyage général RÉGLAGE UTILISATION RECOMMANDÉE LITE allumage Pour allumer ...

Страница 23: ...ongues périodes alterner l utilisation des surfaces de cuisson des éléments ou des brûleurs de surface entre les quantités préparées Cette alternance permettra aux surfaces les plus récemment utilisées de refroidir Centrer l autoclave sur la grille ou la plus grande surface de cuisson ou sur le plus grand élément Les autoclaves ne devraient pas dépasser de plus de 1 2 5 cm hors de la surface de cu...

Страница 24: ...Chauffe lentement et uniformément Convient pour le brunissage et la friture Maintient la chaleur pour une cuisson lente Céramique ou vitrocéramique Suivre les instructions du fabricant Chauffe lentement mais inégalement Les meilleurs résultats sont obtenus sur les réglages de chaleur basse à moyenne Cuivre Chauffe très rapidement et également Terre cuite Suivre les instructions du fabricant Utilis...

Страница 25: ...sonores ne peuvent être réglés ou désactivés Pour modifier sur certains modèles Appuyer sur BAKE pendant 5 secondes Un signal sonore se fera entendre et Snd LO apparaîtra sur l affichage Recommencer pour modifier et Snd Hi apparaîtra sur l affichage FahrenheitetCelsius La température est préréglée en Fahrenheit mais elle peut être changée en Celsius Modification Appuyer sur CUSTOM BROIL pendant 5 ...

Страница 26: ... émanations peut causer la mort de certains oiseaux Toujours déplacer les oiseaux dans une autre pièce fermée et bien aérée Papierd aluminium IMPORTANT Afin de ne pas endommager de façon permanente la finition du fond du four ne pas recouvrir le fond du four de papier d aluminium de garnitures ou ustensiles de cuisson quelconques Sur ces modèles avec évent au fond du four ne pas bloquer ou recouvr...

Страница 27: ...rmat d ustensiles recommandé dans la recette Se servir du tableau suivant comme guide NOMBRE D USTEN SILES POSITION SUR LA GRILLE 1 Centre de la grille 2 Côte à côte ou légèrement décalés 3 ou 4 Dans les coins opposés sur chaque grille S assurer qu aucun ustensile de cuisson ne se trouve directement au dessus d un autre A Grille en deux pièces B Section amovible A Section arrière de grille B Secti...

Страница 28: ...nditionnement un signal sonore se fait entendre et la température sélectionnée apparaît sur l afficheur Les températures de préchauffage sont affectées par divers facteurs tels que la température ambiante et les heures de pointe de consommation d énergie Il est normal que la température indiquée sur l affichage diffère de la température réelle du four ceci est dû aux éléments qui fonctionnent par ...

Страница 29: ...n de cuisson désirée 5 Appuyer sur START mise en marche L afficheur procède à un compte à rebours de la durée Lorsque la durée est terminée le four s arrête automatiquement et End fin apparaît sur l afficheur Les signaux sonores de fin de programme se feront entendre suivis si activés des signaux de rappel à intervalles de 1 minute 6 Ouvrir et fermer la porte du four pour effacer l affichage et ou...

Страница 30: ...se en marche est atteinte le four s allume automatiquement Les réglages de température et ou de durée peuvent être changés en tout temps après avoir appuyé sur START ENTER mise en marche entrée en répétant les étapes 2 à 7 Lorsque la durée de cuisson prend fin le four s éteint automatiquement et End fin apparaît sur l afficheur 8 Appuyer sur OFF CANCEL arrêt annulation ou ouvrir la porte du four p...

Страница 31: ...ouillera pas avant que le four ne soit refroidi Lorsque le programme est terminé et que le four refroidit End fin apparaît sur l afficheur du four et LOCKED verrouillée affiché sur certains modèles s efface Sur les autres modèles les témoins lumineux s effaceront 4 Appuyer sur CANCEL ou OFF CANCEL ou ouvrir la porte du four pour effacer l affichage du four Pour différer l autonettoyage sur certain...

Страница 32: ...e non abrasif et nettoyant liquide doux légèrement abrasif Nettoyer dès que la table de cuisson les grilles et les chapeaux sont refroidis Lave vaisselle grilles seulement pas les chapeaux Utiliser le programme le plus intensif BRÛLEURS DE SURFACE Voir la section Brûleurs de surface scellés EXTÉRIEUR DE LA PORTE DU FOUR Un nettoyant à vitre et des essuie tout ou des tampons à récurer en plastique ...

Страница 33: ...tirer les goupilles pendant que la porte est enlevée 2 Fermer la porte lentement jusqu à ce qu elle repose contre les goupilles 3 Saisir la porte par les côtés en plaçant les doigts sur l avant de la porte et les pouces sur la surface interne 4 Tirer tout droit sur la porte puis vers soi Les supports de charnière glisseront hors de la fente de charnière avant du châssis Ne pas enlever les goupille...

Страница 34: ... niveau approprié de chaleur Voir la section Commandes de la table de cuisson L appareil est il d aplomb Niveler l appareil Voir les instructions d installation Le four ne fonctionne pas Est ce la première fois qu on utilise le four Tourner n importe lequel des boutons de brûleur de surface pour libérer l air des canalisations de gaz Les commandes électroniques du four sont elles réglées correctem...

Страница 35: ...e service Si vous avez encore besoin d aide suivre les instructions ci dessous Lors d un appel veuillez connaître la date d achat le numéro de modèle et le numéro de série au complet de l appareil Ces renseignements nous aideront à mieux répondre à votre demande Si vous avez besoin de pièces de rechange Si vous avez besoin de commander des pièces de rechange nous vous recommandons d employer uniqu...

Страница 36: ...clusion ou la limitation des dommages fortuits ou indirects de sorte que cette exclusion ou limitation peut ne pas être applicable dans votre cas Cette garantie vous confère des droits juridiques spécifiques et vous pouvez également jouir d autres droits qui peuvent varier d une province à l autre À l extérieur du Canada cette garantie ne s applique pas Si vous avez besoin de service voir d abord ...

Отзывы: