background image

15

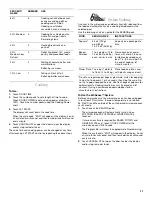
Kids Menu

The Kids Menu function is preset with cooking times and cook 
powers for several typical children’s menu items that are cooked 
in the microwave oven. Use the following chart as a guide.

*This function is not intended for meal-in-a-cup products.

To Use Kids Menu:

1. Touch KIDS MENU.

The display will show “PAD -.”

2. Touch KIDS MENU repeatedly to scroll through the Kids 

Menu items

or

Touch number pad to select Kids Menu item.

The display will show the name of the selected menu item for 
2-3 seconds, and then prompt for the quantity of food to be 
entered.

3. Enter quantity of food items using the prompts in the display 

or the quantities from the chart above. Only pads valid for the 
selected food class will give a response.

Doneness may be adjusted at this time by touching COOK 
POWER.

4. Touch JET START.

The display will count down the cook time.

When the cycle ends, “END” will appear in the display, 4 end-
of-cycle tones will sound, and then reminder tones will sound 
every minute.

5. Touch CANCEL•OFF or open the door to clear the display 

and/or stop reminder tones.

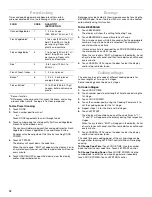
Simmer Cooking and Steaming

Use the Simmer Cook function for foods such as soups, 
casseroles, stews and other liquid food. It can also be used to 
cook pasta.

To Simmer:

Before using, make sure the microwave oven has been plugged 
in for at least 2

¹⁄₂

 minutes. Add 

¹⁄₄

 to 

¹⁄₂

 cup (60 to 125 mL) of 

water to vegetables and cover dish with its lid, not plastic wrap.

1. Touch STEAM/SIMMER.

2. Touch the number pads to set a length of time to simmer.

3. Touch JET START.

“BOIL” will appear in the display. When water begins to boil, 
the display will count down the simmer time.

When the cycle ends, “END” will appear in the display, 4 end-
of-cycle tones will sound, and then reminder tones will sound 
every minute.

4. Touch CANCEL•OFF or open the door to clear the display 

and/or stop reminder tones.

Simmering Pasta

Use a container large enough to cover food completely with 
water. Add 1 tbsp (15 mL) oil to water. Put container and water in 
the microwave oven and follow the above steps, setting a simmer 
time of 1 second. When time ends place food in the water. Cover, 
then follow the above steps setting the desired simmer time.

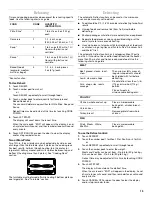
Steamer Vessel

Use the steamer vessel, (provided with the microwave oven) with 
the Steam Cook feature to steam foods.

See “General Cleaning” section for additional information.

The steamer vessel will become hot. Always use oven mitts 
or pot holders when handling.

Do not use in a conventional- or combination-type oven, with 
“Crisp” or “Grill” functions or on electric or gas burners.

To avoid scratching, use plastic utensils.

Do not overfill. One-half full is recommended.

Cooking Cover: Always use when cooking. Place directly over 
the colander and dish or just the dish.

Colander: Use for foods such as fish, vegetables and potatoes. 
Do not use with foods such as rice, pasta and white beans. When 
using, place directly over the dish.

Dish: Use for foods such as rice and pasta.

FOOD

CODE

KIDS MENU 
PAD

QUANTITY/
INSTRUCTION

Canned 
pasta*

1

1 time

1, 2, 3 or 4 servings/
Follow food label 
instructions.

Frozen 
Pizza

2

2  times

5-7  oz/
Follow food label 
instructions.

Frozen 
Meal

3

3 times

8, 10 or 12 oz/
Follow food label 
instructions.

Hot Dogs

4

4 times

1, 2, 3 or 4 pieces/
Use paper plate. 
Cook without bun.

Hot 
Cereal 
(oatmeal)

5

5 times

1 or 2 servings/
Follow food label 
instructions.

Chicken 
Nuggets

6

6 times

1 or 2 servings/
Place nuggets on 
paper plate covered 
with paper towel.

1. Cooking cover
2. Colander
3. Dish

1

2

3

Содержание GH9176XM

Страница 1: ...INATION Use CareGuide For questions about features operation performance parts accessories or service call 1 800 253 1301 or visit our website at www whirlpool com Table of Contents 2 8185468 4619 652 62271 Model GH9176XM ...

Страница 2: ...n 8 Cooktop Light 9 Demo Mode 9 MICROWAVE OVEN USE 9 Food Characteristics 9 Cooking Guidelines 9 Cookware and Dinnerware 10 Aluminum Foil and Metal 10 Cooking Power 10 Cooking 11 6th Sense System Cooking 11 Preset Cooking 12 Beverage 12 Cooking in Stages 12 Reheating 13 Defrosting 13 Soften 14 Melt 14 Kids Menu 15 Simmer Cooking and Steaming 15 Warm Hold 16 MICROWAVE OVEN CARE 16 General Cleaning ...

Страница 3: ...Some products such as whole eggs in the shell and sealed containers for example closed glass jars are able to explode and should not be heated in the microwave oven Use the microwave oven only for its intended use as described in this manual Do not use corrosive chemicals or vapors in the microwave oven This type of oven is specifically designed to heat cook or dry food It is not designed for indu...

Страница 4: ...se overheating of the oven Do not store anything directly on top of the microwave oven when the microwave oven is in operation To reduce the risk of injury to persons Liquids such as water coffee or tea are able to be overheated beyond the boiling point without appearing to be boiling Visible bubbling or boiling when the container is removed from the microwave oven is not always present THIS COULD...

Страница 5: ...ven must be grounded In the event of an electrical short circuit grounding reduces the risk of electric shock by providing an escape wire for the electric current The microwave oven is equipped with a cord having a grounding wire with a grounding plug The plug must be plugged into an outlet that is properly installed and grounded WARNING Improper use of the grounding plug can result in a risk of e...

Страница 6: ...turned off except during an auto function This is helpful when cooking with plates that are larger than the turntable or when cooking with two 10 in 26 cm plates that are side by side To Turn Off Touch TURNTABLE ON OFF A turntable off icon will appear in the display The turntable will turn back on automatically when cooking is over or CANCEL OFF is touched CookingRack The cooking rack is ideal for...

Страница 7: ...JETSTART Feature The JET START control will start any function If not touched within 5 seconds after touching a pad START will appear on the display as a reminder If not touched within 5 minutes after touching a pad the display will return to the time of day mode and the programmed function will be canceled If cooking is interrupted touching the JET START control will resume the preset cycle The J...

Страница 8: ...play will return to the time of day mode and the programmed function will be canceled When the set time ends END will appear on the display and 1 tone will sound If the Timer is active in the display touch TIMER SET OFF to cancel timer If the Timer is not active in the display touch TIMER SET OFF to make the Timer active in the display then touch TIMER SET OFF again or CANCEL OFF to cancel the Tim...

Страница 9: ...cteristics When microwave cooking the amount size and shape starting temperature composition and density of the food affect cooking results Amount of Food The more food heated at once the longer the cook time Check for doneness and add small increments of time if necessary Size and Shape Smaller pieces of food will cook more quickly than larger pieces and uniformly shaped foods cook more evenly th...

Страница 10: ...taples and objects with gold or silver trim or a metallic glaze should not be used in the oven CookingPower Many recipes for microwave cooking specify which cooking power to use by percent name or number For example 70 7 Medium High Use the following chart as a general guide for the suggested cooking power of specific foods MATERIAL RECOMMENDATIONS Aluminum Foil Metal See Aluminum Foil and Metal s...

Страница 11: ... and microwave oven cavity are dry 1 Touch one of the SENSOR pads The microwave oven will automatically turn on when POPCORN BAKED POTATOES or DINNER PLATE is touched If more or less time is required for BAKED POTATO and DINNER PLATE only touch COOK POWER after the microwave oven starts to cook The Progress Bar will show the approximate time remaining When the cycle ends END will appear in the dis...

Страница 12: ... Touch CANCEL OFF or open the door to clear the display and or stop reminder tones CookinginStages The oven can be set to cook at different cooking powers for various lengths of time up to 3 stages Sensor cooking cannot be done in stages To Cook in Stages 1 Touch COOK TIME 2 Touch number pads to enter length of time to cook during the 1st stage 3 Touch COOK POWER 4 Touch the number pad s using the...

Страница 13: ...s of food such as chicken wings leg tips and fish tails See Aluminum Foil and Metal first The automatic Defrost control has 3 categories Meat Poultry and Fish It should not be used for food left outside the freezer more than 20 minutes and frozen ready made food Use the following chart as a guide To use the Defrost control 1 Touch DEFROST 2 Touch the number pad 1 for Meat 2 for Poultry or 3 for Fi...

Страница 14: ...es will sound and then reminder tones will sound every minute 5 Touch CANCEL OFF or open the door to clear the display and or stop reminder tones Melt The microwave oven uses low power to melt certain foods The foods may not be completely melted when the program ends but stirring the food will complete the melting Use the following chart as a guide To Melt 1 Touch MELT The display will alternate b...

Страница 15: ...cle ends END will appear in the display 4 end of cycle tones will sound and then reminder tones will sound every minute 4 Touch CANCEL OFF or open the door to clear the display and or stop reminder tones Simmering Pasta Use a container large enough to cover food completely with water Add 1 tbsp 15 mL oil to water Put container and water in the microwave oven and follow the above steps setting a si...

Страница 16: ...OVEN CARE GeneralCleaning IMPORTANT Before cleaning make sure all controls are off and the oven is cool Always follow label instructions on cleaning products Soap water and a soft cloth or sponge are suggested first unless otherwise noted GREASE FILTERS Do not use ammonia or corrosive cleaning agents such as lye based oven cleaners Hot water and mild detergent Soak filters then scrub and swish to ...

Страница 17: ...uld be facing out Then replace the vent grille by aligning the bottom tabs and snapping it back into place GREASE FILTERS To Remove and Replace Grease Filters 1 Unplug oven or disconnect power 2 Remove each of the grease filters by pushing the back of the filter up grasping the tab and sliding the filter to the back Pull tab down until the filter drops out 3 Replace grease filters by inserting the...

Страница 18: ... for service See Assistance or Service section Oven makes humming noise This is normal and occurs when the power supply switches the magnetron on and off Oven door looks wavy This is normal and will not affect performance Turntable will not operate Is the turntable properly in place Make sure turntable is correct side up and is sitting securely on the turntable support Is the turntable support ope...

Страница 19: ... they are made with the same precision used to build every new WHIRLPOOL appliance To locate FSP replacement parts in your area call our Customer Interaction Center telephone number or your nearest Whirlpool designated service center IntheU S A Call the Whirlpool Customer Interaction Center toll free 1 800 253 1301 Our consultants provide assistance with Features and specifications on our full lin...

Страница 20: ...AL OR CONSEQUENTIAL DAMAGES Some states do not allow the exclusion or limitation of incidental or consequential damages so this exclusion or limitation may not apply to you This warranty gives you specific legal rights and you may also have other rights which may vary from state to state Outside the 50 United States this warranty does not apply Contact your authorized Whirlpool dealer to determine...

Отзывы: