background image

7

ACCESSORIES

The following accessories have been provided with your new microwave oven. Any of the parts may be ordered for replacement.

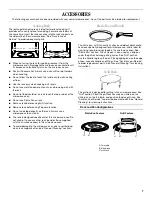
Cooking Rack

The rectangular cooking rack is ideal for two-level cooking. It 
provides extra cavity space for cooking 2 or more containers at 
the same time. Insert the rack securely into the rack supports on 
the side walls of the microwave oven. See “Assistance or 
Service” to order replacement parts.

When not using the rack for cooking, remove it from the 
microwave oven. Damage to the microwave oven could result 
if someone unintentionally turns on the microwave oven.

Rack will become hot. Always use oven mitts or pot holders 
when handling.

Do not allow the rack to touch the inside cavity walls, ceiling 
or floor.

Use the rack only when cooking on 2 levels.

Do not use metal cookware, utensils, or a browning dish with 
the rack.

Do not let food container on rack touch the top or sides of the 
microwave oven.

Do not use Sizzle Pan on rack.

Remove rack before using Grill function.

Remove rack before using Popcorn function.

Do not cook food directly on the rack. Always use a 
microwave-safe container.

The rack is designed specifically for this microwave oven. Do 
not attempt to use any other rack (besides those supplied 
with the microwave oven) in this microwave oven.

To avoid damage to the microwave oven due to soil buildup, 
clean rack supports often (see “General Cleaning” section).

Sizzle Pan and Handle

The sizzle pan, with its nonstick surface and detachable handle, 
has been specially designed for microwave use, and is ideal for 
pan-frying (pan-browning) foods in the microwave oven. See 
“Sizzle Pan” section. The sizzle pan is also used as a drip pan 
under the grill rack during grilling cycles. See “Grill” section.

Use the handle to grasp the pan. Place gripping end on the edge 
of pan, squeeze handle and lift pan. See “Assistance or Service” 
to order replacement parts. See “General Cleaning” for cleaning 
instructions.

Grill Rack

The grill rack is designed for grilling in the microwave oven. See 
“Grill” section. Place the grill rack securely on sizzle pan, the 
sizzle pan on the turntable, and position food on grill rack. See 
“Assistance or Service” to order replacement parts. See “General 
Cleaning” for cleaning instructions.

Rack and Pan Configurations

Sizzle Pan Feature

Grill Feature

A. Turntable
B. Sizzle pan

C. Grill rack

A      B

A      B                        C

Содержание GH6208XR

Страница 1: ...VE HOOD COMBINATION Use CareGuide For questions about features operation performance parts accessories or service call 1 800 253 1301 or visit our website at www whirlpool com Table of Contents 2 8206205 Model GH6208XR ...

Страница 2: ... Progress Bar 14 MICROWAVE OVEN USE 14 Food Characteristics 14 Cooking Guidelines 15 Cookware and Dinnerware 15 Aluminum Foil and Metal 15 Microwave Cooking Power 16 MANUAL COOKING 16 Add 30 Seconds 16 Microwave Time Power Cooking 16 Time Power Cooking 16 Warm Hold 17 Cooking in Stages or steps 17 PROGRAMMED COOKING 18 Sensor Cooking 18 Preheating 18 Doneness 18 Quick Touch Menu 18 Popcorn Sensor ...

Страница 3: ... or dry food It is not designed for industrial or laboratory use As with any appliance close supervision is necessary when used by children Do not operate the microwave oven if it has a damaged cord or plug if it is not working properly or if it has been damaged or dropped The microwave oven should be serviced only by qualified service personnel Call an authorized service company for examination r...

Страница 4: ...ven near water for example near a kitchen sink in a wet basement or near a swimming pool or similar locations Do not immerse cord or plug in water Keep cord away from heated surfaces Do not let cord hang over edge of table or counter Do not mount over a sink Do not cover racks or any other part of the oven with metal foil This will cause overheating of the oven PRECAUTIONS TO AVOID POSSIBLE EXPOSU...

Страница 5: ...k by providing an escape wire for the electric current The microwave oven is equipped with a cord having a grounding wire with a grounding plug The plug must be plugged into an outlet that is properly installed and grounded WARNING Improper use of the grounding plug can result in a risk of electric shock Consult a qualified electrician or serviceman if the grounding instructions are not completely...

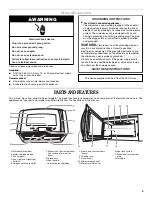
Страница 6: ...ll element for various cooking functions When the element is in use the halogen bulb glows very brightly while the glow of the quartz bulb is barely if at all visible See Troubleshooting for quartz bulb testing The microwave oven cavity and door will become hot The use of oven mitts is recommended Turntable The turntable can rotate in either direction to help cook food more evenly Do not operate t...

Страница 7: ...rectly on the rack Always use a microwave safe container The rack is designed specifically for this microwave oven Do not attempt to use any other rack besides those supplied with the microwave oven in this microwave oven To avoid damage to the microwave oven due to soil buildup clean rack supports often see General Cleaning section SizzlePanandHandle The sizzle pan with its nonstick surface and d...

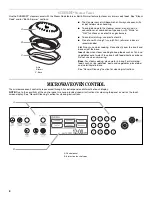
Страница 8: ...insert and base or just the base Insert Use when steam cooking to keep foods such as fish and vegetables out of water Place insert with food directly over base Do not use when simmering Base For steam cooking place water in base For simmering foods such as rice potatoes pasta and vegetables place food and water liquid in base See General Cleaning section for cleaning instructions MICROWAVE OVEN CO...

Страница 9: ...ing a cooking cycle the display shows progress bar sensor functions only see Progress Bar section cooking animation see Cooking Animation section and the countdown of cook time remaining The display will also give prompts to tend to the food during certain automatic cycles Touch Screen The LCD touch screen is used to make menu selections adjust settings and input commands Menu selections and input...

Страница 10: ...sume pan browning When the cycle is over the Finished screen appears If you would like to either add more time or keep the food warm you may do so at this time 9 If the doneness is satisfactory touch CANCEL on the control panel to return to the default screen The same cooking can also be accomplished using the Food Type menus instead of the Cook Method menu 1 On Main Menu touch Food Type 2 Touch P...

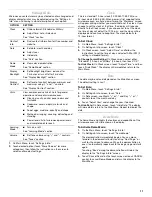
Страница 11: ... and change the year if desired To Hide Date On Date screen touch Hide Date The display will immediately return to the Main Menu Repeat to display the date DemoMode The Demo Mode highlights the features and capabilities of the microwave oven in a slide show on the display To Activate Demo Mode 1 On the Main Menu touch Settings Info 2 On Settings Info screen touch Demo Mode The demonstration immedi...

Страница 12: ...e Two Tones Between stages short tones Reminder repeat each minute for 15 minutes after the end of cycle tones Hidden feature entered or exited very short quick tones Three Tones Invalid entry very short quick tones Retry Error Four Tones End of cycle 2 short tones followed by 2 longer tones Interruption tend to food short tones Attention door needs to be opened and closed To Adjust Tone Volume 1 ...

Страница 13: ...vate Child Lock Touch and hold CANCEL control for 5 seconds Two tones will sound the Child Lock is off screen will appear and the padlock icon will be removed from the display TRUCAPTURE VentFan Cooktop Light and Night Light The microwave oven s hood controls on the lower left side of the microwave oven see Parts and Features operate the vent fan and cooktop lights TRUCAPTURE Vent Fan The vent fan...

Страница 14: ...ble is chipped or broken See Assistance or Service section to reorder Baby bottles and baby food jars should not be heated in microwave oven Clothes flowers fruit herbs wood gourds paper including brown paper bags and newspaper should not be dried in microwave oven Do not use the microwave oven for canning sterilizing or deep frying Paraffin wax will not melt in the microwave oven because it does ...

Страница 15: ...r 1 minute Do not use cookware or dinnerware if it becomes hot and the water stays cool AluminumFoilandMetal Always use oven mitts or pot holders when removing dishes from the microwave oven Aluminum foil and some metal can be used in the microwave oven If not used properly arcing a blue flash of light can occur and cause damage to the microwave oven OK for Use Racks and bakeware supplied with the...

Страница 16: ...ime and or cooking power may be changed by touching Adjust Settings on the touch screen and following the prompts When the cycle ends the end of cycle tones will sound followed by reminder tones 5 Touch CANCEL control or open the door to stop reminder tones The display will return to the Main Menu after CANCEL control is touched Time PowerCooking The Time Power control on the Main Menu is for manu...

Страница 17: ...s up to 4 stages total The first stage may be programmed using any of the manual controls The stages may be reviewed at any time during programming and or cooking by touching Review Steps on the touch screen NOTE Manual Defrost can be programmed only as the 1st stage and is not available for subsequent stage programming To Cook in Stages 1 Follow steps 1 3 in Microwave Time Power Cooking or follow...

Страница 18: ...ded to or subtracted from the cycle Some of the Meat and Poultry cycle have only the more done settings QuickTouchMenu The Quick Touch Menu is a shortcut to 11 common program cycles Unlike the Most Used menu this list of preset cycles cannot be updated These programs are microwave only cycles To Use Quick Touch Menu Touch QUICK TOUCH MENU control and then follow the screen prompts PopcornSensor Po...

Страница 19: ...t the food Defrost should not be used for food left out of the freezer for more than 20 minutes or for frozen ready made food Food should be 0 F 18 C or colder at the time the cycle is started for optimal results How foods are stored can affect results Unwrap foods and remove lids for example from fruit juice containers before defrosting Shallow packages will defrost more quickly than thick blocks...

Страница 20: ...rilling The food grill rack Sizzle Pan microwave oven cavity and door will be very hot Using oven mitts grasp the Sizzle Pan securely with both hands and remove it with the grill rack and food still in place Use the detachable handle when handling the hot Sizzle Pan Use oven mitts when handling the hot grill rack Boil Simmer The Boil Simmer menu has a selection of main food categories plus a short...

Страница 21: ...ction Steam Cook is a sensor function and uses only microwaves to steam your food See Cook Method Chart for specific food items and amounts Use the provided steamer vessel and its lid Place 1 cups 295 mL water in the base place food in the insert place the insert in the base and cover Do not remove the lid while the vessel is inside the microwave oven as the rush of steam will disrupt the sensor r...

Страница 22: ... Cook Sizzle Pan Snack Pocket Cook POULTRY Chicken Nuggets Chicken Tenders Poultry Breast Sizzle Pan or Kids Menu Cook Boneless Frozen Chicken Pieces Ground Poultry Defrost Boneless Defrost or Cook Boneless Pan Brown Defrost or Cook Sizzle Pan Bone In Boneless Poached Defrost Cook or Grill Cook MEAT Beef Beef cont d Pork Ground Beef Roast Bacon Defrost or Cook Sizzle Pan Sizzle Pan Hamburger Patty...

Страница 23: ...k Cook Brown Rice Long Grain Cook Rotini Cook Regular Cook White Rice Instant Cook Spaghetti Cook Instant Macaroni Cheese Cook White Rice Long Grain Cook Fresh Pasta Cook Pasta Linguine White Rice Short Grain Dried Pasta Cook Cook Fettuccine Ravioli Cook Cook Macaroni Tortellini Cook Cook BREAKFAST FOOD Bacon French Toast Muffin Sizzle Pan Cook or Sizzle Pan Fresh Instant Cereal Grits Reheat or Si...

Страница 24: ...auce Fresh 1 6 rolls Thick senses 1 4 cups 250 mL 1 L Frozen 1 6 rolls Thin senses 1 4 cups 250 mL 1 L Manual Reheat DEFROST Meat Fish Seafood 0 1 6 5 lbs 45 g 2 9 kg 0 1 4 5 lbs 45 g 2 0 kg Weight Unknown Weight Unknown Chops Fillet 1 6 pieces small 1 6 pieces Shrimp 1 4 cups 250 mL 1 L medium 1 6 pieces Scallops 1 4 cups 250 mL 1 L large 1 4 pieces Steak 1 4 pieces Ground 1 2 3 or 4 cups 250 500...

Страница 25: ... oz 57 227 g Cereal Oatmeal Macaroni senses 0 5 2 0 cups 125 500 mL Hot Wheat 1 4 servings Penne senses 0 5 2 0 cups 125 500 mL Instant Cereal 1 4 servings Rotini senses 0 5 2 0 cups 125 500 mL Instant Oatmeal 1 or 2 servings Spaghetti senses 2 8 oz 57 227 g Regular Oatmeal 1 4 servings Fresh Pasta Regular Grits senses 1 4 servings Linguine senses 9 or 18 oz 255 or 510 g Quick Grits senses 1 4 ser...

Страница 26: ...Brownies 20 oz 567 g package Slice 1 4 slices Cookies 4 6 or 8 cookies Steak 4 8 oz 113 227 g Muffins 4 6 or 8 muffins Hamburger Patty 1 4 patties Roll Refrigerated Meatballs 0 5 or 1 0 lb 227 or 454 g Regular 4 or 8 rolls Sausage 2 10 links Large 5 or 6 rolls Egg Frozen Food Fried Egg 1 4 eggs Cheese Sticks 1 4 servings Omelet 2 4 eggs Rising Crust Pizza 6 11 15 2 27 9 cm Poultry Breast Boneless ...

Страница 27: ...r 2 to 5 minutes in microwave oven Microwave Inlet Cover To avoid arcing and damage to the microwave oven the microwave inlet cover see Parts and Features should be kept clean Wipe with wet cloth CONTROL PANEL INTERACTIVE TOUCH DISPLAY Activate the Child Lock to avoid control panel activation during cleaning See Child Lock section To avoid damage to the control panel and interactive touch display ...

Страница 28: ...he grease filters should be removed and cleaned at least once a month The charcoal filters cannot be washed and should be replaced every 6 to 12 months Do not operate the microwave oven without the filters in place See Replacement Parts section in Assistance or Service to reorder filters See General Cleaning for cleaning instructions To Remove Replace 1 Squeeze the small tab on the outer edge of t...

Страница 29: ...rowave oven or disconnect power 2 Gently pull vent screen rings and lift the screen off the exhaust vent at the top of the microwave oven If using recirculating exhaust venting skip Step 3 3 For wall or roof venting remove the vent deflector by removing the mounting screws 1 from each end and lifting out the vent deflector 4 Remove the bulb cover mounting screw then lift cover A Bulb cover mountin...

Страница 30: ...ly on the turntable support Is the turntable support operating properly Remove turntable Remove and clean turntable support and rollers Replace turntable support Replace turntable Place 1 cup 250 mL of water on turntable then restart microwave oven If it still is not working call for service See Assistance or Service section Do not operate the microwave oven without turntable and turntable support...

Страница 31: ...every new WHIRLPOOL appliance To locate FSP replacement parts in your area call us or your nearest Whirlpool designated service center IntheU S A Call the Whirlpool Customer eXperience Center toll free 1 800 253 1301 Our consultants provide assistance with Features and specifications on our full line of appliances Installation information Use and maintenance procedures Accessory and repair parts s...

Страница 32: ...rchased DISCLAIMER OF IMPLIED WARRANTIES LIMITATION OF REMEDIES CUSTOMER S SOLE AND EXCLUSIVE REMEDY UNDER THIS LIMITED WARRANTY SHALL BE PRODUCT REPAIR AS PROVIDED HEREIN IMPLIED WARRANTIES INCLUDING WARRANTIES OF MERCHANTABILITY OR FITNESS FOR A PARTICULAR PURPOSE ARE LIMITED TO ONE YEAR OR THE SHORTEST PERIOD ALLOWED BY LAW WHIRLPOOL SHALL NOT BE LIABLE FOR INCIDENTAL OR CONSEQUENTIAL DAMAGES S...

Отзывы: