background image

EN 10

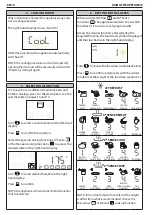
4  COOLING DOWN

When a function is finished, the appliance may carry 

out a cooling procedure.

The right-hand display shows "Cool On".

After this procedure, the appliance automatically 

switches off.

NOTE: 

the cooling procedure can be interrupted by 

opening the door and will be eventually reactivated, 

if needs, by closing it again.

5  SELECTING A FUNCTION

To choose from six different main functions and 

further cooking cycles. For the description, see the 

specific table on pages 13 and 14.

Turn  

  to select a main function in the left-hand 

display.

Press  

  to confirm the selection.

Select the special cooking functions 6

th

 Sense  

or the Manual cooking functions 

  to access the 

related cluster in the right-hand display. 

Turn  

  to select desired function in the right-

hand display.

Press  

  to confirm. 

NOTE: 

the appliance will remember the last function 

that was selected.

6  SETTING FOOD CLASSES

When using Jet Defrost  

  and 6

th

 Sense 

functions 

  the appliance needs to know which 

food class it is to use to reach proper results. 

Access the desired function: after selecting the 

required function, the food class symbol is displayed 

and the class flashes in the right-hand display. 

Turn  

  to choose the food class (see tables below).

Press  

  to confirm and proceed with the wizard 

mode to set the weight of the food (see section 6.1).

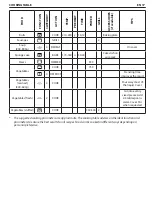
JET DEFROST

FROZEN 

MEAT

FROZEN 

VEGETABLES FROZEN BREAD

FROZEN 

POULTRY

FROZEN FISH


6

th

 SENSE REHEAT

DINNER 

PLATE

FROZEN 

PORTION

FROZEN 

LASAGNE

SOUP

BEVERAGE


6

th

 SENSE COOK

BAKED 

POTATOES

FRESH 

VEGETABLES

FROZEN 

VEGETABLES

CANNED 

VEGETABLES

POPCORN


6

th

 SENSE CRISP

FRENCH 

FRIES

PIZZA,  

THIN CRUST

PIZZA,  

PAN STYLE

BUFFALO 

WINGS CHICKEN 

NUGGETS

FISH 

FINGERS

NOTE: 

for food not listed in the table or if the weight  

is differs from what is recommended, choose the 
Microwave  

  or Manual  

  cooking function.

USING THE APPLIANCE

Содержание AMW509/IX

Страница 1: ...MICROWAVE OVEN EN User and maintenance manual ...

Страница 2: ...I ...

Страница 3: ...AND DISPLAY 8 SETTINGTHE CLOCK 9 ON OFF 9 JET START 9 PAUSE RESUME RESTART COOKING 9 COOLING DOWN 10 SELECTING A FUNCTION 10 SETTING FOOD CLASSES 10 SETTINGTHE WEIGHT 11 TURNING FOOD 11 SETTINGTHE GRILL LEVEL 11 SETTINGTHETEMPERATURE 11 SETTINGTHE MICROWAVE POWER 12 SETTINGTHE DURATION 12 QUICK PREHEAT 12 KEY LOCK 12 FUNCTION DESCRIPTIONSTABLE 13 COOKINGTABLE 15 TESTED RECIPES 18 RECOMMENDED USE A...

Страница 4: ...ctive gloves to perform all unpacking and installation operations The appliance must be disconnected from the power supply before carrying out any installation work Installation and maintenance must be carried out by a qualified technician in compliance with the manufacturer s instructions and local safety regulations Do not repair or replace any part of the appliance unless specifically stated in...

Страница 5: ... be done by unsupervised children During and after use do not touch the heating elements or interior surfaces of the appliance risk of burns Do not allow the appliance to come into contact with cloths or other flammable materials until all the components have cooled down completely At the end of cooking exercise caution when opening the appliance door letting the hot air or steam exit gradually be...

Страница 6: ...se or circuit breaker panel Do not over cook food Fire could result Cleaning is the only maintenance normally required Failure to maintain the appliance in a clean condition could lead to deterioration of the surface that could adversely affect the life of the appliance and possibly result in a hazardous situation Never use steam cleaning equipment Do not use harsh abrasive cleaners or sharp metal...

Страница 7: ...e oven if specified in the cooking table or recipe Use dark lacquered or enameled baking moulds as they absorb heat far better Switch the appliance off 10 15 minutes before the set cooking time Food requiring prolonged cooking will continue to cook even once the appliance is switched off Scrapping the product This appliance is marked in conformity with European Directive 2012 19 EU Waste Electrica...

Страница 8: ...l door seal is not damaged Empty the microwave oven and clean the interior with a soft damp cloth Do not operate this appliance if it has a damaged mains cord if it is not working properly or if it has been damaged or dropped Do not immerse the mains cord in water Keep the cord away from hot surfaces Electrical shock fire or other hazards may result If the power supply cord is too short have a qua...

Страница 9: ...cookingcycles Tobeplacedontheturntablesupport C Wire rack Tocookandbake D Baking plate only in some models Neveruseincombinationwithmicrowaves E Crisp plate only in some models Usetheglassturntableassupport F Crisp handle only in some models Toremovethehotcrispplate The number and the type of accessories may vary according to which model is purchased ACCESSORIES NOT SUPPLIED Other accessories can ...

Страница 10: ...evel or microwave power ON OFF To switch the appliance ON or OFF at any time START To run the cooking functions BACK To return to the previous display screen TIME To set the clock and adjust the duration of a cooking cycle LEFT HAND DISPLAY This display shows the main cooking functions The selectable functions are displayed more brightly The symbols indicate the function For a full description see...

Страница 11: ...e door Press to start NOTE thisfunctionisonlyavailablewhenthe applianceisswitchedOFF Eachtimeyoupress thisincreasestheduration in30 secondincrements Itisalwayspossibletochangethedefaultsettings duringthecookingcycle Seesection7 3and8 Accessories not permitted for this function wire rack baking plate crisp plate 3 PAUSE RESUME RESTART COOKING PAUSE COOKING Press to pause the cooking cycle The cooki...

Страница 12: ...cewillrememberthelastfunction thatwasselected 6 SETTING FOOD CLASSES When using Jet Defrost and 6th Sense functions the appliance needs to know which food class it is to use to reach proper results Access the desired function after selecting the requiredfunction thefoodclasssymbolisdisplayed and the class flashes in the right hand display Turn tochoosethefoodclass seetablesbelow Press to confirm a...

Страница 13: ...ned Thedefrosttimewillbelongerin thiscase 7 1 SETTINGTHE GRILL LEVEL TosetthegrillpowerlevelforGrill GrillCombi TurboGrill andTurboGrill Combi cookingfunctions Therearethree definedpowerlevelsforgrilling 1 low 2 mid 3 high The default value is displayed between two flashing symbols Turn to set the desired grill level Press to confirm and go ahead with the wizard mode or press to quick start NOTE b...

Страница 14: ...ration Press or to confirm and start cooking cycle NOTE byturning duringacookingcycle itis possibletoadjusttheduration Eachtimeyoupress thisincreasestheduration in30 secondincrements 9 QUICK PREHEAT Topreheatthemicrowaveovencavityquickly Seethefulldescriptiononpage15 Select the icon in the right hand display Press to confirm Turn to set the target temperature Press or to start quick preheat When t...

Страница 15: ...nction put it in the centre of the glass turntable Use the special crisp handle or oven gloves when removing the hot crisp plate JET DEFROST This function allows you to quickly and automatically defrost meat poultry fish vegetables and bread Jet Defrost should only be used if the net weight is between 100 g and 2 5 kg During the defrosting process the appliance should stop prompting you to TURN th...

Страница 16: ... the food on the wire rack Turn the food during this cooking cycle Ensure that the utensils used are heat resistant and oven proof before grilling with them We recommend that you preheat the grill for 3 5 minutes on grill power level 3 GRILL COMBI This function combines microwave and grill heating allowing you to cook and grill rapidly It is useful for cooking food like lasagne fish and potato gra...

Страница 17: ...AKE 175 28 30 90 Preparing casserole COOK 500 Cover Cheese COOK 500 SOFT 160 Chicken halves COOK 500 650 2 Chicken legs COOK 350 500 1 Chicken nuggets 200 500 g 4 CRISP Crisp plate Oil the crisp plate Chicken whole COOK 210 220 n 50 60 Dish on wire rack Chocolate MELT 350 Cookies BAKE 170 180 y 10 12 Baking plate Dinner plate 250 500 g 1 REHEAT Cover Egg dishes COOK 500 Fish steaks or fillets COOK...

Страница 18: ...sp plate Pizza thin crust 200 500 g 2 CRISP Crisp plate Popcorn 100 g 5 COOK One bag at a time Potatoes french fries 200 500 g 1 CRISP Crisp plate Spread the fries out in an even layer on the crisp plate Potatoes 200 800 g 2 COOK Cut into evenly sized pieces Add 2 4 tablespoons water Cover Stir when requested Potatoes roasted COOK 500 650 2 Potatoes baked 200 1000 g 1 COOK Turn when requested Poul...

Страница 19: ... COOK 750 4 DEFROST Standing time improves the result Vegetables canned 200 600 g 4 COOK Pour away most of the liquid Cover Vegetables fresh 2 COOK Cut into evenly sized pieces Add 2 4 tablespoons water Cover Stir when requested Vegetables stuffed COOK 350 500 2 Thesuggestedcookingparametersareapproximate Thecookingtableadvisesontheidealfunctionand parameterstoensurethebestresultsforallrecipes Foo...

Страница 20: ...of container Pyrex 3 827 12 3 3 Meat loaf 900 g 13 14 750 Microwave proof container Pyrex 3 838 12 3 4 Potato gratin 1100 g 190 28 30 350 Microwave proof container Pyrex 3 827 12 3 5 Cake 700 g 175 28 30 90 Microwave proof container Pyrex 3 827 12 3 6 Chicken 1000 g 210 30 32 350 Microwave proof container Pyrex 3 827 13 3 Meat defrosting 500 g 10 160 In accordance with IEC 60350 8 4 1 Shortbread n...

Страница 21: ...ue to cook after microwave has finished cooking it Therefore always allow for standing time to complete the cooking Stirring is usually necessary during microwave cooking When stirring bring the cooked portions on the outside edges towards the centre and the less cooked centre portions towards the outside Place thin slices of meat on top of each other or interlace them Thicker slices such as meat ...

Страница 22: ...leaning Microwave oven interior Use a mild detergent water and a soft cloth to clean the interior surfaces front and rear of the door and the door opening Do not allow grease or food particles to build up around the door For stubborn stains boil a cup of water in the microwave oven for 2 or 3 minutes Steam will soften the marks Adding some lemon juice to a cup of water placing this on the turntabl...

Страница 23: ...nnecting and trying again The electronic programmer does not work If the display shows the letter F followed by a number contact the nearest After Sales Service In this case quote the number that follows the letter F AFTER SALES SERVICES Before calling the After Sales Service 1 See if you can solve the problem yourself with the help of the suggestions given in the Troubleshooting guide 2 Switch th...

Страница 24: ......

Страница 25: ...Whirlpool is a registered trademark of Whirlpool USA 4 0 0 0 1 0 7 8 8 7 4 8 Printed in Italy EN ...

Отзывы: