background image

16

EN

f

ollow


The


proceDure


 for “Cook & Reheat with 

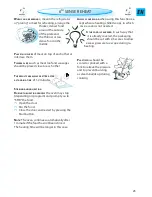
microwaves” and choose power level 160 W 

when defrosting manually.

c

heck


anD


inspecT


The


fooD


regularly

 You will 

learn the times required for various amounts 

from experience.

MANUAL DEFROST

T

urn


large


JoinTs


 halfway through the defrost-

ing process.

b

oileD


fooD

sTews


anD


meaT


sauces


 defrost 

better if stirred during defrosting.

w

hen


DefrosTing


 it is better to under 

thaw the food slightly and allow the 

process to finish during standing time.

s

TanDing


Time


afTer


DefrosTing


always


proDuces


beT

-

Ter


resulTs


 since the temperature  

will then be evenly distributed 

throughout the food.

f

rozen


fooD


in


plasTic


bags

 plastic film or card-

board packaging can be placed directly in the 

oven provided the packaging does not 

have any metal parts (e.g. metal twist 

ties).

T

he


shape


of


The


package


 changes the de-

frosting time. Shallow packaging de-

frosts more quickly than deep packag-

ing.

s

eparaTe


iTems


 as they begin to defrost.  

Individual slices defrost more easily.

c

over


areas


of


fooD


 with small  

pieces of aluminium foil if they 

start to become warm (e.g. 

chicken legs and wing tips).

Содержание AMW 730

Страница 1: ...Instructions for use EN AMW 730 ...

Страница 2: ...eandelectricshock resultingfromimproperuseofthe appliance Carefullyobservethe followinginstructions Keep these instructions close at hand for future reference Use protective gloves to perform all unpacking and installation operations The appliance must be handled and installed by two or more persons The appliance must be disconnected from the power supply before carrying out any installation work ...

Страница 3: ...or damage to property if these advices and precautions are not respected This appliance is intended to be used in household and similar applications such as Staff kitchen areas in shops offices and other working environments Farm houses By clients in hotels motels and other residential environments Bed and breakfast type environments This appliance is intended to be used built in Do not use it fre...

Страница 4: ...drying textiles paper spices herbs wood flowers fruit or other combustible materials Fire could result Do not leave the appliance unattended especially when using paper plastic or other combustible materials in the cooking process Paper can char or burn and some plastics can melt if used when heating foods Use containers suitable for use in a microwave oven only Overheating the liquid beyond boili...

Страница 5: ...nce and possibly result in a hazardous situation Never use steam cleaning equipment Do not use harsh abrasive cleaners or sharp metal scrapers to clean the appliance door glass since they can scratch the surface which may result in shattering of the glass Do not use corrosive chemicals or vapors in this appliance This type of appliance is specifically designed to heat or cook food It is not design...

Страница 6: ...otherwise be caused by inappropriate waste handling of this product The symbol on the product or on the accompanying documentation indicates that it should not be treated as domestic waste but must be taken to an appropriate collection centre for the recycling of electrical and electronic equipment SCRAPPING OF HOUSEHOLD APPLIANCES This appliance is manufactured with recyclable or reusable materia...

Страница 7: ...or other hazards may result If the power supply cord is too short have a qualified electrician or serviceman installer an outlet near the appliance The power supply cord must be long enough for connecting the appliance once fitting in its housing to the main power supply For installation to comply with current safety regulations an omnipolar switch with minimum contact gap of 3 mm must be utilized...

Страница 8: ... this possibility q Avoid using straight sided containers with narrow necks w Stir the liquid before placing the container in the microwave oven cavity and leave the teaspoon in the container e After heating stir again before carefully removing the container from the microwave oven BABY FOOD After heating baby food or liquids in a baby bottle or in a baby food jar always stir and check the tempera...

Страница 9: ...9 EN PANEL DESCRIPTION Function symbols STOP PAUSE button ON OFF button POWER button START button BACK button ADJUST knob CLOCK button Digital display Power ...

Страница 10: ... crisp plate Do not place any utensils on the crisp plate since it will quickly become very hot and is likely to damage the utensil The crisp plate may be preheated before use max 3 minutes Always use the Crisp function when preheating the crisp plate GENERAL There are a number of accessories available on the market Make sure that they are suitable for microwave use before making any purchases Mak...

Страница 11: ...ues au tomatically after 2 minutes if the food has not been turned The defrost time will be longer in this case When the appliance is turned OFF all the buttons and the adjust knob are non responsive apart from the Start button The 24 hour clock is dis played Note The descriptions in these Instructions for use assume that the oven is turned ON When using some of the 6th Sense functions the oven ma...

Страница 12: ... guide on this oven indicates which food class is used in the functions that apply food classes FOOD Meat 100 g 2 0 kg Poultry 100 g For food not listed in the tables and if the weight is lesser or greater than the recom mended weights you should follow the proce dure for Cook Reheat with microwaves 6th SENSE Reheat Dinner plate Frozen portion Frozen lasagne Soup Beverage 6th SENSE Cook Baked pota...

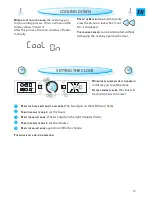
Страница 13: ...ng the oven by opening the door COOLING DOWN q Press the Clock button a second The two digits on the left hours flash w Turn the adjust knob to set the hours e Press the adjust knob The two digits on the right minutes flash r Turn the adjust knob to set the minutes t Press the adjust knob again to confirm the change The clock is set and is in operation SETTING THE CLOCK When the appliance is first...

Страница 14: ...on and proceed as follows q Turn the adjust knob until you find the microwave function w Press the adjust knob to confirm your selection e Turn the adjust knob to set the microwave power level r Press the adjust knob to confirm your selection t Turn the adjust knob to set the cooking time y Press the Start button or adjust knob Once the cooking process has been started The time can easily be incre...

Страница 15: ...o 30 seconds Each additional press increases the time by 30 seconds JET START This function is used to quickly re heat food with a high water con tent such as clear soup coffee or tea You can also alter the time by turning the adjust knob to increase or decrease the time after the function has started Note This function is only available when the oven is switched off or in Standby mode while the m...

Страница 16: ... process to finish during standing time Standing time after defrosting always produces bet ter results since the temperature will then be evenly distributed throughout the food Frozen food in plastic bags plastic film or card board packaging can be placed directly in the oven provided the packaging does not have any metal parts e g metal twist ties The shape of the package changes the de frosting ...

Страница 17: ...y Press the Start button Use this function for defrosting meat poultry fish vegetables and bread Jet Defrost should only be used if the net weight is between 100 g and 2 5 kg Always place the food on the glass turntable Midway through the defrosting process the oven stops and prompts you to TURN the food ɳ ɳ Open the door ɳ ɳ Turn the food ɳ ɳ Close the door and restart by pressing the Start butto...

Страница 18: ...wer food weight If the food is colder than deep freeze temperature 18 C choose a higher food weight FOOD TIPS q Meat 100 g 2 0 kg Minced meat cutlets steaks or roasts w Poultry 100 g 2 5 kg Chicken whole pieces or fillets e Fish 100 g 1 5 kg Whole steaks or fillets r Vegetables 100 g 1 5 kg Mixed vegetables peas broccoli etc t Bread 100 g 1 0 kg Loaf buns or rolls For food not listed in this table...

Страница 19: ...ob to set the cooking time r Press the Start button Use this function to quickly turn the surface of any food placed on the wire rack golden brown Place food on the wire rack Turn food during cooking Make sure that the utensils used are heat resistant and microwave safe before grilling with them Do not use plastic utensils when grilling They will melt Items made of wood or paper are not suitable e...

Страница 20: ... button Each press increases the time by 30 seconds You may also alter the time by turning the adjust knob to increase or de crease the time During cooking you can change the cooking time and or power level by pressing the desired button The max possible microwave power level when using the Grill Combi is limited to a factory preset level Place food on the wire rack or on the glass turntable Use t...

Страница 21: ...ill to heat the crisp plate This way the crisp plate will rapidly reach its working tem perature and begin to brown and crisp the food Make sure that the crisp plate is correctly placed in the middle of the glass turntable The Oven And The Crisp Plate become very hot when using this function Do not place the hot crisp plate on any surface susceptible to heat Take care not to touch the grill elemen...

Страница 22: ...should follow the procedure for Cook Reheat with microwaves Switch on the microwave by pressing the button and proceed as follows q Turn the adjust knob until you find the 6th Sense function w Press the adjust knob to confirm your selection e Turn the adjust knob until you find the 6th Sense Reheat function r Press the adjust knob to confirm your selection t Turn the adjust knob to select the desi...

Страница 23: ...ng arrange the thicker denser food around the outside of the plate and the thinner or less dense food in the middle Place thin slices of meat on top of each other or interlace them Thicker slices such as meat loaf and sausages should be placed close to each other The results are always better after a standing time of 1 2 minutes Stirring during heating During the heating process the oven may stop ...

Страница 24: ...d if the weight is lesser or greater than the recommended weight you should follow the procedure for Cook Reheat with microwaves Switch on the microwave by pressing the button and proceed as follows q Turn the adjust knob until you find the 6th Sense function w Press the adjust knob to confirm your selection e Turn the adjust knob until you find the 6th Sense Cook function r Press the adjust knob ...

Страница 25: ... lesser or greater than the recommended weight you should follow the procedure for Cook Reheat with microwaves Switch on the microwave by pressing the button and proceed as follows q Turn the adjust knob until you find the 6th Sense function w Press the adjust knob to confirm your selection e Turn the adjust knob until you find the 6th Sense Crisp function r Press the adjust knob to confirm your s...

Страница 26: ...ed for cleaning Use a mild detergent water and a soft cloth to clean the interior surfaces front and rear of the door and the door opening Do not allow grease or food particles to build up around the door For stubborn stains boil a cup of water in the oven for 2 or 3 minutes Steam will soften the marks Adding some lemon juice to a cup of water plac ing this on the turntable and boiling for a few m...

Страница 27: ...e more ɳ ɳ Open and then close the door before you try again ɳ ɳ Disconnect the oven from the power sup ply Wait for 10 minutes before reconnect ing and trying again DATA FOR TESTING HEATING PERFORMANCE In accordance with IEC 60705 and IEC 60350 The International Electrotechnical Commission has developed a standard for comparative testing of the heating performance of different microwave ovens We ...

Страница 28: ...4 0 0 0 1 0 8 8 8 4 2 9 EN Whirlpool is a registered trademark of Whirlpool USA ...

Отзывы: