background image

6

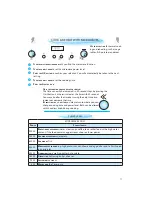
DONENESS 

 (

AUTO


FUNCTIONS


ONLY

)

D

ONENESS


IS


AVAILABLE


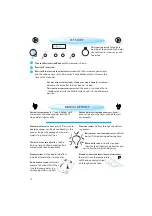
 in most of the auto func-

tions. You have the possibility to personally 
control the end result through the Adjust do-
neness feature. This feature enables you to 
achieve higher or lower end temperature com-
pared to the default standard setting.

W

HEN


USING


 one of these functions the oven 

chooses the default standard setting. This set-
ting normally gives you the best result. But if 
the food you heated became too warm to eat 
at once, you can easily adjust this before you 
use that function the next time. 

N

OTE

:

T

HE

 D

ONENESS


 can only be set or altered during 

the first 20 seconds of operation.

W

HEN


USING


SOME


OF


THE

 A

UTO


FUNCTIONS


 the oven 

may stop (depending on the chosen program 
and food class) and prompt you to STIR FOOD 
or TURN FOOD.

STIR OR TURN FOOD 

 (

AUTO


FUNCTIONS


ONLY

)

T

HIS


IS


DONE


BY


SELECTING


A

 D

ONENESS


LEVEL


 with the 

adjust knob right after you have pressed the 
Start button.

N

OTE

IN

 A

UTO

 D

EFROST


MODE

THE


OVEN


CONTIN

-

UES


AUTOMATICALLY


AFTER

 2 

MIN

.  

if the food hasn’t 

been turned / stirred. The defrost time will be 
longer in this case.

T

O


CONTINUE


COOKING

:


Open the door.


Stir or turn the food.


Close the door and restart by pressing the 
Start button.

DONENESS

L

EVEL

E

FFECT

H

IGH

 +2

Y

IELDS


HIGHEST


END


TEMPERATURE

H

IGH

 +1

Y

IELDS


HIGHER


END


TEMPERATURE

M

ED

   0

D

EFAULT


STANDARD


SETTING

L

OW

 -1

Y

IELDS


LOWER


END


TEMPERATURE

L

OW

 -2

Y

IELDS


LOWEST


END


TEMPERATURE

Содержание AMW 7096

Страница 1: ...HELYEZÉS RÖVID KEZDÉSI ÚTMUTATÓ INSTALACE NÁVOD VE ZKRATCE INSTALACJA SKRÓCONA INSTRUKCJA OBSŁUGI УСТАНОВКА КРАТКОЕ СПРАВОЧНОЕ РУКОВОДСТВО INŠTALÁCIA ÚVODNÁ PRÍRUČKA INSTALLATION DÉMARRAGE RAPIDE AUFSTELLUNG KURZANLEITUNG INSTALLAZIONE GUIDA RAPIDA INICIO RÁPIDO PARA LA INSTALACIÓN INSTALAÇÃO GUIA DE INICIAÇÃO RÁPIDA INSTALLATION SNABBGUIDE ...

Страница 2: ... or plug if it is not working proper ly or if it has been damaged or dropped Do not immerse the mains cord or plug in water Keep the cord away from hot surfaces Electri cal shock fire or other hazards may result DO NOT REMOVE THE MICROWAVE INLET PROTECTION PLATES located on the side of the oven cavity wall They prevent grease food par ticles from entering the mi crowave inlet channels ENSURE the o...

Страница 3: ...that the child is able to use the appliance in a safe way and understands the hazards of improper use THIS APPLIANCE IS NOT INTENDED FOR use by per sons including children with reduced physical sensory or mental capabilities unless used under the supervision of a person responsible for their safety WARNING ACCESSIBLE PARTS MAY BECOME HOT during use young children should be kept away DO NOT USE YOU...

Страница 4: ...d let the teaspoon remain in the container 3 After heating allow standing for a short time stirring again before carefully re moving the container from the oven CAREFUL ALWAYS REFER to a microwave cookbook for de tails Especially if cooking or reheating food that contains alcohol AFTER HEATING BABY FOOD or liquids in a baby bottle or in a baby food jar always stir and check the temperature before ...

Страница 5: ...allow microwaves to pass through them before cooking WHEN YOU PUT FOOD AND ACCESSORIES in the micro wave oven ensure that they do not come in contact with the interior of the oven This is especially important with accesso ries made of metal or metal parts ALWAYS ENSURE that the turntable is able to turn freely before starting the oven THERE ARE a number of accessories available on the market Befor...

Страница 6: ...uring the first 20 seconds of operation WHEN USING SOME OF THE AUTO FUNCTIONS the oven may stop depending on the chosen program and food class and prompt you to STIR FOOD or TURN FOOD STIR OR TURN FOOD AUTO FUNCTIONS ONLY THIS IS DONE BY SELECTING A DONENESS LEVEL with the adjust knob right after you have pressed the Start button NOTE IN AUTO DEFROST MODE THE OVEN CONTIN UES AUTOMATICALLY AFTER 2 ...

Страница 7: ...00 C HOT and the current cavity temperature is dis played Be careful not to touch the cavity in side when removing food Use oven mittens IF THE TEMPERATURE IS LESS THAN 50 C the 24 hour clock is displayed PRESS THE BACK BUTTON to temporarily view the 24 hour clock when HOT is displayed THE COOLING PROCEDURE can be inter rupted without any harm to the oven by opening the door FOOD CLASSES AUTO FUNC...

Страница 8: ...st Clock Sound ECO Brightness PRESS THE STOP BUTTON TO EXIT the settings function and save all your changes when you are done PRESS THE OK BUTTON The left right hand digits hours flicker TURN THE ADJUST KNOB to set the hours PRESS THE OK BUTTON The two right hand digits minutes flicker TURN THE ADJUST KNOB to set the minutes PRESS THE OK BUTTON again to confirm the change THE CLOCK IS SET AND IN O...

Страница 9: ... ADJUST KNOB to turn the ECO setting ON or OFF PRESS THE OK BUTTON again to confirm the change WHEN ECO IS ON the display will automatically turn off after a while to save energy It will automatically light up again when a button is pressed or the door is opened WHEN OFF IS SET the display will not turn off and the 24 h clock will always be visible CHANGING SETTINGS ...

Страница 10: ...SIGNAL will be heard when the timer has finished to count down PRESSING THE STOP BUTTON before the timer has finished will reset the timer to zero CHANGING SETTINGS BRIGHTNESS PRESS THE OK BUTTON TURN THE ADJUST KNOB to set the level of brightness suitable to your preference PRESS THE OK BUTTON again to confirm your selection LANGUAGE PRESS THE OK BUTTON TURN THE ADJUST KNOB to choose one of the a...

Страница 11: ...e or decrease the time BY PRESSING THE BUTTON you may return to where you can change cooking time and power level Both can be altered with the adjust knob during cooking USE THIS FUNCTION for normal cook ing and reheating such as vege tables fish potatoes and meat MICROWAVES ONLY POWER SUGGESTED USE 900 W REHEATING OF BEVERAGES water clear soups coffee tea or other food with a high water content I...

Страница 12: ...CHECK AND INSPECT THE FOOD REGULARLY Experi ence will give you the times needed for vari ous amounts TURN LARGE JOINTS halfway through the defrost ing process FROZEN FOOD IN PLASTIC BAGS plastic films or card board packages can be placed directly in the oven as long as the package has no met al parts e g metal twist ties THE SHAPE OF THE PACKAGE alters the de frosting time Shallow packets defrost ...

Страница 13: ...OD and food class is displayed PRESS THE OK BUTTON to confirm your selection You will automatically be taken to the next setting TURN THE ADJUST KNOB to set the weight PRESS THE OK BUTTON to confirm your selection PRESS THE START BUTTON USE THIS FUNCTION for defrosting Meat Poultry Fish Vegetables and Bread Jet Defrost should only be used if the net weight is between 100 g 3 0 kg ALWAYS PLACE THE ...

Страница 14: ...TER THAN RECOMMENDED WEIGHT Follow the procedure for Cook Reheat with microwaves and choose 160 W when defrosting JET DEFROST FOOD HINTS MEAT 100g 2 0Kg MINCED MEAT cutlets steaks or roasts POULTRY 100g 3 0Kg CHICKEN WHOLE pieces or fillets FISH 100g 2 0Kg WHOLE STEAKS or fillets VEGETABLES 100g 2 0Kg MIXED VEGETABLES peas broccoli etc BREAD 100g 2 0Kg LOAF buns or rolls FOR FOOD NOT LISTED IN THI...

Страница 15: ...ct food class FOOD and food class is displayed PRESS THE OK BUTTON to confirm your selection You will automatically be taken to the next setting TURN THE ADJUST KNOB to set the weight PRESS THE OK BUTTON to confirm your selection PRESS THE START BUTTON USE THIS FUNCTION when reheating ready made food either frozen chilled or room tempered PLACE FOOD onto a microwave safe heat proof dinner plate or...

Страница 16: ...e to be placed close to each other PLASTIC FOIL should be scored or pricked with a fork to relieve the pressure and to prevent bursting as steam builds up during cooking 1 2 MINUTES STANDING TIME ALWAYS IMPROVES the result especially for frozen food AUTO REHEAT FOOD HINTS DINNER PLATE 250g 600g PREPARE FOOD in line with recommendations above Heat under cover SOUP 200g 800g REHEAT UNCOVERED in sepa...

Страница 17: ...S especially if spill overs have occurred remove the turntable the turntable support and wipe the base of the oven clean THIS OVEN IS DESIGNED to operate with the turnta ble in place DO NOT operate the microwave oven when the turntable has been removed for cleaning USE A MILD DETERGENT water and a soft cloth to clean the interior surfaces front and rear of the door and the door opening DO NOT ALLO...

Страница 18: ...ary calls for which you will be charged When calling for Service please give the serial number and type number of the oven see Ser vice label Consult your warranty booklet for further advice IF THE MAINS CORD NEEDS REPLACING it should be replaced by the original mains cord which is available via our service organiza tion The mains cord may only be replaced by a trained service technician SERVICE O...

Страница 19: ...I IEC 60705 DATA FOR TEST HEATING PERFORMANCE TECHNICAL SPECIFICATION TEST AMOUNT APPROX TIME POWER LEVEL CONTAINER 12 3 1 1000 G 12 13 MIN 650 W PYREX 3 227 12 3 2 475 G 5 MIN 650 W PYREX 3 827 12 3 3 900 G 13 14 MIN 750 W PYREX 3 838 13 3 500 G 10 MIN 160 W SUPPLY VOLTAGE 230 V 50 HZ RATED POWER INPUT 1600 W FUSE 10 A MW OUTPUT POWER 900 W OUTER DIMENSIONS HXWXD 455 X 595 X 560 INNER DIMENSIONS ...

Страница 20: ... on the product or on the docu ments accompanying the product indicates that this appliance may not be treated as household waste Instead it shall be handed over to the applicable collection point for the recycling of electrical and electronic equipment DISPOSAL must be carried out in accordance with lo cal environmental regula tions for waste disposal FOR MORE DETAILED INFORMATION about treatment...

Отзывы: