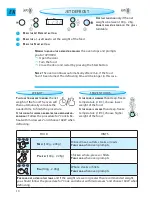
Whirlpool AMW 423 Скачать руководство пользователя страница 13

13

EN

MANUAL DEFROST

JET START

f

ollow


The


proceDure


 for “cook & reheat with mi-

crowaves” and choose power level 160 W when 

defrosting manually.

c

heck


anD


inspecT


The


fooD


regularly

 Experi-

ence will give you the times needed for vari-

ous amounts.

q

T

his


funcTion


is


useD


 for quick re-

heating of food with a high water 

content such as clear soups, cof-

fee or tea.

q

  p

ress


The

 s

TarT


buTTon

T

his


funcTion


auTomaTically


sTarTs


 with maximum microwave power 

level and the cooking time set to 30 seconds. 

Each additional press


increases the time with 30 seconds. You may also alter the time by 

pressing the +/- buttons to increase or decrease the time after the 

function has started.

T

urn


large


joinTs


 halfway through the defrost-

ing process.

b

oileD


fooD

sTews


anD


meaT


sauces


 defrost 

better if stirred during defrosting time.

w

hen


DefrosTing


 it is better to under-

thaw the food slightly and allow the 

process to finish during standing time.

s

TanDing


Time


afTer


DefrosTing


always


improves


the result since the temperature 

will then be evenly distributed 

throughout the food.

f

rozen


fooD


in


plasTic


bags

 plastic films or card-

board packages can be placed directly in the 

oven as long as the package has no met-

al parts (e.g. metal twist ties).

T

he


shape


of


The


package


 alters the de-

frosting time. Shallow packets defrost 

more quickly than a deep block.

s

eparaTe


pieces


 as they begin to defrost.  

Individual slices defrost more easily.

s

hielD


areas


of


fooD


 with small 

pieces of aluminum foil if they 

start to become warm (e.g. 

chicken legs and wing tips).

Содержание AMW 423

Страница 1: ...INSTALLATION QUICK START EN AMW 423 ...

Страница 2: ...ndelectricshock resultingfromimproperuseofthe appliance Carefullyobservethe followinginstructions Keep these instructions close at hand for future reference Use protective gloves to perform all unpacking and installation operations The appliance must be handled and installed by two or more persons The appliance must be disconnected from the power supply before carrying out any installation work In...

Страница 3: ...nimals or damage to property if these advices and precautions are not respected This appliance is intended to be used built in Do not use it freestanding or in a cabinet with door The appliance and its accessible parts become hot during use Care should be taken to avoid touching heating elements Very young 0 3 years and young children 3 8 years shall be kept away unless continuously supervised Chi...

Страница 4: ...lastics can melt if used when heating foods Use containers suitable for use in a microwave oven only Overheating the liquid beyond boiling point can occur without evidence of bubbling This could result in a sudden boil over of the hot liquid Do not use microwave oven for deep frying because the oil temperature cannot be controlled After heating baby food or liquids in a baby bottle or in a baby fo...

Страница 5: ...ers to clean the appliance door glass since they can scratch the surface which may result in shattering of the glass Do not use corrosive chemicals or vapors in this appliance This type of appliance is specifically designed to heat or cook food It is not designed for industrial or laboratory use Do not remove any cover The door seals and the door seal areas must be regularly inspected for damage I...

Страница 6: ...quipment WEEE By ensuring this product is disposed of correctly you will help prevent potential negative consequences for the environment and human health which could otherwise be caused by inappropriate waste handling of this product The symbol on the product or on the accompanying documentation indicates that it should not be treated as domestic waste but must be taken to an appropriate collecti...

Страница 7: ...or other hazards may result If the power supply cord is too short have a qualified electrician or serviceman installer an outlet near the appliance The power supply cord must be long enough for connecting the appliance once fitting in its housing to the main power supply For installation to comply with current safety regulations an omnipolar switch with minimum contact gap of 3 mm must be utilized...

Страница 8: ... this possibility q Avoid using straight sided containers with narrow necks w Stir the liquid before placing the container in the microwave oven cavity and leave the teaspoon in the container e After heating stir again before carefully removing the container from the microwave oven BABY FOOD After heating baby food or liquids in a baby bottle or in a baby food jar always stir and check the tempera...

Страница 9: ...Always ensure that the turntable is able to turn freely before starting the oven TURNTABLE SUPPORT Use the turntable support under the Glass turntable Never put any oth er utensils on the turntable sup port ɳ ɳ Fit the turntable support in the oven GLASS TURNTABLE Use the Glass turntable with all cooking meth ods It collects the dripping juic es and food particles that other wise would stain and s...

Страница 10: ...e door and press the STOP button A beep will signal once or twice a minute for 10 minutes when the cooking is finished Press the STOP button or open the door to cancel the signal Note The oven will only hold the settings for 60 seconds if the door is opened and then closed after the cooking is finished PAUSE OR STOP COOKING When a function is finished the oven may carry out a cooling procedure Thi...

Страница 11: ...sure w Press the power button repeatedly to set the power to 0 W e Press the Start button An acoustic signal will be heard when the timer has finished to count down When the appliance is first plugged in or after a power failure the dis play is blank If the clock is not set the display will remain blank until the cooking time is set q Press the Stop button 3 seconds until the left hand digit hour ...

Страница 12: ...ng time when using the timer only q w e Use this function for normal cook ing and reheating such as vege tables fish potatoes and meat q Press the buttons to set the time w Press the power button repeatedly to set the power e Press the Start button Once the cooking process has been started The time can easily be increased in 30 second steps by pressing the Start button Each press increases the tim...

Страница 13: ...rted Turn large joints halfway through the defrost ing process Boiled food stews and meat sauces defrost better if stirred during defrosting time When defrosting it is better to under thaw the food slightly and allow the process to finish during standing time Standing time after defrosting always improves the result since the temperature will then be evenly distributed throughout the food Frozen f...

Страница 14: ...weight of the food e Press the Start button Midway through the defrosting process the oven stops and prompts you to TURN FOOD ɳ ɳ Open the door ɳ ɳ Turn the food ɳ ɳ Close the door and restart by pressing the Start button Note The oven continues automatically after 2 min if the food hasn t been turned The defrosting time will be longer in this case WEIGHT This function needs to know the net weight...

Страница 15: ...l overs have occurred remove the turntable the turntable support and wipe the base of the oven clean This oven is designed to operate with the turnta ble in place Do not operate the microwave oven when the turntable has been removed for cleaning Use a mild detergent water and a soft cloth to clean the interior surfaces front and rear of the door and the door opening Do not allow grease or food par...

Страница 16: ...s for which you will be charged When calling for Service please give the serial number and type number of the oven see Ser vice label Consult your warranty booklet for further advice If the mains cord needs replacing it should be replaced by the original mains cord which is availa ble via our service organi zation The mains cord may only be replaced by a trained service technician Service only to ...

Страница 17: ...ted Power Input 1300 W Fuse 10 A UK 13 A MW output power 750 W H x W x D Outer dimensions HxWxD 382 x 595 x 320 Inner dimensions HxWxD 187 x 370 x 290 TECHNICAL SPECIFICATIONS DATA FOR TEST HEATING PERFORMANCE In accordance with IEC 60705 The International Electrotechnical Commission has developed a standard for comparative testing of heating performance of different microwave ovens We recommend t...

Страница 18: ......

Страница 19: ......

Страница 20: ...4 0 0 0 1 0 8 7 8 1 6 6 EN Whirlpool is a registered trademark of Whirlpool USA ...

Отзывы: