


13
Pilot and Bypass Screws Conversion
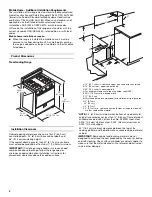
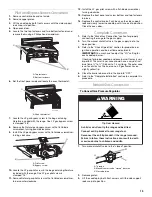
1. Remove control knobs and set aside.
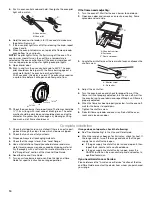
2. Remove upper grates.
3. Lift the cooktop by both front corners until the side support
rods snap into position.
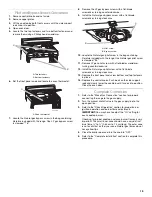
4. Open oven door.
5. Locate the two top fasteners and two bottom fasteners and
remove them using a Phillips head screwdriver.
6. Set the front panel aside and locate the oven thermostat.
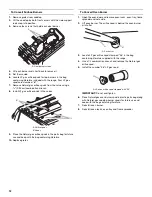
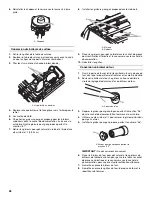
7. Locate the LP gas bypass screw in the bag containing
literature included with the range. One LP gas bypass screw
is stamped “48.”
8. Remove the Natural gas bypass screw with a flat-blade
screwdriver, turning counterclockwise.
9. Install the LP gas bypass screw with a flat-blade screwdriver,
turning clockwise.
10. Locate the LP gas pilot screw in the bag containing literature
included with the range. One LP gas pilot screw is
stamped “15.”
11. Remove Natural gas pilot screw with a flat-blade screwdriver,
turner counterclockwise.
12. Install the LP gas pilot screw with a flat-blade screwdriver,
turning clockwise.
13. Replace the front panel and screw bottom and top fasteners
in place.
14. Replace the control knobs. Push back on the side support
rods and slowly lower the cooktop until it snaps into position.
Close the oven door.
Complete Conversion
1. Refer to the “Make Gas Connection” section for properly
connecting the range to the gas supply.
2. Turn the manual shutoff valve in the gas supply line to the
open position.
3. Refer to the “Check Operation” section for proper burner
ignition, operation and burner flame adjustments.
IMPORTANT: You may have to adjust the “LO” setting for
each cooktop burner.
Checking for proper cooktop and oven burner flames is very
important. The small inner cone should have a very distinct
blue flame ¼" to ½" (0.64 cm to 1.3 cm) long. The outer cone
is not as distinct as the inner cone. LP gas flames have a
slightly yellow tip.
4. Close the broiler door and turn the knob to “OFF.”
5. Refer to the “Complete Installation” section to complete this
procedure.
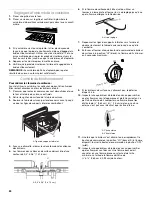
Natural Gas Conversion
To Convert Gas Pressure Regulator
1. Turn manual shutoff valve to the “closed” position.
2. Remove grates.
3. Lift the cooktop by both front corners until the side support
rods snap into position.
A. Top fasteners
B. Bottom fasteners
A. Oven thermostat
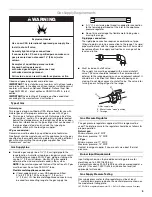
A. Pilot screw
B. Bypass screw
A
B
A
A
B
A. To range
B. Manual shutoff valve “closed” position
C. Gas supply line
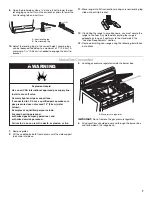
WARNING
Tip Over Hazard
A child or adult can tip the range and be killed.
Connect anti-tip bracket to rear range foot.
Reconnect the anti-tip bracket, if the range is moved.
Failure to follow these instructions can result in death
or serious burns to children and adults.
A
B
C