background image

15

“Warning - this appliance must be 
earthed”

Fuse replacement
If the mains lead of this appliance is fitted with a 
BS 1363A 13amp fused plug, to change a fuse in 
this type of plug use an A.S.T.A. approved fuse 
to BS 1362 type and proceed as follows:

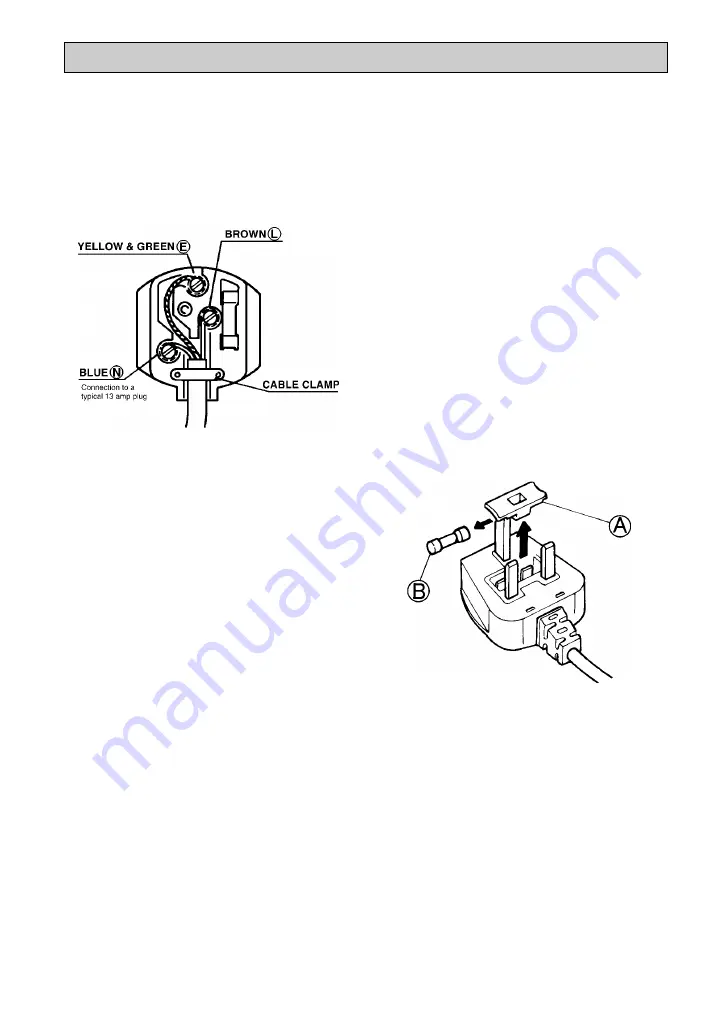
1. Remove the fuse cover (A) and fuse (B).
2. Fit replacement 13A fuse into fuse cover.
3. Refit both into plug.

Important:
The fuse cover must be refitted when changing a 
fuse and if the fuse cover is lost the plug must not 
be used until a correct replacement is fitted.
Correct replacement are identified by the colour 
insert or the colour embossed in words on the 
base of the plug.
Replacement fuse covers are available from 
your local electrical store.

Connection to a rewirable plug

If the fitted plug is not suitable for your socket 
outlet, then it should be cut off and disposed of in 
order to avoid a possible shock hazard should it 
be inserted into a 13A socket elsewhere.
A suitable alternative plug should then be fitted 
to the cable.
The wires in the mains lead are coloured in 
accordance with the following code:
BLUE - “NEUTRAL” (“N”)
BROWN - “LIVE” (“L”)
GREEN AND YELLOW - “EARTH” (“E”)

1. The GREEN AND YELLOW wire must be 

connected to the terminal in the plug which is 
marked with the letter “E” or by the Earth 
symbol 4 or coloured green or green and 
yellow.

2. The BLUE wire must be connected to the 

terminal which is marked with the letter “N” or 
coloured black.

3. The BROWN wire must be connected to the 

terminal which is marked with the letter “L” or 
coloured red.

For the Republic of Ireland only

The information given in respect of Great Britain 
will frequently apply, but a third type of plug and 
socket is also used, the 2-pin, side earth type. In 
this case, the wire which is coloured GREEN 
AND YELLOW must be connected to the EARTH 
contact, and the two wires to the two pins, 
irrespective of colour. The supply to the socket 
must be fitted with a 16 amp fuse.

ELECTRICAL CONNECTION

Содержание AFG 351

Страница 1: ...IRONMENT PAGE 9 PRECAUTIONS AND GENERAL RECOMMENDATIONS PAGE 9 HOW TO OPERATE THE FREEZER PAGE 11 HOW TO DEFROST AND CLEAN THE FREEZER PAGE 13 CARE AND MAINTENANCE PAGE 13 TROUBLE SHOOTING GUIDE PAGE 14 CUSTOMER SERVICE PAGE 14 INSTALLATION PAGE 14 ELECTRICAL CONNECTION PAGE 15 ...

Страница 2: ...r FCs refrigerant circuit contains R600a Isobutane For more details refer to the rating plate fitted on the appliance Use the freezer only for storing frozen foods freezing fresh food and producing ice cubes Do not cover or close the vents of the freezer Do not store glass containers with liquids in the freezer since they may burst Do not eat ice cubes or ice lollies immediately after removing the...

Страница 3: ...lation consult the enclosed product chart Note Internal freezer temperatures are affected by room temperature frequency of opening of the door and the position of the freezer The thermostat setting must be changed depending on these factors Activation of rapid freezing The quantity in kilos of fresh food that can be frozen within 24 hours is indicated on the appliance rating plate For optimal free...

Страница 4: ...ing Defrosted or partially defrosted food must be consumed immediately Do not refreeze food unless you intend preparing individual servings Once cooked the defrosted food can be frozen again Freezing and storing food Place the food to be frozen in the freezer compartments Ice packs if present must be placed in the space provided see enclosed product card Important For information regarding periods...

Страница 5: ...e on the pack Always follow the instructions on the package regarding storage of frozen foods Removal of the drawers Pull the drawer outwards as far as it will go left slightly and extract it Note The freezer can also be used without the drawers in order to obtain greater volume Check that the load does not exceed the limitations indicated Making ice cubes Fill the ice cube tray 2 3 full of water ...

Страница 6: ... in a thermal bag Leave the freezer door open to allow the frost to melt Pull out the defrost water drain and place a tray below it Clean the inside of the freezer using a sponge soaked in a solution of warm water and neutral detergent Do not use abrasive substances Rinse and dry carefully Fit the drain back in place Place the foods inside Close the freezer door Plug in the appliance again Start u...

Страница 7: ...door opening can be changed if this operation is performed by Customer Service it is not covered by the warranty Install the freezer away from heat sources Installation in a hot environment direct exposure to the sun rays or placing the appliance near heat sources radiators cookers must be avoided as this increases power consumption If this is not possible the minimum distances must be respected 3...

Страница 8: ...e shock hazard should it be inserted into a 13A socket elsewhere A suitable alternative plug should then be fitted to the cable The wires in the mains lead are coloured in accordance with the following code BLUE NEUTRAL N BROWN LIVE L GREEN AND YELLOW EARTH E 1 The GREEN AND YELLOW wire must be connected to the terminal in the plug which is marked with the letter E or by the Earth symbol 4 or colo...

Отзывы: