background image

10

Starting Your Air Conditioner

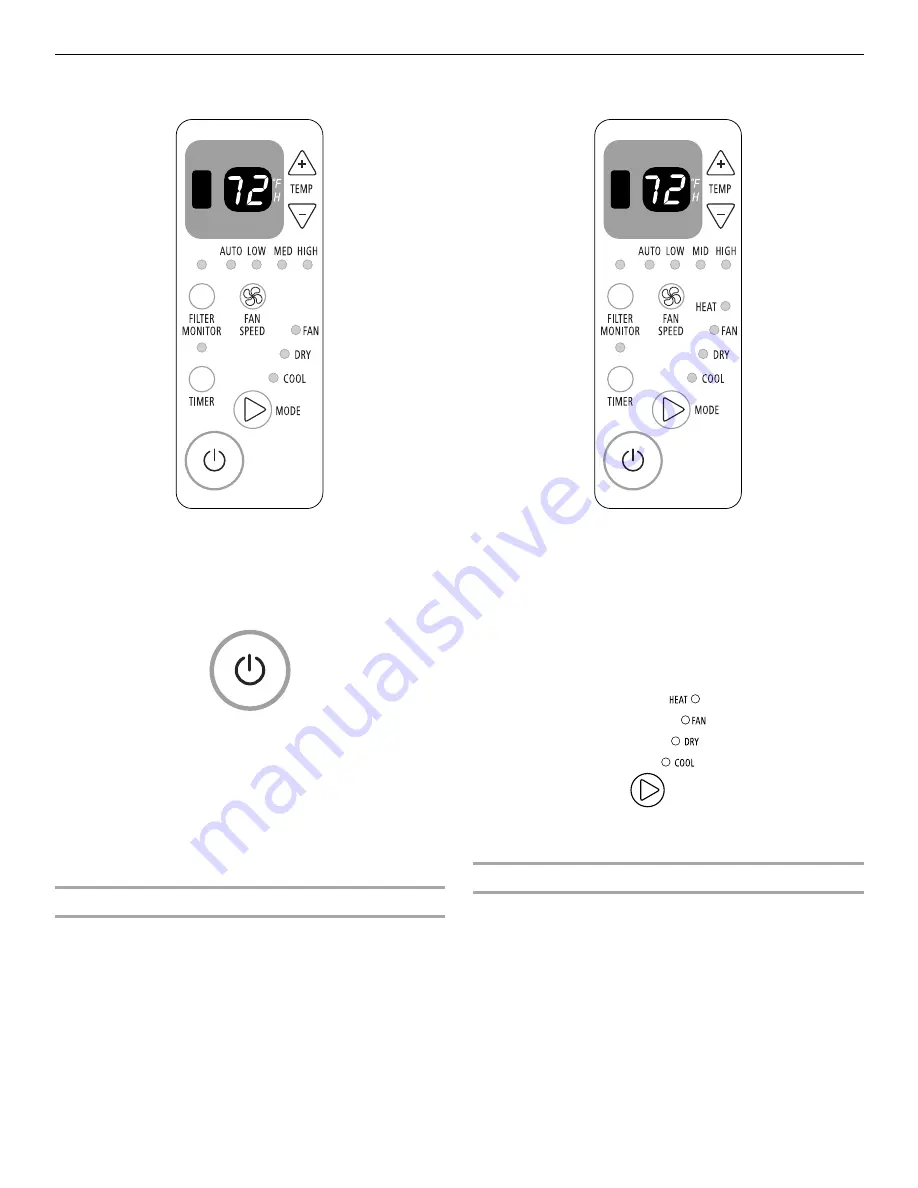
Cool Only Models

Heat/Cool Models

NOTE: When the air conditioner is set to Fan mode and the room 
temperature is below 32ºF (0ºC), the display will show LO. If the 
room temperature is above 99ºF (37ºC), the display will show HI.

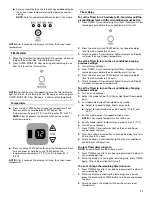
1. Remove the clear protective film from the front panel badge.

2. Press the power button to turn on the air conditioner.

NOTE: When the air conditioner is turned on for the first time 
after it is plugged in, the display will show the current room 
temperature and will run in the 6

th

 Sense

 System control. 

When the air conditioner is turned on at all other times, the 
display will show the previous settings for 5 seconds, and 
then show the current room temperature.

3. Select mode. See “Mode.”

4. Select fan speed. See “Fan Speed.”

5. Set temperature. See “Temperature.”

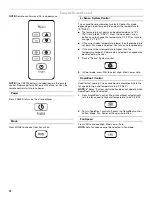
Mode

1. Press MODE until you see the indicator light glow for the 

desired setting.

2. Choose Cool, Dry, Fan or Heat (Heat/Cool models only).

Cool—Cools the room. Press FAN SPEED to select High, 
Med, Low or Auto. Press the plus or minus TEMP button 
to adjust the temperature.

Dry—Dries the room. The air conditioner automatically 
selects the temperature. Fan runs on Low speed only.

NOTE: Dry mode should not be used to cool the room.

Fan—Only the fan runs. Press FAN SPEED to select High, 
Med or Low. The display shows the current room 
temperature.

Heat (Heat/Cool models only)—Heats the room. Press 
FAN SPEED to select High, Med, Low or Auto. Press the 
plus or minus TEMP buttons to adjust the temperature.

NOTE: After 5 seconds, the display will show the current room 
temperature.

Fan Speed

NOTE: The Fan Speed button will operate only when the Cool, 
Fan or Heat mode (on some models) is selected.

1. Press FAN SPEED until you see the indicator light glow for 

the desired setting. 

2. Choose High, Med, Low or Auto.

Highfor maximum cooling 

Medfor normal cooling

Lowfor sleeping comfort

Содержание ACQ088PV

Страница 1: ... AIRE PARA HABITACIÓN Manualdeusoycuidado Si tiene preguntas respecto a las características funcionamiento rendimiento partes o servicio técnico llame al 1 877 465 3566 o visite nuestro sito de internet en www whirlpool com CLIMATISEUR DEPIÈCE Guided utilisationetd entretien Au Canada pour assistance installation ou service composez le 1 800 360 2742 ou visitez notre site web à www whirlpool com T...

Страница 2: ...condicionador de aire 23 Complete la instalación 24 USO DE SU ACONDICIONADOR DE AIRE 25 Cómo poner en marcha su acondicionador de aire 25 Cómo usar el control remoto 27 Cómo cambiar la dirección del aire 29 Ducto de escape de aire 30 Sonidos normales 30 CÓMO CUIDAR SU ACONDICIONADOR DE AIRE 30 Limpieza del filtro de aire 30 Limpieza del panel delantero 30 Reparación de la pintura dañada 30 Manteni...

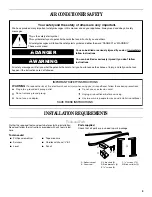
Страница 3: ...ppliance Always read and obey all safety messages This is the safety alert symbol This symbol alerts you to potential hazards that can kill or hurt you and others All safety messages will follow the safety alert symbol and either the word DANGER or WARNING These words mean follow instructions instructions DANGER WARNING IMPORTANT SAFETY INSTRUCTIONS WARNING To reduce the risk of fire electrical sh...

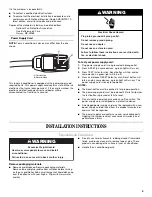
Страница 4: ...ings for your air conditioner are listed on the model and serial number label The model and serial number label is located on the right hand side of the air conditioner cabinet Specific electrical requirements are listed in the chart below Follow the requirements for the type of plug on the power supply cord Recommended Grounding Method This air conditioner must be grounded This air conditioner is...

Страница 5: ... power supply cord must be replaced if it fails to trip when the test button is pressed or fails to reset Do not use the power supply cord as an off on switch The power supply cord is designed as a protective device A damaged power supply cord must be replaced with a new power supply cord obtained from the product manufacturer and must not be repaired The power supply cord contains no user service...

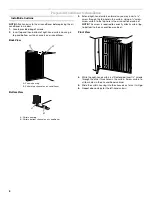
Страница 6: ...curtain Using a screw screw curtain to the top hole in the air conditioner cabinet NOTE This screw is required to correctly attach curtain top to bottom to the air conditioner cabinet Front View 4 While the right hand curtain is still extended insert screws through the other three holes in the curtain Screw curtain to all four holes in the air conditioner cabinet 5 Slide the curtain housing into t...

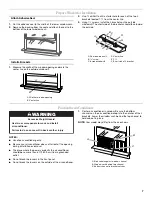
Страница 7: ...ion or removal The place where the power cord exits the air conditioner should be no more than 6 ft 182 9 cm from a grounded outlet Do not block the louvers in the front panel Do not block the louvers on the outside of the air conditioner 1 Center air conditioner in window Be sure the bottom channels on the air conditioner drop into the notches of the L brackets Lower the window sash behind the to...

Страница 8: ...Window 1 Pull the left hand curtain out until it fits into the window channel 2 Use drill bit to drill a starter hole through the hole in the side curtain and window sash 3 Insert one of the screws through the left hand curtain and into the window sash 4 Repeat for the right hand curtain Window Sash View 5 Drill a starter hole through the notch in the side curtain and the windowsill 6 Insert one o...

Страница 9: ...f you turn off the air conditioner wait at least 3 minutes before turning it back on This prevents the air conditioner from blowing a fuse or tripping a circuit breaker Do not try to operate your air conditioner in the Cool mode when outside temperature is below 65 F 18 C The inside evaporator coil will freeze up and the air conditioner will not operate properly NOTE In the event of a power failur...

Страница 10: ...you see the indicator light glow for the desired setting 2 Choose Cool Dry Fan or Heat Heat Cool models only Cool Cools the room Press FAN SPEED to select High Med Low or Auto Press the plus or minus TEMP button to adjust the temperature Dry Dries the room The air conditioner automatically selects the temperature Fan runs on Low speed only NOTE Dry mode should not be used to cool the room Fan Only...

Страница 11: ...show the current room temperature To set the Timer to turn on the air conditioner keeping previous settings 1 Turn off air conditioner 2 Press TIMER Timer indicator light will flash Display will show remaining hours before the air conditioner will turn on 3 Press the plus or minus TEMP button to change the delay time from 30 minutes to 24 hours 4 After 5 seconds Timer indicator light will remain o...

Страница 12: ...emperature is lower than the temperature set point Dry mode is selected Fan runs on Auto speed only If the current room temperature is higher than the temperature set point Cool mode is selected Fan speed may be selected by the user 1 Press 6th Sense System control 2 In Cool mode press FAN to select High Med Low or Auto RapidCool Control Used for fast cooling The air conditioner automatically sets...

Страница 13: ...ator light on the air conditioner control panel will remain on To set Timer to turn on air conditioner keeping previous settings 1 Turn off the air conditioner 2 Press TIMER Timer indicator light on the air conditioner control panel will flash 3 Press up or down arrow button to change the delay time from 30 minutes to 24 hours 4 After 5 seconds Timer indicator light on the air conditioner control ...

Страница 14: ...n tells you how to clean and care for your air conditioner properly Call your local authorized dealer for an annual checkup Remember the cost of this service call is your responsibility CleaningtheAirFilter The air filter is removable for easy cleaning A clean filter helps remove dust lint and other particles from the air and is important for best cooling and operating efficiency Check the filter ...

Страница 15: ...l turn on to resume operation Electrical overloading overheating cord pinching or aging can trip Reset button will pop out the power supply cord After correcting the problem press and release RESET listen for click Reset button will latch and on some devices a green light will turn on to resume operation NOTE A damaged power supply cord must be replaced with a new power supply cord obtained from t...

Страница 16: ...iance you need to know your complete model number and serial number You can find this information on the model and serial number label See Electrical Requirements for the location of the model and serial number label Please record the model and serial number information below Also record the purchase date of your appliance and the store s name address and telephone number Model Number_____________...

Страница 17: ...17 Notes ...

Страница 18: ...ADVERTENCIA PELIGRO Este es el símbolo de advertencia de seguridad Este símbolo le llama la atención sobre peligros potenciales que pueden ocasionar la muerte o una lesión a usted y a los demás Todos los mensajes de seguridad irán a continuación del símbolo de advertencia de seguridad y de la palabra PELIGRO o ADVERTENCIA Estas palabras significan INSTRUCCIONES IMPORTANTES DE SEGURIDAD ADVERTENCIA...

Страница 19: ... aire NOTA No use un cable eléctrico de extensión Libertad de movimiento del aire en la habitación que desea enfriar Una abertura con la amplitud suficiente para el acondicionador de aire Se incluyen piezas de instalación para ventanas de guillotina Soporte adecuado en la pared para el peso del acondicionador de aire El acondicionador de aire pesa de 88 lbs a 100 lbs 40 kg a 45 kg NOTA No deben ob...

Страница 20: ...cionador de aire para habitación está equipado con un cable de suministro de energía según lo exige UL Este cable de suministro de energía incluye circuitos electrónicos de última generación que detectan la fuga de corriente Si se aplasta el cable el elemento electrónico detecta la fuga de corriente y la energía se desconecta en una fracción de segundo Para poner a prueba el cable de suministro de...

Страница 21: ...inflamables o productos de limpieza abrasivos para eliminar los restos de cinta o goma Estos productos pueden dañar la superficie de su acondicionador de aire Trate el acondicionador de aire con cuidado Prepareelacondicionadordeaireparalainstalación Instalación de las cortinas laterales NOTA Sujete las cortinas al acondicionador de aire antes de colocar la unidad en la ventana 1 Ubique la bolsa pr...

Страница 22: ...el sello a la parte inferior del marco más bajo de la ventana Instalación de los soportes en L 1 Mida el ancho de la abertura de la ventana y marque la línea central en el umbral exterior de la ventana 2 Use una broca de para taladrar un orificio guía para cada uno de los dos soportes en L ubicados a 7 de la línea central 3 Usando tornillos de instale los soportes en L en la parte exterior del umb...

Страница 23: ...l soporte lateral a la carcasa del acondicionador del aire 4 Use una broca de para taladrar un orificio guía a través de los orificios del soporte lateral y del umbral de la ventana 5 Usando dos tornillos de fije el soporte lateral al umbral de la ventana 6 Repita el lado izquierdo del acondicionador soporte lateral en el lado izquierdo del acondicionador de aire Encaje las cortinas laterales a la...

Страница 24: ... ranura superior 3 Sujete el canal superior al marco de la ventana con un tornillo de para asegurar la ventana en su lugar 4 Conecte a un contacto de pared de conexión a tierra de 3 terminales 5 Presione RESET Reposición en el cable de suministro de energía Vea Requisitos eléctricos A Marco de la ventana B Orificio en la cortina lateral C Tornillo de A B C A Tornillo de B Muesca de la cortina late...

Страница 25: ...ansparente de la placa del panel frontal 2 Oprima el botón de encendido para encender el acondicionador de aire NOTA Cuando el acondicionador de aire se encienda por primera vez después de haberlo conectado la pantalla mostrará la temperatura actual de la habitación y pondrá a funcionar el control del sistema 6th Sense Cuando el acondicionador de aire se encienda todas las otras veces la pantalla ...

Страница 26: ... actual de la habitación Monitor del filtro 1 Cuando la luz indicadora Filter filtro se encienda o destelle saque limpie y vuelva a colocar el filtro de aire Vea Limpieza del filtro de aire 2 Presione FILTER MONITOR Monitor del filtro después de limpiar y volver a colocar el filtro de aire Esto vuelve a fijar el monitor del filtro NOTA Después de que el ventilador funcione por 360 horas la luz ind...

Страница 27: ...regule la temperatura hacia arriba o hacia abajo en intervalos de 4ºF 2ºC 6 Apague el acondicionador de aire 7 Oprima TIMER Temporizador La luz del indicador se encenderá intermitentemente en el panel de control del acondicionador de aire 8 Oprima el botón con las flechas hacia arriba o hacia abajo para cambiar el tiempo de retardo de 30 minutos a 24 horas 9 Después de 5 segundos La luz del indica...

Страница 28: ...lador Auto Automática no puede seleccionarse en el modo de Fan Ventilador Control de Sleep Dormir NOTAS Si la temperatura ambiente actual es de 80ºF 26ºC o mayor la temperatura de ajuste no cambiará cuando se active el control de Sleep Dormir Si la temperatura ambiente actual es menor de 80ºF 26ºC la temperatura de ajuste se incrementará automáticamente en intervalos de 2ºF 1ºC durante las 2 prime...

Страница 29: ...or ajuste la velocidad del ventilador a High Alta Med Media o Low Baja NOTA En el modo de Fan Ventilador no se puede ajustar la temperatura 5 Para el modo del control del sistema 6th Sense ajuste la velocidad del ventilador a High Alta Med Media Low Baja o Auto Automática 6 Para los modos del control del sistema 6th Sense y Dry Seco regule la temperatura hacia arriba o hacia abajo en intervalos de...

Страница 30: ...a una limpieza fácil Un filtro limpio ayuda a quitar el polvo las pelusas y otras partículas del aire y es importante para que el aparato enfríe más eficientemente Revise el filtro cada dos semanas para ver si necesita limpieza NOTA No haga funcionar el acondicionador de aire si el filtro no está colocado en su lugar 1 Apague el acondicionador de aire 2 Quite el filtro de aire deslizándolo desde c...

Страница 31: ...hacer que se dispare el botón de reposición salta el cable de suministro de energía Luego de corregir el problema presione y libere RESET Reposición escuche el chasquido el botón de reposición queda asegurado y en algunos aparatos se encenderá una luz verde para reanudar el funcionamiento NOTA Un cable de suministro de energía dañado debe ser reemplazado por un nuevo cable de suministro de energía...

Страница 32: ...mpleto del modelo y de la serie de su electrodoméstico Esta información nos ayudará a atender mejor a su pedido Si necesita piezas de repuesto Si necesita pedir piezas de repuesto recomendamos que use únicamente piezas de repuesto especificadas de fábrica Estas piezas encajarán bien y funcionarán bien ya que están confeccionadas con la misma precisión empleada en la fabricación de cada electrodomé...

Страница 33: ... de sécurité et de vous y conformer AVERTISSEMENT DANGER Voici le symbole d alerte de sécurité Ce symbole d alerte de sécurité vous signale les dangers potentiels de décès et de blessures graves à vous et à d autres Tous les messages de sécurité suivront le symbole d alerte de sécurité et le mot DANGER ou AVERTISSEMENT Ces mots signifient IMPORTANTES INSTRUCTIONS DE SÉCURITÉ AVERTISSEMENT Pour réd...

Страница 34: ...limentation du climatiseur REMARQUE Ne pas utiliser un câble de rallonge Une circulation libre de l air dans la pièce à refroidir Une ouverture de taille suffisante pour le climatiseur Les pièces d installation sont fournies pour les fenêtres à guillotine double Un support mural adéquat pour le poids du climatiseur Le poids du climatiseur est de 88 lb à 100 lb 40 kg à 45 kg REMARQUE Veiller à ne p...

Страница 35: ... d un cordon d alimentation conforme aux exigences de UL Ce cordon d alimentation comporte des circuits électroniques d avant garde détectant les courants de fuite En cas d écrasement du cordon d alimentation les circuits électroniques détectent les courants de fuite et l alimentation est interrompue en une fraction de seconde Pour tester le cordon d alimentation 1 Brancher le cordon d alimentatio...

Страница 36: ...utiliser d instruments coupants d alcool à friction de liquides inflammables ou de nettoyants abrasifs pour enlever le ruban adhésif ou la colle Ces produits peuvent endommager la surface de votre climatiseur Manipuler le climatiseur délicatement Préparerleclimatiseurpourl installation Installation des rideaux latéraux REMARQUE Fixer les rideaux au climatiseur avant d installer l appareil dans la ...

Страница 37: ...nlever l endos du joint apposer le joint en bas du châssis de fenêtre inférieur Fixation des brides en L 1 Mesurer la largeur de l ouverture de la fenêtre et marquer la position de l axe central sur le seuil du châssis extérieur 2 Utiliser un foret de pour percer un avant trou pour chacune des deux brides en L à 7 de l axe central 3 Fixer chaque bride en L sur le seuil du châssis extérieur avec de...

Страница 38: ...aisse du climatiseur 4 Utiliser un foret de pour percer un avant trou à travers le trou dans la bride latérale et le seuil du châssis 5 Utiliser deux vis de pour fixer la bride latérale sur le seuil du châssis 6 Répéter pour l installation de la bride latérale sur le côté gauche du climatiseur Fixer les rideaux latéraux sur la fenêtre 1 Tirer sur le rideau gauche vers l extérieur jusqu à ce qu il ...

Страница 39: ...seuil du châssis avec l une des vis de pour bien maintenir la fenêtre en place 4 Brancher sur une prise à 3 alvéoles reliée à la terre 5 Appuyer sur RESET réinitialisation sur la prise du cordon d alimentation Voir Spécifications électriques A Châssis de fenêtre B Avant trou à travers le trou dans le rideau latéral C Vis de A B C A Vis de B Encoche sur le rideau latéral C Seuil du châssis A B C A ...

Страница 40: ...nt du tableau de commande et la plaque du panneau avant 2 Appuyer sur le bouton d alimentation pour mettre le climatiseur en marche REMARQUE Lorsqu on met le climatiseur en marche pour la première fois après l avoir branché celui ci affichera la température actuelle de la pièce et fonctionnera au système de commande 6th Sense lorsqu on le met en marche à tout autre moment il affichera les réglages...

Страница 41: ...lumé enlever nettoyer et remplacer le filtre à air Voir Nettoyage du filtre à air 2 Appuyer sans relâche sur FILTER MONITOR pendant 3 secondes après avoir nettoyé ou remplacé le filtre à air Cette manœuvre réinitialise l état du filtre REMARQUE Après 360 heures de fonctionnement du ventilateur le témoin lumineux du filtre monitor s allume et ceci pendant 180 heures ou jusqu à ce que FILTER MONITOR...

Страница 42: ...fficheur indiquera le temps qui reste 2 Alors que le temps qui reste est affiché appuyer de nouveau sur TIMER Le témoin indicateur s éteindra Pour voir le temps qui reste en heures ou le modifier 1 Appuyer sur TIMER après que la minuterie a été programmée L afficheur indiquera le temps qui reste 2 Au bout de 5 secondes l affichage indique la température actuelle de la pièce Utilisationdelatélécomm...

Страница 43: ...eau sur SLEEP veille ou attendre l arrêt automatique du climatiseur après 8 heures REMARQUE Après la désactivation du mode de fonctionnement nocturne le climatiseur retrouve le paramétrage antérieur Température Appuyer sur le bouton à flèche vers le haut pour augmenter la température Chaque fois que l on appuie sur le bouton à flèche haut la température augmente de 2ºF 1 C jusqu à ce qu elle attei...

Страница 44: ...u de TEMP lorsque le temps restant est indiqué sur l afficheur 3 Au bout de 5 secondes l affichage indique la température actuelle de la pièce Changementdedirectiondel air Tourner la roue pour diriger l air vers la gauche ou vers la droite Tourner toute la cartouche pour diriger l air vers le haut vers le bas ou directement à l avant Ventilation Tirer la commande de ventilation pour ouvrir les éve...

Страница 45: ...ésente un problème Le cas échéant faites des retouches avec une peinture émail de bonne qualité Entretienannuel Votre climatiseur nécessite un entretien annuel pour aider à assurer un rendement maximal toute l année Contacter votre marchand local autorisé pour fixer un examen annuel Le coût de l examen annuel est à votre charge DÉPANNAGE Avant de faire un appel de service essayez les suggestions c...

Страница 46: ...pièce à refroidir Manœuvres d arrêt et de mise en marche du climatiseur trop fréquentes le climatiseur ne refroidit réchauffe pas la pièce au mode refroidissement chauffage La taille du climatiseur n est pas appropriée à la pièce Vérifier la capacité de refroidissement du climatiseur de la pièce Les climatiseurs pour une seule pièce ne sont pas conçus pour refroidir plusieurs pièces Le filtre est ...

Страница 47: ...__ Numéro de téléphone du magasin _______________________________ Conservez ce manuel et votre reçu de vente ensemble pour consultation ultérieure AuxÉtats Unis Téléphoner au Service à la clientèle sans frais d interurbain au 1 877 465 3566 ou visitez notre site web à www whirlpool com Nos consultants sont prêts à vous aider pour les questions suivantes Caractéristiques et spécifications sur toute...

Страница 48: ...ured under license by Hisense U S A Inc Suwanee Georgia Marca registrada TM Marca de comercio de Whirlpool U S A Fabricado bajo licencia por Hisense U S A Inc Suwanee Georgia Marque déposée TM Marque de commerce de Whirlpool U S A Fabriqué sous licence par Hisense U S A Inc Suwanee Géorgie 11 07 Printed in China Impreso en China Imprimé en Chine ...

Отзывы: