background image

Содержание ACC602

Страница 1: ...T 1 01 3 Installation hiLtions and UseMareGuide Control panel r I Control panel Model and serial number Model and serkl number plate behlndfrontpanel AIRCONDITIONERS Models ACS602 ACS802 ACSlOP ACC602 a ...

Страница 2: ...ndi ioner follow these basic precautions 1Read ail instructions i ore using your air conditioner 1Complete the installation requirements as described in the instaliatlon Instructions Never allow chlidren to operate or piay with the air conditioner Do Not operate the alr conditioner with tbs front panel removed 1Never clean air conditioner parts with flammable fluids The fumes can create a fire haz...

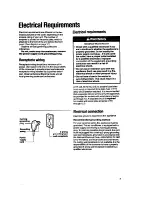
Страница 3: ...sult In a risk of eiectrlcai shock l Do not use an extension cord with this appliance Such use may resuit In a fire eiectrlcai shock or other personal Iniuw l Do not have a fuse in the neutral or grounding circuit This could result In a risk of eiectrlcai shock A 115volt 60 Hz AC only 15ampere fused elec trical supply is required time delay fuse or time delay circuit breaker required It is recomme...

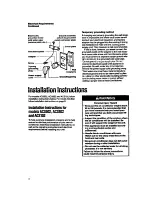
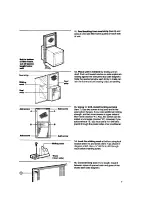
Страница 4: ...ulating corlneC tors including water meter or pump wfthout adding a jumper wire at these connections For models ACS602 ACS802 and ACSlOP follow installation instructions below For model ACC802 follow installation instructions on page 8 Installation Instructions for modelsACS602 ACM02 andACSIM Tohelp avoid any installation problems and to help assure trouble free perfomtance of your new air conditi...

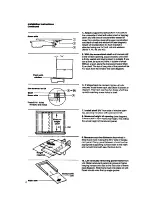
Страница 5: ... air to flow freely and directly into the room s you want cooled Remember it s difficult to move air around corners If the inner sliding window slides to the left the unit will be installed on the right Remove window screen if there is one Choose a sliding window that s also near an electrical outlet Refer to Electrical Requirements on page 3 for type of receptacle and wiring needed Do not use an ...

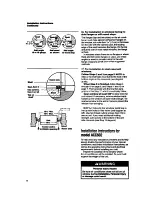
Страница 6: ...e of the panel will be s back from the window line see diagram 5 If slope back is correct tighten all nuts securely Install lower track seal Item 9 shown in diagram This track seal has two holes which line up with matching screw holes in shelf 7 install shelf 2 from side of window open ing securing it in place with screws 6 or 8A 8 Measure height of opening see diagram Subtract 20 from measured he...

Страница 7: ...all locking screws Item 7 Use two screws in top jamb and in the side bottom flanges If you need additional holding strength add two more screws at upper sides of filler frame marked A Also two screws can be added at unit sides marked 6 However if you add screws at 6 you must use a I drill bit to predrill through the plastic sides of air conditioner 14 Lock the sliding sash at bottom using lock bra...

Страница 8: ...teps 11and 12on page 7 Then proceed with the final two para graphs in this Step 17 which immediately follow Open wlndow at least 18 p to allow room for unit cabinet If necessary remove window crank handle so the window will open wide enough Tii opened window to the wall or frame to prevent the window from swinging Drill Vu holes in the window jamb top to line up with holes in filler frame see diag...

Страница 9: ... long math screw 3 Bottom mounting bracket 4 Knurled knob screw 5 Top mounting bracket NOTE Above parts not shipped loose installed on unit by factory 2 Pick the correct window First decide what room s you want to cool Then choose a window that will allow the air conditioned air to flow frwfy and directly into the room s you want cooled Remember its diiicult to move air around comers Choose a wind...

Страница 10: ...Tighten the bottom screws Item 2 This will pull the unit mounting flange tightly to the window frame sealing and locking the air conditioner in place 8 Loosen the two knurled knob screws and slide the top mounting bracket Item 5 toward the outside of the unit engaging the window frame Tighten the knurled knob screw in this position This will lock the unit in place so it cannot tftt into the room T...

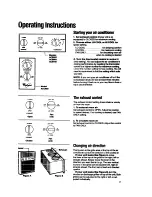
Страница 11: ...a fuse or trip a circuit breaker Theexhaust control The exhaust control setting draws stale or smoky air from the room 1 To exhaust room alr Set exhaust control to OPEN Adjust fan control to speed desired If no cooling is desired use FAN ONLY setting 2 To circulate room alr Set exhaust control to CLOSED Adjust fan control to FAN ONLY Changing airdirection The louvers in the grille area at the top ...

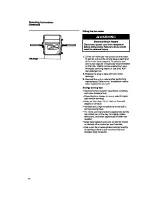
Страница 12: ... Press down at top edge of the front as shown in diagrams at left depending on your model 2 When the front moves away from top of cabinet pull top of front toward you 3 Lift up and away from the bottom spring clips 4 Clean front panel with warm water and mild soap or detergent Use a soft cloth Rinse and dry Replace front panel 5 Wipe control panel clean with a soft dry cloth Cleaning air condition...

Страница 13: ... reinstall your unlt and that yoUbothll 9propMllftlngbChfIlq l Handb the alr condmmrwtthcare Watchoutforthesharpmetalflnsonthe front and reer colb l Donotu6ethecolbctedwaferfordrlnklng purposea ft Is not sanltafy Fallure to follow the above precmutlona couldmsultInebcWcal or Ww 1 Disconnect power supply 2 Remove unit from cabinet Wrap the motor electrical control box and electrical terminals boxin...

Страница 14: ...ming maintenance Refer to the Installation instruc tions section for your unit Energy saving tips l Improve home insulation seal doors windows and close fireplace flue l Close blinds or drapes on sunny side of house add window awnings l Keep air filter clean Don t block air flow with drapes or furniture l Ventilate attic high temperature levels add to normal cooling load l Try not to use heat prod...

Страница 15: ...in your area 3 if you need service vkf 01 l9 workof Whi Whirtpoolhasanationwide ssnriceannpaniw3 whirlpool KRVICE servicetechniciansar9batned tofllHilltheprodlGt and provide after warranty servtce anywhere in the united States To locate the authorized Whfdpool m con pany in your area call our COOL LINE0 m as t ante telephone number see Step 2 or bok In your telephone directory Yellow Pages under S...

Страница 16: ... Whirlpool D The removal and reinstallation of the air conditioner if it is installed in an overhead or other ineccessible location or not installed in accordance with published installation instructions Bewke under the full warranties must be provided by an authorized Whirfpoolsuservice company WHIRLPOOL CORPORATION SHALL NOT BE LIABLE FOR INCIDENTAL OR CONSEQUENTIAL DAMAGES Some states do not al...

Отзывы: