background image

Содержание 8205144

Страница 1: ... Wall 8 Attach Mounting Plate to Wall 9 Prepare Upper Cabinet 9 Install Damper Assembly 10 Install the Microwave Oven 10 Complete Installation 12 ASSISTAN CE 12 Replacement PaRs 12 Accessories 12 SECURITE DE L ENSEMBLE FOUR MICRO ONDES HOTTE 13 SPECIFICATIONS CONCEPTION DU CIRCUIT D EVACUATION 13 EXIGENCES D INSTALLATION 15 Outillage et pi_ces 15 Exigences d emplacement 15 Dimensions du produit 16...

Страница 2: ...ith microwave hood We do not recommend using a flexible metal vent To avoid possible product damage be sure to vent air outside unless using ventless recirculating installation Do not vent exhaust air into concealed spaces such as spaces within walls or ceilings attics crawl spaces or garages For optimal venting installation we recommend using roof or wall caps that have back draft dampers using a...

Страница 3: ...mper from sticking INSTALLATION REQUIREMENTS E F G A Rectangular to round transition piece 3 _ x 10 to 6 5 ft 8 3 x 25 4 cm to 5 2 cm 1 5 rn B Roof cap 3 x 10 24 ft 8 3 x 25 4 cm 7 3 m C 90 elbow 3 _ x 10 25 ft 8 3 x 25 4 cm 7 6 m D 90 elbow 6 0 ft 15 2 cm 3 rn E Wall cap 3 x 10 40 ft 8 3 x 25 4 cm 2 2rn F 45 elbow 6 5 ft 15 2 cm 1 5 rn G 90 flat elbow 3 x 10 10 ft 8 3 x 25 4 cm 3 m Recommended Ve...

Страница 4: ...e microwave oven and upper cabinet Grounded electrical outlet inside upper cabinet See Electrical Requirements section NOTES T If installing the microwave oven near a left sidewall make sure there is at least 6 15 2 cm of clearance between the wall and the microwave oven so that the door can open fully 161 4 Some cabinet and building materials are not designed to 41 3cml withstand the heat produce...

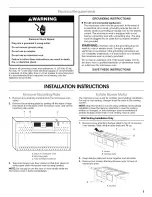
Страница 5: ...e an extension cord If the power supply cord is too short have a qualified electrician or serviceman install an outlet near the microwave oven SAVE THESE INSTRUCTIONS INSTALLATIONINSTRUCTIONS I 2 Remove any remaining contents from the microwave oven cavity Remove the mounting plate by peeling off the strips of tape that attach it to the back of the microwave oven and set the mounting plate aside A...

Страница 6: ...tive slots in the microwave oven _ Imm A BC D E A Damper plate B Tabs at back of damper plate C Slots in back of microwave oven exterior D Damper plate tabs E Slots in top of microwave oven exterior 9 Secure damper plate with screw A Exhaust port IMPORTANT If blower motor is not positioned with flat sides facing the back of the microwave oven as shown performance will be poor 6 Reattach blower mot...

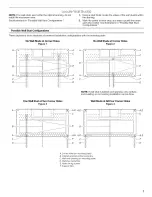
Страница 7: ... _ E i J J o o o o o o o o o o o o o o o o o o o o o A o o o o o o o o o o o o o o o o F I B _ i D i i i I li NOTE If wall stud is behind vent opening only ventless recirculating or roof venting installation can be done One Wall Stud at Two Corner Holes Figure 3 Wall Studs at All Four Corner Holes Figure 4 v i I A o f o i A E A E _ B II II i o o o o o o o o _ o o o o o o oo i ooOoOot o O ooooooooo...

Страница 8: ...m the mark made in Step 6 and mark 9 Using a straightedge draw the 2 horizontal level lines through the marks made in steps 6 and 8 10 Draw the 2 vertical plumb lines down from the marks made in Step 7 to complete the 12 x 4 30 5 x 10 2 cm rectangle This is the venting cutout area 11 Cut a 3 4 19 mm hole in one corner of the cutout area 12 Using a keyhole saw cut out the venting cutout area In add...

Страница 9: ...at Two Corner Holes in the Drill Holes in Rear Wall section 2 Start toggle nuts on the bolts from the back of the mounting plate Leave enough space for the toggle nut to go through the wall and to open 3 Position mounting plate on the wall making sure that the top of the mounting plate is aligned with the front edge of the upper cabinet 4 Push the 2 bolts with toggle nuts through the drywall and f...

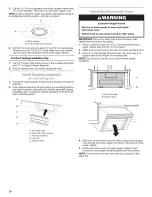
Страница 10: ... damper assembly must be to left side of mounting plate A A Mounting plate B Mounting plate opening C Damper assembly D Long tab E Damper blade sto tse Mic eve Oven Excessive Weight Hazard Use two or more people to move and install microwave oven Failure to do so can result in back or other injury IMPORTANT The control side of the unit is the heavy side Handle the microwave oven gently 1 Place a w...

Страница 11: ...ter bolts are available at most hardware stores Overtightening bolts may warp the top of the microwave oven To avoid warping wood filler blocks may be added The blocks must be the same thickness as the space between the upper cabinet bottom and the microwave oven A n A Bolts For Roof Venting Installation Only 1 Insert damper assembly through the cabinet cutout so that the long tab of the damper as...

Страница 12: ... appropriate part number listed here Damper Assembly Part Number 8205558 Mounting Plate Part Number 8205400 Upper Cabinet Template Part Number 8205927 Mounting Screw Kit includes parts A F in Parts Supplied section Part Number 8205948 2 3 4 5 Plug microwave oven into grounded 3 prong outlet Reconnect power Check the operation of microwave oven by placing 1 cup 250 mL of water on the turntable and ...

Страница 13: ...eriorations du produit veiller ace que I air aspire soit decharge a I exterieur sauf dans le cas d une installation avec recyclage Veiller ace que I air aspire ne soit pas d6charge dans un espace ferme dissimule cavite dans une cloison au dessus du plafond grenier vide sanitaire ou garage Recommandations pour une installation optimale du circuit d _vacuation utiliser une bouche de decharge murale ...

Страница 14: ...ia 6 15 2 cm La Iongueur equivalente totale du circuit d evacuation ceci incluant les sections de conduit rectilignes coude s raccords de transition et bouche de decharge murale ou sur toit ne doit pas d_passer 140 pi 42 7 m quel que soit le type de conduit Les Iongueurs equivalentes des divers composants sont mentionnees au tableau Raccords standard recommandes Pour optimiser la performance ne pa...

Страница 15: ...Dimensions a respecter Iors de I installation Au moins un poteau de colombage en bois 2 x 4 50 8 x 101 6 mm et parement de pl tre ou panneau de gypse d _paisseur 3 8 9 5 mm ou plus dans I ouverture du placard Capacite de support de charge de 150 Ib 68 kg ceci incluant le four a micro ondes et les articles places a I interieur du four micro ondes et du placard mural Prise de courant electrique reli...

Страница 16: ...e par un circuit ind_pendant INSTRUCTIONS DE MISE LA TERRE Pour tout appareil menager connecte par un cordon de courant electrique II faut que le four micro ondes soit relie la terre En cas de court circuit electrique la liaison la terre reduit le risque de choc electrique car le courant electrique dispose d un itineraire direct d acheminement la terre Le four micro ondes est dote d un cordon de c...

Страница 17: ...utre Le four a micro ondes a ete configure a I usine pour une installation avec recyclage sans d charge a I exterieur Pour la decharge de Fair aspire a travers lemur ou a travers le toit on dolt modifier le systeme de ventilation du four REMARQUE Si le produit est destine a _tre utilise sans decharge a I ext ieur avec recyclage de Fair ne pas tenir compte de cette section Conserver le module du cl...

Страница 18: ...rient s vers le haut du four a micro ondes et que les c6tes plats du moteur du ventilateur soient orientes vers I arri_re du four a micro ondes Rabaisser le moteur du ventilateur dans le four a micro ondes A 6 Fixer nouveau le moteur du ventilateur a I arriere du four micro ondes avec 2 vis 6tees a I etape 3 de la section Pour une installation avec decharge murale seulement plus t6t dans cette sec...

Страница 19: ...igure 1 Aucun poteau du colombage la position des trous des angles Figure 2 i I o o o o o o L _ o o o o o o oo i i o e o e o o o o o e o _ d2 o o o o o o o o o _ D Deux trous des angles face un poteau du colombage mural Figure 3 REMARQUE Si le poteau du colombage se trouve derriere I ouverture de passage du conduit d evacuation on ne pourra utiliser que la configuration sans decharge I exterieur r...

Страница 20: ...ue de montage part Pour une installation avec d_charge murale seulement Axece _ Jt Fondd_cardeup_rieur t 4 10 2 cm 6 15 2 cm f 3 s 1cm 6 15 2 cm 6 Marquer un point sur I axe central a 3 8 1 cm au dessous de la rive inferieure du placard mural 7 Utiliser un m_tre ruban marquer un point a 6 15 2 cm de chaque c6te de I axe central 8 Marquer un point a 4 10 2 cm au dessous de la marque tracee a I etap...

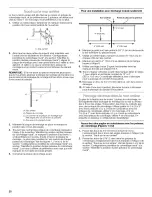
Страница 21: ..._ 3 Positionner la plaque de montage sur le mur veiller ace que le sommet de la plaque de montage soit aligne avec la rive avant du placard mural Pousser les 4 vis avec ecrou articule travers le panneau de gypse visser les visa la main pour verifier que chaque _crou articule s est deploye et prend appui contre le panneau de gypse C A Vis 1 4 20 x 3 B Plaque de montage C Panneau de gypse D crou art...

Страница 22: ...tion 6 A Placard m_tallique B Garniture du trou de passage du cordon d alimentation Percer des trous de 3 8 10 mm aux points D et E du gabarit Ces trous sont utilises pour le passage de deux vis t_te ronde 1 4 20 x 3 avec rondelle utilisees pour la fixation du four a micro ondes contre le placard mural Pour une installation avec d_charge I ext_rieur travers le toit seulement 7 Decouper un trou de ...

Страница 23: ...rer les vis travers le placard mural et dans le four a micro ondes Serrer les vis jusqu a ce qu il ne reste aucun espace entre le placard mural et le four a micro ondes REMARQUES Certaines configurations du placard mural necessitent I emploi de vis plus Iongues ou plus courtes que 3 7 6 cm Acheter les vis necessaires plus Iongues ou plus courtes dans une quincaillerie locale Un serrage excessif de...

Страница 24: ...causer un decca un incendie ou un choc electrique 2 Brancher le four a micro ondes sur une prise a trois alveoles reliee a la terre 3 Remettrele courant 4 Contr61er le fonctionnement du four a micro ondes placer sur le plateau rotatif 1 r_cipient contenant 250 mL d eau et programmer une periode de chauffage de 1 minute a la puissance maximale 100 Faire aussi fonctionner le ventilateur d extraction...

Отзывы: