background image

5

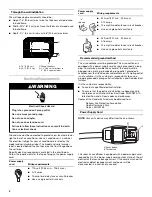
To test your power supply cord: 

1. Plug power supply cord into a grounded 3 prong outlet.

2. Press RESET.

3. Press TEST (listen for click; Reset button will trip and pop 

out).

4. Press and release RESET (listen for click; Reset button will 

latch and remain in). The power supply cord 


is ready for 

operation.

NOTES:

The Reset button must be pushed in for proper operation.

The power supply cord must be replaced if it fails to trip when 
the test button is pressed or fails to reset.

Do not use the power supply cord as an off/on switch. The 
power supply cord is designed as a protective device.

A damaged power supply cord must be replaced with a new 
power supply cord obtained from the product manufacturer 
and must not be repaired. 

The power supply cord contains no user serviceable parts. 
Opening the tamper-resistant case voids all warranty and 
performance claims.

INSTALLATION INSTRUCTIONS

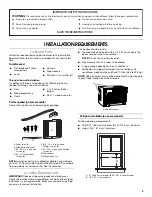
Unpacking

Remove packaging materials

Remove and properly dispose of packaging materials.  
Remove tape and glue residue from surfaces before turning 
on the air conditioner. Rub a small amount of liquid dish soap 
over the adhesive with your fingers. Wipe with warm water 
and dry.

Do not use sharp instruments, rubbing alcohol, flammable 
fluids, or abrasive cleaners to remove tape or glue. These 
products can damage the surface of your air conditioner. 

Handle air conditioner gently.  

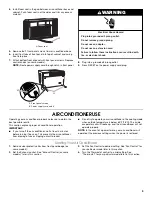
1. Remove air conditioner from carton and place on cardboard.

2. Remove shipping screw from side wall of cabinet.

3. Pull off control knobs (on some models).

4. Remove front panel from air conditioner and set aside.

5. Remove ground screw and ground wire from front of air 

conditioner base. Save ground screw.


6. Pull on handle to slide air conditioner out of cabinet. Place air 

conditioner on cardboard.

NOTE: Do not lift, push, pull or remove any expanded 
polystyrene (foam) from inside the air conditioner. It is not 
packing material.

Electrical Shock Hazard

Plug into a grounded 3 prong outlet.

Do not remove ground prong.

Do not use an adapter.

Do not use an extension cord.

Failure to follow these instructions can result in death, 
fire, or electrical shock.

WARNING

A. Shipping screw

WARNING

Excessive Weight Hazard

Use two or more people to move and install 
air conditioner.

Failure to do so can result in back or other injury.

A

A. Green ground wire
B. Ground screw

A. Handle

A

B

+

+

+

A

Содержание 1188080

Страница 1: ...s accessories or service call 1 800 253 1301 in the U S A ACONDICIONADOR DE AIRE ManualdeUsoyCuidado Si tiene preguntas respecto a las características funcionamiento rendimiento partes accesorios o servicio técnico llame al 1 800 253 1301 en los EE UU Table of Contents Índice 2 1188080A ...

Страница 2: ...R DE AIRE 23 Cómo poner en marcha su acondicionador de aire 23 Cómo cambiar la dirección del aire 24 Sonidos normales 24 CUIDADO DE SU ACONDICIONADOR DE AIRE 25 Limpieza del filtro de aire 25 Limpieza del panel delantero 25 Reparación de la pintura dañada 25 Mantenimiento anual 25 SOLUCIÓN DE PROBLEMAS 25 AYUDA O SERVICIO TÉCNICO 27 Accesorios 27 AIR CONDITIONER SAFETY You can be killed or serious...

Страница 3: ...ning for the air conditioner Adequate wall support for weight of air conditioner Air conditioner weighs between 80 and 110 lbs 36 3 to 49 9 kg NOTE Cabinet louvers must not be obstructed Air must be able to pass freely through the cabinet louvers Window installation on some models Window opening measurements Width 27 68 6 cm minimum to 40 101 6 cm maximum Height 16 41 3 cm minimum IMPORTANT SAFETY...

Страница 4: ... qualified electrical installer To assure that the electrical installation is adequate and in conformance with National Electrical Code ANSI NFPA 70 latest edition and all local codes and ordinances Copies of the standards listed may be obtained from National Fire Protection Association One Batterymarch Park Quincy MA 02269 Power Supply Cord NOTE Your unit s device may differ from the one shown Th...

Страница 5: ...mall amount of liquid dish soap over the adhesive with your fingers Wipe with warm water and dry Do not use sharp instruments rubbing alcohol flammable fluids or abrasive cleaners to remove tape or glue These products can damage the surface of your air conditioner Handle air conditioner gently 1 Remove air conditioner from carton and place on cardboard 2 Remove shipping screw from side wall of cab...

Страница 6: ...e right hand curtain is still extended insert 8 18 x pan head screws into the top and bottom slots of curtain Screw curtain to the top and bottom holes in air conditioner cabinet NOTE Some curtains may have 2 slots at each end You will be able to see a mounting hole through the correct slot 7 Slide curtain housing into guides as far as it will go 8 Repeat above steps for left hand curtain Through ...

Страница 7: ... cm from a grounded 3 prong outlet Do not block the louvers on the front panel Do not block the louvers on the outside of the air conditioner Window installation on some models 1 Center empty cabinet in window Check that lower rail of air conditioner cabinet is behind and against back side of windowsill Maintain a firm hold on the air conditioner cabinet Lower window sash to hold cabinet in place ...

Страница 8: ...the insulation to seal opening between cabinet and frame 5 Use existing holes and 6 8 x wood screws not provided to attach cabinet to frame NOTE Do not overtighten screws or cabinet will distort and provide a poor air seal between cabinet and air conditioner 6 Caulk all outside wall openings around cabinet CompleteInstallation NOTE Handle air conditioner gently 1 Make sure the free end of the grou...

Страница 9: ...ng a circuit breaker Do not try to operate your air conditioner in the cooling mode when outside temperature is below 65 F 18 C The inside evaporator coil will freeze up and the air conditioner will not operate properly NOTE In the event of a power failure your air conditioner will operate at the previous settings when the power is restored StartingYourAirConditioner 1 Remove clear protective film...

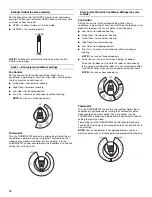
Страница 10: ...s Fan Control Set the Fan control to the desired setting When the air conditioner is operating at Low Cool High Cool Turbo Cool Low Heat or Turbo Heat the fan circulates air continuously Low Heat for reduced heating Turbo Heat for maximum heating Turbo Cool for maximum cooling High Cool for normal cooling Low Cool for sleeping comfort Fan Only to move air continuously without cooling or heating NO...

Страница 11: ...r conditioner without the filter in place 1 Turn off air conditioner 2 Using the indents in top of filter door pull door down Filter door is not removable 3 Slide air filter up and out to remove from the filter door 4 Use a vacuum cleaner to clean air filter If air filter is very dirty wash it in warm water with a mild detergent Do not wash air filter in the dishwasher or use any chemical cleaners...

Страница 12: ...efficiency Refer to the efficiency rating EER and capacity rating in BTU h marked on the air conditioner The air conditioner is in a heavily occupied room or heat producing appliances are in use in the room Use exhaust vent fans while cooking or bathing and try not to use heat producing appliances during the hottest part of the day A higher capacity air conditioner may be required depending on the...

Страница 13: ...ndence Please record your model s information Whenever you call to request service on your appliance you need to know your complete model number and serial number You can find this information on the model and serial number label See Electrical Requirements for model and serial number location Please record the model and serial number information below Also record the purchase date of your applian...

Страница 14: ...14 Notes ...

Страница 15: ... símbolo de advertencia de seguridad Este símbolo le llama la atención sobre peligros potenciales que pueden ocasionar la muerte o una y de la palabra PELIGRO o ADVERTENCIA Estas palabras significan PELIGRO ADVERTENCIA a usted y a los demás Lea y obedezca siempre todos los mensajes de seguridad Todos los mensajes de seguridad irán a continuación del símbolo de advertencia de seguridad puede morir ...

Страница 16: ...or de aire El acondicionador de aire pesa entre 80 y 110 libras 36 3 a 49 9 kg NOTA No deben obstruirse las rejillas del gabinete El aire debe circular libremente a través de las rejillas del gabinete Instalación en la ventana en algunos modelos Medidas de la abertura de la ventana Ancho 27 68 6 cm mínimo a 40 101 6 cm máximo Altura 16 41 3 cm mínimo Instalación a través de la pared Las medidas de...

Страница 17: ... eléctrica sea adecuada y esté hecha de acuerdo con el Código Nacional Eléctrico ANSI NFPA 70 última edición y todos los códigos y reglamentos locales Pueden obtenerse copias de las normas señaladas en National Fire Protection Association One Batterymarch Park Quincy MA 02269 Cable de suministro de energía NOTA Su aparato puede ser diferente del que se ilustra Este acondicionador de aire para habi...

Страница 18: ...os materiales de embalaje Quite las cintas y los residuos de goma de la superficie antes de encender el acondicionador de aire Frote un poco de detergente líquido para vajillas sobre el adhesivo con los dedos Limpie con agua tibia y seque No use instrumentos filosos alcohol para fricciones líquidos inflamables o productos de limpieza abrasivos para eliminar los restos de cinta o goma Estos product...

Страница 19: ...ior para cortinas en el gabinete del acondicionador de aire Vista posterior Vista inferior 5 Extienda la cortina derecha hacia fuera de manera que pueda insertar el primer tornillo a través del orificio del medio de la cortina Utilice tornillos de cabeza de cono achatado 8 18 x para atornillar la cortina al orificio del medio en el gabinete del acondicionador de aire NOTA Se requiere este tornillo...

Страница 20: ...lique un sellador de madera a la superficie exterior expuesta 5 Inserte el marco en la abertura de la pared Cuadre y nivele el marco 6 Sujete con firmeza el marco a la pared Colocacióndelgabinetedel acondicionadordeaire Trate el acondicionador de aire con cuidado Asegúrese de que el gabinete del acondicionador de aire no se caiga de la abertura durante la instalación o al quitarlo La parte de dond...

Страница 21: ... con un tornillo de cabeza redonda 8 x para asegurar la ventana en su lugar Instalación a través de la pared 1 Inserte el gabinete en la abertura de la pared con el marco La parte superior del gabinete debe extenderse 13 mm dentro de la habitación Si hay un resguardo el gabinete debe extenderse 13 mm más allá del resguardo 2 Use un nivel para verificar que el gabinete esté nivelado de lado a lado ...

Страница 22: ...nel delantero Vuelva a colocar las perillas de control en algunos modelos NOTA Haga pasar el cable de alimentación por la muesca en el panel delantero 8 Conecte a un contacto de pared de conexión a tierra de 3 terminales 9 Presione RESET Reposición sobre el enchufe del cable de suministro de energía A Alambre verde de conexión a tierra B Tornillo de puesta a tierra A Obturador de espuma ADVERTENCI...

Страница 23: ...para hacer salir el aire de la sala al exterior CLOSED para que circule el aire en la sala NOTA El control de Respiradero funciona únicamente cuando el control de Fan Ventilación está funcionando Estilo 1 Ajustes del acondicionador de aire sólo frío Control de Fan Ventilación Ponga el control de FAN Ventilación en la posición que desee Cuando el acondicionador de aire está funcionando a Low Cool P...

Страница 24: ...TAT Termostato hacia la izquierda El calentador de tira eléctrica se activa cuando el Control de Fan Ventilación se coloca en una posición de calor NOTA Su acondicionador de aire no está diseñado para ser usado como fuente primaria de calor Está diseñado para ser una fuente suplementaria de calor solamente Cómocambiarladireccióndelaire Use la lengüetas para dirigir el aire hacia la derecha o hacia...

Страница 25: ...nte sobre el gabinete del acondicionador de aire Para obtener información sobre cómo pedir una cubierta resistente vea la sección Accesorios Mantenimientoanual Su acondicionador de aire necesita mantenimiento anual para ayudar a asegurar un rendimiento constante de la mejor calidad durante todo el año Llame al vendedor autorizado de su localidad para hacer una cita para el chequeo anual El precio ...

Страница 26: ...ire de la sala continuamente Para mayor comodidad use Low Cool Poco fría High Cool Muy fría o Turbo Cool Máximo nivel de frío El acondicionador de aire no tiene el tamaño adecuado para su habitación Verifique la capacidad de enfriamiento de su acondicionador de aire para habitación Los acondicionadores de aire para habitaciones no están diseñados para enfriar varias habitaciones El filtro está suc...

Страница 27: ...r anote la información sobre su modelo Siempre que llame para solicitar servicio del aparato necesitará saber el número del modelo y el número de serie completos Esta información la encuentra en la placa de número del modelo y número de serie Vea la ubicación del número del modelo y del número de serie en Requisitos eléctricos Por favor anote la información sobre el número del modelo y el número d...

Страница 28: ...1188080A 2005 All rights reserved Todos los derechos reservados 5 05 Printed in U S A Impreso en EE UU ...

Отзывы: