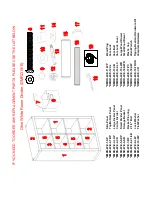
Whalen DMRD-W-E Скачать руководство пользователя страница 7

Model # DMRD-W-E 


Please call for replacement parts or assistance: 

866-942-5362 

Whalen Furniture Manufacturing 


    Page 7                                    Factory No. 17052 

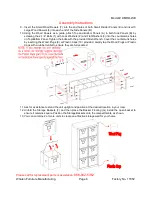
TIPPING RESTRAINT HARDWARE 


NOTE:  We  have  included  two  sets  of  Tipping  Restraint  Hardware  for  this  unit.  You  must 
install this hardware to prevent accidents or injuries from falling unit. 


When properly installed, this restraint can provide protection against the unexpected tipping 
of the unit due to small tremors, bumps or climbing. We strongly recommend mounting this 
hardware to a wall stud and your unit. 


Please carefully read the instructions printed on the plastic bag containing tipping restraint 
hardware to attach the tipping restraints to the unit and the wall. 


NOTE:  Young  children  can  be  seriously  injured  by  tipping  furniture.  You  must  install  the 
Tipping  Restraint  Hardware  with  the  unit  to  prevent  the  unit  from  tipping,  causing  any 
accidents  or  damage.  The  tipping  restraint  is  intended  only  as  a  deterrent,  they  are  not  a 
substitute for proper adult supervision. The tipping restraint is not an earthquake restraint. If 
you  wish  to  add  the  extra  security  of  earthquake  restraints,  they  must  be  purchased  and 
installed separately. 


Tools required: Phillips screwdriver, Mallet, Power Drill, and 3/8” Drill Bit. 


Содержание DMRD-W-E

Страница 1: ...DGES AS RECEIVED If you have any questions regarding assembly or if parts are missing DO NOT return this item to the store where it was purchased Please call our toll free customer service number and...

Страница 2: ...Make sure Cam Lock pointed arrow is pointed towards the entry of Cam Bolt 4 Connect both panels together making sure Cam Bolt goes into pre drilled hole on the end of panel with Cam Lock 5 Once Cam Bo...

Страница 3: ...C Large Divider Panel 2 D Center Divider 1 With Cam lock holes E Small Divider Panel 4 F Storage Basket 8 G Basket Flooring 8 1 2 1 4 Bolt 8 1 extra 2 Lock Washer 8 1 extra 3 Flat Washer 8 1 extra 4...

Страница 4: ...anels B on a level and protected surface with the pre drilled holes facing up Screw 2 Cam Bolts 5 into the plastic bushings included on the center of each Side Panel Fully tighten with a Phillips scre...

Страница 5: ...are located on the other end of Center Divider D 6 Insert 20 Small Wood Dowels 7 into the end holes of Large Divider Panels C and Center Divider D DO NOT put dowels into the Cam Bolt holes 7 Insert 4...

Страница 6: ...Washers 3 into the countersunk holes on Top Bottom Panel Tighten the bolts with the provided Allen Wrench Cover the countersunk holes by inserting the Wood Plugs 9 or Plastic Caps 10 provided Gently...

Страница 7: ...d and your unit Please carefully read the instructions printed on the plastic bag containing tipping restraint hardware to attach the tipping restraints to the unit and the wall NOTE Young children ca...

Страница 8: ...l to repair your furniture Further advice about wood furniture care It is best to keep your furniture in a climate controlled environment Extreme temperature and humidity changes can cause warping shr...

Страница 9: ...E 13 CB Cam Bolt DMRD W E 4 CD Center Divider DMRD W E 14 CLC Cam Lock Cover DMRD W E 5 SDP Small Divider Panel DMRD W E 15 LWD Large Wood Dowel DMRD W E 6 SB Storage Basket DMRD W E 16 SWD Small Wood...

Отзывы: