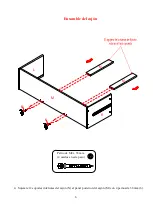
17
Assembly Instructions
17.
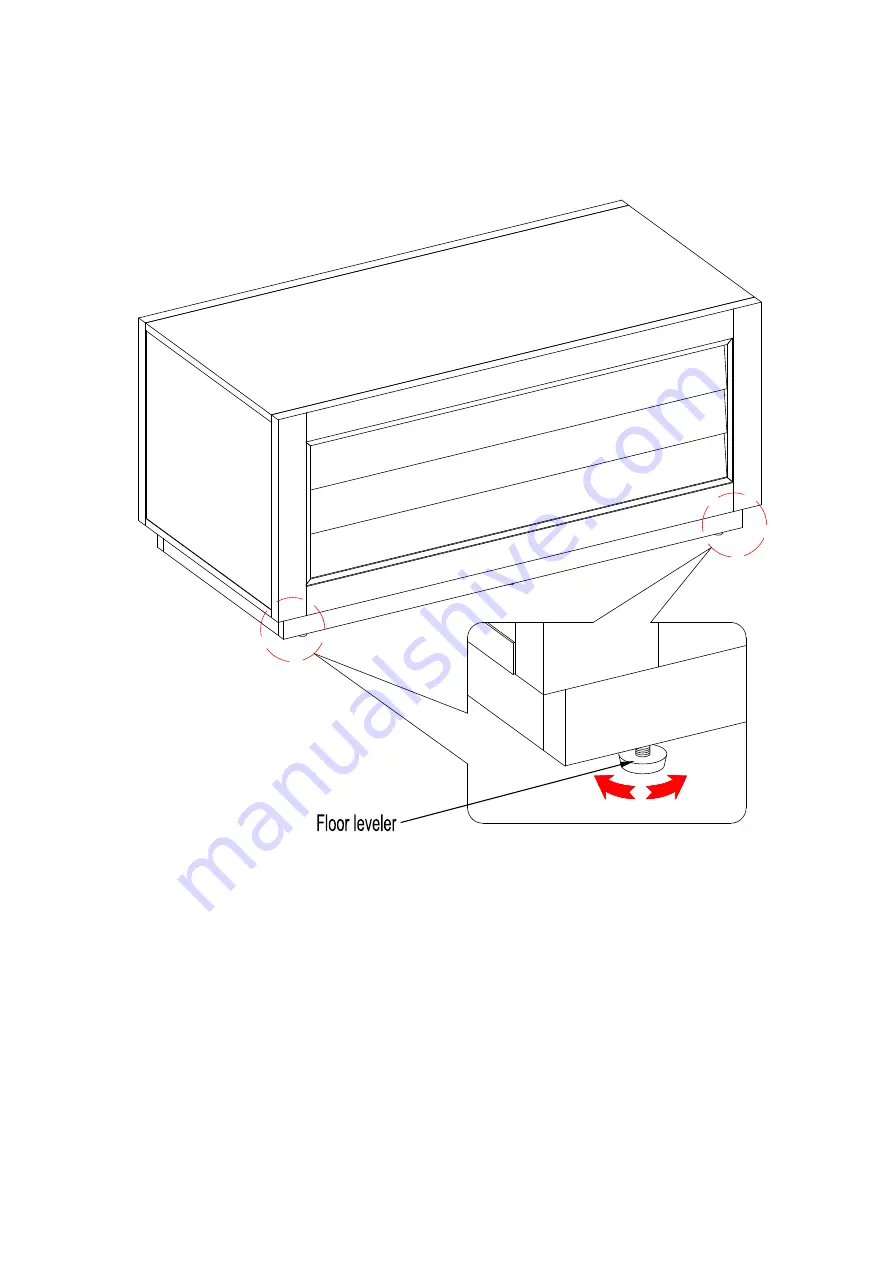
If necessary, adjust the pre-attached floor levelers at the bottom of Base Front Stretcher (G) to level the unit.
G
Страница 1: ...rts are missing DO NOT return this item to the store where it was purchased Please call our customer service number and have your instructions and parts list ready to provide the model name part name or factory number 866 942 5362 Pacific Standard Time 8 30 a m 4 30 p m Monday Friday Or visit our web site 24 hours a day 7 days a week for product assistance at www whalenstyle com Or e mail your req...
Страница 2: ... carton before discarding Remove all parts from carton and separate into groups as indicated on part list Please ensure all parts are included prior to assembly Use of power tools to complete assembly is not recommended MAXIMUM RECOMMENDED WEIGHT LOADS THIS UNIT IS INTENDED ONLY FOR USE WITHIN THE MAXIMUM WEIGHTS INDICATED USE WITH LOAD HEAVIER THAN THE MAXIMUM WEIGHTS INDICATED MAY RESULT IN INST...
Страница 3: ...RATION HOW THE KNOCK DOWN KD ASSEMBLY SYSTEM WORKS 1 Screw the Cam Bolt into the threaded inserts on the panel Connect both panels together making sure Cam Bolt goes into the pre drilled hole on the end of panel for Cam Lock 2 Insert the Cam Lock into the pre drilled large hole on the panel Make sure the arrow on the face of Cam Lock faces out and points towards Cam Bolt 3 Take a Phillips screwdri...
Страница 4: ...se Back Stretcher Qty 1 I Base Side Stretcher Qty 2 J Drawer Front Qty 1 K Drawer Left Side Qty 1 L Drawer Right Side Qty 1 M Drawer Back Panel Qty 1 N Drawer Bottom Support Qty 2 O Drawer Bottom Panel Qty 1 1 Small Cam Lock 2 Large Cam Lock 3 Cam Bolt Qty 6 1 extra Qty 30 1 extra Qty 36 1 extra 4 Small Wood Dowel 5 Large Wood Dowel 6 M4 x 38 mm Screw Qty 10 1 extra Qty 30 1 extra Qty 13 1 extra 7...
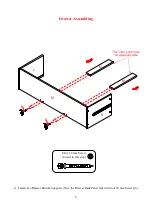
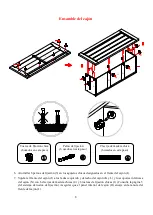
Страница 5: ...ap in with a rubber mallet if necessary Make sure that you use a small amount of glue with both ends of all dowels NOTE It is very important to use a small amount of glue on both ends of dowels 3 Fasten the Drawer Back Panel M between the Drawer Left and Right Side Panels K and L with four 38 mm Screws 6 4 4 6 6 6 6 M K L Small Wood Dowel 4 used in this step M4 x 38 mm Screw 4 used in this step ...
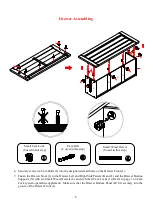
Страница 6: ...6 Drawer Assembling 4 Fasten two Drawer Bottom Supports N to the Drawer Back Panel M with four 38 mm Screws 6 M K L N N 6 6 M4 x 38 mm Screw 4 used in this step ...
Страница 7: ...7 Drawer Assembling 5 Slide the Drawer Bottom Panel O into the grooves between the Drawer Left and Right Side Panels K and L until fully inserted into the groove of the Drawer Back Panel M K N N O L M ...
Страница 8: ... and L and the Drawer Bottom Supports N with six Small Wood Dowels 4 and six Small Cam Locks 1 Refer to page 3 on Cam Lock system operation supplement Make sure that the Drawer Bottom Panel O fits securely into the groove of the Drawer Front J Cam Bolt 6 used in this step Small Cam Lock 6 used in this step Small Wood Dowel 6 used in this step 1 1 1 1 J J K L N N O 4 4 3 3 1 1 ...
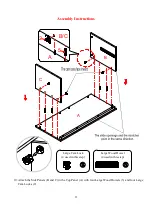
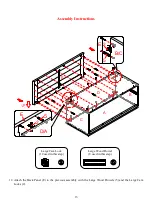
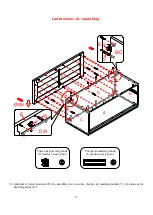
Страница 9: ...uctions 8 Securely screw the Cam Bolts 3 into the designated small holes on the Top Panel A Bottom Panel D Back Panel E and Base Stretchers G and H using a Phillips screwdriver Cam Bolt 30 used in this step D E H G 3 A ...
Страница 10: ...mbly Instructions 9 Attach Top Front Stretcher F to Top Panel A with two Large Wood Dowels 5 and five 38 mm Screws 6 Large Wood Dowel 2 used in this step M4 x 38 mm Screw 5 used in this step 5 5 A 6 6 6 6 6 F ...
Страница 11: ...y Instructions 10 Attach the Side Panels B and C to the Top Panel A with four Large Wood Dowels 5 and four Large Cam Locks 2 A B C A B C 5 2 Large Wood Dowel 4 used in this step Large Cam Lock 4 used in this step ...
Страница 12: ...Instructions 11 Attach the Bottom Panel D to the Side Panels B and C with four Large Wood Dowels 5 and four 50 mm Screws 7 D C B A 7 D B C 5 M4 x 50 mm Screw 4 used in this step Large Wood Dowel 4 used in this step ...
Страница 13: ...ructions 12 Attach the Back Panel E to the previous assembly with the Large Wood Dowels 5 and the Large Cam Locks 2 D A C B E E D A 5 2 E B C 5 2 Large Cam Lock 12 used in this step Large Wood Dowel 8 used in this step ...
Страница 14: ...Combine the Base Front Stretcher G Back Stretcher H and Side Stretchers I together with four Large Cam Locks 2 and four Large Wood Dowels 5 H I G I 2 5 I G H Large Cam Lock 4 used in this step Large Wood Dowel 4 used in this step ...
Страница 15: ...ructions 14 Attach the assembled base to the Bottom Panel D with eight Large Wood Dowels 5 and ten Large Cam Locks 2 D I G I H 2 5 H G I D B C A Large Cam Lock 10 used in this step Large Wood Dowel 8 used in this step ...
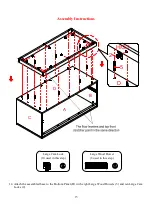
Страница 16: ...align the slide runners on the assembled drawer with the slide tracks and push the drawer carefully inside until it stops NOTE If the drawer does not go in smoothly please take it out and repeat the step If you need to remove the drawer please pull the drawer all the way out then simultaneously push the plastic release lever of the ball bearing slide up on one side and down on the other side and t...
Страница 17: ...17 Assembly Instructions 17 If necessary adjust the pre attached floor levelers at the bottom of Base Front Stretcher G to level the unit G ...
Страница 18: ...nvironment Extreme temperature and humidity changes can cause fading warping shrinking and splitting of wood It is advised to keep furniture away from direct sunlight as sun may damage the finish Proper care and cleaning at home will extend the life of your purchase Follow these important and helpful tips that will enhance your furniture as it ages A touch up pen has been provided to minimize the ...
Страница 19: ...cimiento donde lo adquirió Por favor llame a nuestro número de servicio al cliente y tienen sus instrucciones y lista de piezas listo para proporcionar el nombre del modelo el nombre o el número de parte de la fábrica 866 942 5362 Hora estándar del Pacífico 8 30 am 4 30 pm de Lunes Viernes O visite nuestro sitio web las 24 horas del día 7 días a la semana para recibir asistencia del producto en ww...
Страница 20: ...orio fijado al cartón antes de tirarlo Una vez apartadas las piezas sepárelas en grupos como se indica en la lista Cerciórese de que tiene todas las piezas antes de comenzar el ensamblaje No se recomienda utilizar herramientas muy potentes para ensamblar este mueble ESTA UNIDAD DEBE UTILIZARSE CON LOS PESOS MÁXIMOS INDICADOS SI SE EXCEDE EL PESO MÁXIMO PODRIA RESULTAR EN UNA INESTABILIDAD DE LA UN...
Страница 21: ... CÓMO FUNCIONA LA INSTALACIÓN DE MONTAJE KD 1 Fijar los tornillos de fijación en los orificios pequeños Conectar ambos paneles cerciorandose que los tornillos de fijación entren bien y que estos queden en los orificios al final del panel con tuercas de fijación 2 Inserte las tuercas de fijación en los orificios grandes del panel Hacer que la flecha en la tuerca este apuntando hacia la entrada del ...
Страница 22: ...1 I Soporte base lateral Cant 2 J Frente del cajón Cant 1 K Lado izquierdo del cajón Cant 1 L Lado derecho del cajón Cant 1 M Panel posterior del cajón Cant 1 N Soporte inferior del cajón Cant 2 O Panel inferior del cajón Cant 1 1 Tuerca de fijación chica 2 Tuerca de fijación grande 3 Perno de fijación Cant 6 1 extra Cant 30 1 extra Cant 36 1 extra 4 Clavija de madera chica 5 Clavija de madera gra...
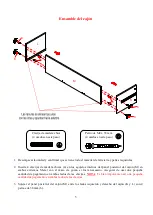
Страница 23: ...er con el mazo de goma si fuera necesario Asegurar de usar una pequeña cantidad de pegamento en ambos lados de las clavijas NOTA Es bien importante usar una pequeña cantidad de pegamento en ambos lados de las clavijas 3 Sujetar el panel posterior del cajón M entre los lados izquierdo y derecho del cajón K y L con 4 pernos de 38 mm 6 4 4 6 6 6 6 M K L Clavija de madera chica 4 usados en este paso P...
Страница 24: ...6 Ensamble del cajón 4 Sujetar el 2 soportes inferiores del cajón N al panel posterior del cajón M con 4 pernos de 38 mm 6 M K L N N 6 6 Perno de M4 x 38 mm 4 usados en este paso ...
Страница 25: ...del cajón 5 Deslizar el panel inferior del cajón O en las ranuras entre los lados izquierdo y derecho del cajón K y L hasta que esté completamente insertado en la ranura del panel posterior del cajón M K N N O L M ...
Страница 26: ...oportes inferiores del cajón N con 6 clavijas de madera chicas 4 y 6 tuercas de fijación chicas 1 Consulte la página 3 del sistema de tuerca de fijación Asegurar que el panel inferior del cajón O encaje en la ranura del frente del cajón J Perno de fijación 6 usados en este paso Tuerca de fijación chica 6 usados en este paso Clavija de madera chica 6 usados en este paso 1 1 1 1 J J K L N N O 4 4 3 ...
Страница 27: ...n los pernos de fijación 3 en los agujeros chicos designados en el panel superior A en el panel inferior D en el panel posterior E y en los soportes de base G y H usando el desarmador estrella Perno de fijación 30 usados en este paso D E H G 3 A ...
Страница 28: ...aje 9 Adjuntar el soporte superior frontal F al panel superior A con 2 clavijas de madera grandes 5 y 5 pernos de 38 mm 6 Clavija de madera grande 2 usados en este paso Perno de M4 x 38 mm 5 usados en este paso 5 5 A 6 6 6 6 6 F ...
Страница 29: ...Adjuntar los paneles laterales B y C al panel superior A con 4 clavijas de madera grandes 5 y 4 tuercas de fijación grandes 2 A B C A B C 5 2 Clavija de madera grande 4 usados en este paso Tuerca de fijación grande 4 usados en este paso ...
Страница 30: ...aje 11 Adjuntar el panel inferior D a los paneles laterales B y C con 4 clavijas de madera grandes 5 y 4 pernos de 50 mm 7 D C B A 7 D B C 5 Perno de M4 x 50 mm 4 usados en este paso Clavija de madera grande 4 usados en este paso ...
Страница 31: ...ar el panel posterior E al ensamble previo con las clavijas de madera grandes 5 y las tuercas de fijación grandes 2 D A C B E E D A 5 2 E B C 5 2 Tuerca de fijación grande 12 usados en este paso Clavija de madera grande 8 usados en este paso ...
Страница 32: ...te frontal de base G el soporte posterior H y los soportes laterales I con 4 tuercas de fijación grandes 2 y 4 clavijas de madera grandes 5 H I G I 2 5 I G H Tuerca de fijación grande 4 usados en este paso Clavija de madera grande 4 usados en este paso ...
Страница 33: ...ar el ensamble de la base al panel inferior D con 8 clavijas de madera grandes 5 y 10 tuercas de fijación grandes 2 D I G I H 2 5 H G I D B C A Tuerca de fijación grandes 10 usados en este paso Clavijas de madera grandes 8 usados en este paso ...
Страница 34: ...Luego alinear los complementos de corredera en el cajón ensamblado con los carriles de corredera y empujar el cajón hacia adentro hasta que tope NOTA Si el cajón no se mueve suavemente por favor saque y repita el paso Si necesita sacar el cajón por favor jale el cajón todo el camino y empuje simultáneamente las palancas de liberación de plástico de las correderas de baleros hacia arriba en una y h...
Страница 35: ...17 G Instrucciones de ensamblaje 17 Si fuera necesario ajustar los niveladores de piso preajustados a la parte inferior del soporte frontal de base G para nivelar la unidad ...
Страница 36: ... que se contraigan o que la madera se parta Es recomendable mantener la unidad lejos del sol directo ya que puede dañar el terminado Cuidados adecuados y limpieza pueden extender la vida útil de su unidad Siga estás recomendaciones y mantendrá su mueble en buenas condiciones de uso por muchos años Un plumón de retoque se ha proporcionado para minimizar las marcas pequeños o rayones que puedan ocur...