Whalen BBXL54NV Скачать руководство пользователя страница 2

Model # BBXL54NV 

Please call for replacement parts or assistance: 

1-866-942-5362


Whalen Furniture Manufacturing   


           Page 2                                 Factory No. 16434 


MANUFACTURER: Whalen Furniture Manufacturing 
CATALOG: 3-IN-1

TM

 TV Console (BBXL54NV) 

DATE OF MANUFACTURE: September 2014 
MADE IN CHINA 


1.  Please read the Assembly Instructions prior to assembling this product. 
2.  Remove all hardware from the box and sort by size. 
3.  Check to see that all hardware and parts are present BEFORE assembling. 
4.  Ask a friend to assist you with the assembly of this furniture. 
5.  To avoid damage, assemble the product on a sturdy, level and protective surface. 
6.  Please wait until all steps are completed before fully tightening Bolts. 
7.  Make sure all Bolts are tightly fastened before the unit is used. 


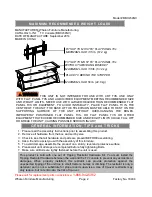
M A X I M U M   R E C O M M E N D E D   W E I G H T   L O A D S  

FITS UP TO MOST 65” FLAT PANEL TVs 
MAXIMUM LOAD 135 lb. (61.2 kg)


FITS UP TO MOST 65” FLAT PANEL TVs 
WITHOUT SWIVELING BRACKET  
MAXIMUM LOAD 135 lb. (61.2 kg)


MAXIMUM LOAD 50 lb. (22.6 kg)


G E N E R A L   I N F O R M A T I O N ,   T I P S   a n d T R I C K S  

This product is sold with one set of Tipping Restraint Hardware Kit. You must install the 
Tipping Restraint Hardware between the wall and the TV console to prevent any accidents or 
damages. When properly installed, this restraint can provide protection against the 
unexpected tipping of the unit due to small tremors, bumps or climbing. The restraint is only a 
deterrent and is not a substitute for proper adult supervision. Use of tip-over restraints may 
only reduce, but not eliminate, the risk of tip-over. 

PLACE TV BEHIND THE STOPPER 

THIS UNIT IS NOT INTENDED FOR USE WITH CRT TVS. USE ONLY 

WITH FLAT PANEL TVS AND AUDIO/VIDEO EQUIPMENT MEETING RECOMMENDED SIZE 
AND WEIGHT LIMITS. NEVER USE WITH LARGER/HEAVIER THAN RECOMMENDED FLAT 
PANEL TVS OR EQUIPMENT. TO AVOID INSTABILITY, PLACE FLAT PANEL TV IN THE 
CENTRE OF THE UNIT; THE BASE OF THE TELEVISION MUST BE ABLE TO REST ON THE 
SUPPORTING SURFACE OF THE UNIT WITHOUT OVER-HANGING THE EDGES. 
IMPROPERLY POSITIONED FLAT PANEL TVS, OR FLAT PANEL TVS OR OTHER 
EQUIPMENT THAT EXCEED RECOMMENDED SIZE AND WEIGHT LIMITS COULD FALL OFF 
OR BREAK THE UNIT, CAUSING POSSIBLE SERIOUS INJURY.

Содержание BBXL54NV

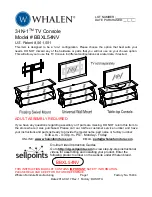
Страница 1: ...configurations at a later date if desired ADULT ASSEMBLY REQUIRED If you have any questions regarding assembly or if parts are missing DO NOT return this item to the store where it was purchased Plea...

Страница 2: ...GENERAL INFORMATION TIPS and TRICKS This product is sold with one set of Tipping Restraint Hardware Kit You must install the Tipping Restraint Hardware between the wall and the TV console to prevent...

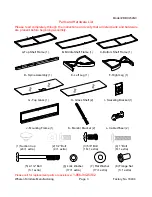
Страница 3: ...dware are present before beginning assembly A Top Shelf Frame 1 B Middle Shelf Frame 1 C Bottom Shelf Frame 1 D Spine Assembly 1 E Left Leg 1 F Right Leg 1 G Top Glass 1 H Glass Shelf 2 I Swiveling Br...

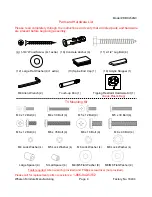
Страница 4: ...chor 4 11 2 1 2 Lag Bolt 4 12 Large Flat Washer 4 1 extra 13 Spine End Cap 1 14 Acrylic Stopper 1 M4 Allen Wrench 2 Touch up Pen 1 Tipping Restraint Hardware Kit 1 Inside Plastic Bag TV Mounting Kit M...

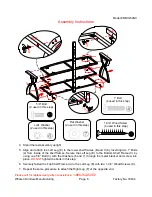
Страница 5: ...r 1 Unpack the unit and confirm that you have all the hardware and required parts 2 Locate the Spine Assembly D and set the back face down on a scratch free surface as shown 3 Align and attach the She...

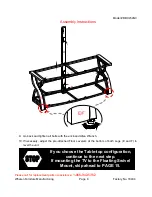
Страница 6: ...es Secure the Left Leg E to the Bottom Shelf Frame C by using one 5 8 Bolt 3 with the Washers 6 and 7 through the metal bracket and screw into place DO NOT tighten the bolts in this step 6 Securely fa...

Страница 7: ...434 Assembly Instructions 8 Secure the Top Shelf Frame A to the inner metal legs E and F using two 5 8 Bolts 3 with the Washers 6 and 7 through the top metal plate of each leg and securely screw into...

Страница 8: ...sembly Instructions 9 Go back and tighten all bolts with the enclosed Allen Wrench 10 If necessary adjust the pre attached Floor Levelers at the bottom of both Legs E and F to level the unit If you ch...

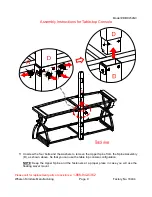
Страница 9: ...o 16434 Assembly Instructions for Table top Console 11 Unscrew the four bolts and the washers to remove the Upper Spine from the Spine Assembly D as shown above So that you can use the table top conso...

Страница 10: ...to the Lower Spine D by inserting one 2 1 2 Bolt 5 with the Washers 6 and 7 through the drilled holes on the lower spine and securely screw into the Flange Nut 8 13 Plug the Spine End Cap 13 all the...

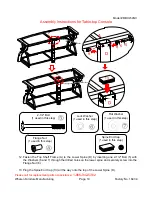
Страница 11: ...ory No 16434 Assembly Instructions for Table top Console 14 Attach 2 Cable Wheels L to the backside of the Lower Spine D with the 5 8 Bolts 3 Tighten the bolts with the enclosed Allen Wrench NOTE You...

Страница 12: ...of the cup with the Allen Wrench while twisting it clockwise into the hole 16 Place the Glass Shelves G and H with the black side of the glass down onto the Suction Cups 1 on shelf frames as shown abo...

Страница 13: ...e Acrylic TV Stopper to prevent the TV from tipping when placing your flat panel television directly on the console 17 Remove the tape of the Acrylic Stopper 14 and place it in the cut out of the Acry...

Страница 14: ...d console at the desired location against a wall Now follow the instructions printed on the plastic bag containing the Tipping Restraint Hardware to attach the tip over restraint to the spine and the...

Страница 15: ...four 5 8 Bolts 3 and four Washers 6 and 7 Turn the Swiveling Bracket against the Upper Spine D when tightening the bolts with the enclosed M4 Allen Wrench Make sure the pivoting bolt head faces up NO...

Страница 16: ...ing Page 16 Factory No 16434 Assembly Instructions for Floating Swivel Mount 22 Hold and attach the flat side of the Mounting Frame J onto the Swiveling Bracket I using four 1 2 Bolts 2 and the Washer...

Страница 17: ...t on the back of the TV If you encounter any resistance stop immediately If you are unable to find the correct bolt consult a local hardware store 24 Follow the appropriate diagram above to attach the...

Страница 18: ...ny resistance stop immediately If you are unable to find the correct bolt consult a local hardware store 26 Follow the appropriate diagram above to attach the Monitor Brackets K to the back of the TV...

Страница 19: ...INSTALLATION OF TV 27 Ask for assistance to lift the television up to hang the Monitor Brackets K onto the Mounting Frame J Set the hooks on the Monitor Brackets over the Mounting Frame and then lowe...

Страница 20: ...e Wheels L to the Spine and install the Glass Shelves G and H into place 30 Carefully move the console and position it at the desired location against a wall Now follow the instructions printed on the...

Страница 21: ...ines you just drew 33 With an electric drill not included drill 3 16 inch diameter holes to at least 2 inch deep on the 4 drill points While holding the Bracket Plate in place loosely screw in the Lag...

Страница 22: ...Using the Mounting Frame J as a template mark 4 drill points with a pencil 36 With an electric drill not included on its low setting drill 7 16 inch diameter holes to at least 2 inch deep Insert Conc...

Страница 23: ...the Mounting Frame J Set the hooks of the Monitor Brackets over the Mounting Frame and then lower them onto the bars of the Mounting Frame Loosen the Lock Bolts that are pre attached on the Monitor B...

Страница 24: ...advice about furniture care It is best to keep your furniture in a climate controlled environment Extreme temperature and humidity changes can cause fading warping shrinking and splitting of wood It i...

Страница 25: ...BBXL54NV 8 MF Mounting Frame BBXL54NV 26 FW Flat Washer BBXL54NV 9 MB Monitor Bracket BBXL54NV 27 FN Flange Nut BBXL54NV 10 LB Lock Bolt BBXL54NV 28 2 1 2LB 2 1 2 Lag Bolt BBXL54NV 11 CW Cable Wheel...

Отзывы: