Whalen AVC78H-13AX Скачать руководство пользователя страница 3

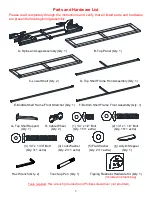
Parts and Hardware List


Please read completely through the instructions and verify that all listed parts and hardware 

are present before beginning assembly.


A- Spine and Legs Assembly (Qty. 1)                                B- Top Panel (Qty. 1) 


C- Lower Shelf (Qty. 2)                         D- Top Shelf Frame Front Assembly (Qty. 1) 


E- Middle Shelf Frame Front Stretcher (Qty. 1)     F- Bottom Shelf Frame Front Assembly (Qty. 1) 


G- Top Shelf Support       H- Cable Wheel        (1) 1/4” x 1/2” Bolt                   (2) 1/4” x 1 1/4” Bolt 

(Qty. 1)                        (Qty. 2)               (Qty. 15+1 extra)                      (Qty. 15+1 extra) 


(3) 1/4” x 1 3/4” Bolt         (4) Lock Washer          (5) Flat Washer       (6) Acrylic Stopper 

(Qty. 3+1 extra)              (Qty. 21+1 extra)          (Qty. 21+1 extra)             (Qty. 1)   


Hex Wrench (Qty. 2)             Touch-up Pen (Qty. 1)             Tipping Restraint Hardware Kit (Qty. 1) 

                                                                                                       (Included in plastic bag) 


Tools required: 

Hex wrench (provided) and Phillips screwdriver (not provided).


Содержание AVC78H-13AX

Страница 1: ...sembly or if parts are missing DO NOT return this item to the store where it was purchased Please call our customer service number and have your instructions and parts list ready to provide the model...

Страница 2: ...UIPMENT MEETING RECOMMENDED SIZE AND WEIGHT LIMITS NEVER USE WITH LARGER HEAVIER THAN RECOMMENDED FLAT PANEL TVS OR EQUIPMENT TO AVOID INSTABILITY PLACE FLAT PANEL TV IN THE CENTER OF THE UNIT THE BAS...

Страница 3: ...e Shelf Frame Front Stretcher Qty 1 F Bottom Shelf Frame Front Assembly Qty 1 G Top Shelf Support H Cable Wheel 1 1 4 x 1 2 Bolt 2 1 4 x 1 1 4 Bolt Qty 1 Qty 2 Qty 15 1 extra Qty 15 1 extra 3 1 4 x 1...

Страница 4: ...have all the hardware and required parts 2 Hold the Spine and Legs Assembly A upright and simply swing the legs outward 3 Attach the Top and Bottom Shelf Frame Front Assembles D and F to the side and...

Страница 5: ...edge 6 Fasten the Top and Bottom Shelf Frame Front Assemblies D and F and the Middle Shelf Frame Front Stretcher E in place with eight 1 2 Bolts 1 DO NOT fully tighten the bolts in this step A D F E D...

Страница 6: ...d 5 through the back rail of the top frame and insert three 1 3 4 Bolts 3 with the Washers 4 and 5 through the Top Shelf Front Rail D and screw into the Top Panel B 1 4 x 1 3 4 Bolt 3 used in this ste...

Страница 7: ...f Support G between the Spine A and the Top Shelf Frame Front Assembly D with three 1 2 Bolts 1 and three Washers 4 and 5 Lock Washer 3 used in this step Flat Washer 3 used in this step 1 4 x 1 2 Bolt...

Страница 8: ...th Shelves overlap the drilled holes on the Shelf Frames Insert six 1 1 4 Bolts 2 with the Washers 4 and 5 through the drilled holes and securely screw into each Lower Shelf C 1 4 x 1 1 4 Bolt 12 used...

Страница 9: ...o Cable Wheels H to the backside of the Spine A with four 1 2 Bolts 1 Tighten the bolts with the provided hex wrench NOTE You can use the Cable Wheels to help keep your entertainment center s cables a...

Страница 10: ...aper backing from the Acrylic Stopper 6 then properly align the acrylic stopper into the cut out on the acrylic stopper template on the front of Top Panel B Press down on the acrylic stopper to help a...

Страница 11: ...st be attached to a wall stud Depending upon your wall construction different anchor hardware maybe required Please contact your local hardware store for assistance Young children can be seriously inj...

Страница 12: ...xtreme temperature and humidity changes can cause fading warping shrinking and splitting of wood It is advised to keep furniture away from direct sunlight as sun may damage the finish Proper care and...

Отзывы: