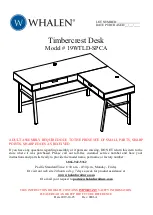
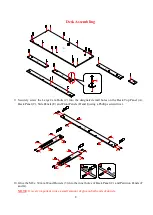
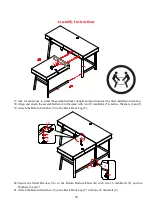
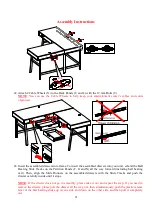
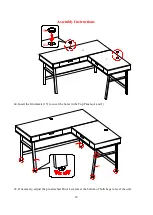
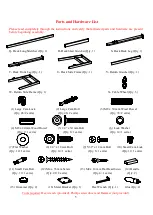
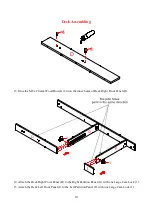
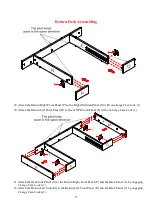
Whalen 19WTLD-SPCA Скачать руководство пользователя страница 10


10


Desk Assembling 


13.


Glue the M8 x 20 mm Wood Dowels (4) into the inner holes of Desk Right Front Panel (D).  


14.


Attach the Desk Right Front Panel (D) to the Right Partition Panel (G) with one Large Cam Lock (1). 
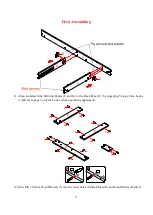
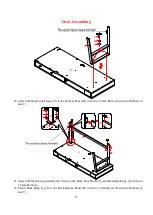
15.


Attach the Desk Left Front Panel (I) to the Left Partition Panel (F) with one Large Cam Lock (1). 

D

4

4

D

I

G

F

1

1

Содержание 19WTLD-SPCA

Страница 1: ...ng assembly or if parts are missing DO NOT return this item to the store where it was purchased Please call our toll free customer service number and have your instructions and parts list ready to pro...

Страница 2: ...before discarding Remove all parts from carton and separate into groups as indicated on part list Please ensure all parts are included prior to assembly Use of power tools to complete assembly is not...

Страница 3: ...OPERATION HOW THE KNOCK DOWN KD ASSEMBLY SYSTEM WORKS 1 Screw the Cam Bolt into the threaded inserts on the panel Connect both panels together making sure Cam Bolt goes into the pre drilled hole on t...

Страница 4: ...Side Panel Qty 3 F Left Partition Panel Qty 2 G Desk Right Partition Panel Qty 1 H1 Drawer Front Qty 2 H2 Drawer Back Panel Qty 2 H6 Drawer Bottom Panel Qty 2 I Desk Left Front Panel Qty 1 J Return T...

Страница 5: ...m Bolt 3 M8 x 30 mm Wood Dowel Qty 46 2 extra Qty 46 2 extra Qty 74 2 extra 4 M8 x 20 mm Wood Dowel 5 1 4 x 30 mm Bolt 6 Lock Washer Qty 2 1 extra Qty 6 1 extra Qty 14 1 extra 7 Flat Washer 8 1 4 x 18...

Страница 6: ...tch 2 Securely screw the Small Cam Bolts 11 into the designated small holes on the Drawer Front H1 using a Phillips screwdriver 3 Fasten the Drawer Left and Right Sides H3 and H4 to the Drawer Front H...

Страница 7: ...2 Make sure that the Drawer Bottom Panel H6 fits securely into the groove of the Drawer Back Panel H2 7 Turn the assembled drawer upright Attach the Handle 14 to the pilot holes on the Drawer Front H1...

Страница 8: ...ck Panel C Side Panels E and Front Panels D and I using a Phillips screwdriver 10 Glue the M8 x 30 mm Wood Dowels 3 into the inner holes of Back Panel C and Partition Panels F and G NOTE It is very im...

Страница 9: ...ion Panels F and G to the Back Panel C by engaging 3 Large Cam Locks 1 Refer to page 3 on Cam Lock system operation supplement 12 Glue M8 x 30 mm Wood Dowels 3 into the inner holes of Side Panels E an...

Страница 10: ...into the inner holes of Desk Right Front Panel D 14 Attach the Desk Right Front Panel D to the Right Partition Panel G with one Large Cam Lock 1 15 Attach the Desk Left Front Panel I to the Left Parti...

Страница 11: ...k Assembling 16 Align and attach the Desk Side Panels E to the both sides by engaging 4 Large Cam Locks 1 17 Align and attach the previous assembly to the Desk Top Panel A by engaging 16 Large Cam Loc...

Страница 12: ...18 Attach the Desk Bottom Panel B to the previous assembly with the 35 mm Screws 12 19 Attach the Metal Bracket 16 to the Desk Bottom Panel B with two 18 mm Bolts 8 and two Washers 6 and 7 E E D C I F...

Страница 13: ...Frame U to the Bottom Panel B with two 30 mm Bolts 5 and two Washers 6 and 7 21 Attach the Desk Long Stretcher Q between the Desk Side Frame U and Desk Back Leg S with two 18 mm Bolts 8 22 Fasten Desk...

Страница 14: ...h the Desk Short Stretcher R between the Desk Front and Back Legs T and S with two 18 mm Bolts 8 24 Fasten Desk Front Leg T to the Desk Bottom Panel B with two 18 mm Bolts 8 and two Washers 6 and 7 B...

Страница 15: ...Return Left Side Panel M Desk Side Panel E and Front Panels O and P using a Phillips screwdriver 26 Glue the M8 x 30 mm Wood Dowels 3 into the inner holes of Back Panel L and Partition Panels F and N...

Страница 16: ...tition Panels F and N to the Back Panel L by engaging 2 Large Cam Locks 1 Refer to page 3 on Cam Lock system operation supplement 28 Glue the M8 x 30 mm Wood Dowels 3 into the inner holes of Side Pane...

Страница 17: ...n Left Front Panel O to the Left Partition Panel F with one Large Cam Lock 1 31 Attach the Desk Side Panel E to the Return Right Front Panel P and the Back Panel L by engaging 2 Large Cam Locks 1 32 A...

Страница 18: ...g 33 Align and attach the previous assembly to Return Top Panel J by engaging 13 Large Cam Locks 1 34 Attach the Return Bottom Panel K to the previous assembly with the 35 mm Screws 12 O P E M L F N J...

Страница 19: ...Assembling 35 Attach the Return Side Frame W to the Bottom Panel K with two 30 mm Bolts 5 and two Washers 6 and 7 36 Attach the Return Stretcher V to the Side Frame W with one 18 mm Bolt 8 8 W V V W...

Страница 20: ...the assembled return to the desk with two 30 mm Bolts 5 and two Washers 6 and 7 39 Attach the Return Stretcher V to the Desk Front Leg T 40 Secure the Metal Bracket 16 to the Return Bottom Panel K wi...

Страница 21: ...s on the Partition Panels F G and N all the way forward including ball bearing cart Then align the Slide Runners on the assembled drawers with the Slide Tracks and push the drawer carefully inside unt...

Страница 22: ...embly Instructions 44 Insert the Grommets 15 to cover the holes in the Top Panels A and J 45 If necessary adjust the pre attached Floor Levelers at the bottom of both Legs to level the unit 15 A J A J...

Страница 23: ...best to keep your furniture in a climate controlled environment Extreme temperature and humidity changes can cause fading warping shrinking and splitting of wood It is advised to keep furniture away f...

Страница 24: ......

Страница 25: ...ourner cet article au point de vente Communiquer sans frais avec notre service la client le en ayant en mains les instructions et la liste des pi ces pour indiquer le nom du mod le le nom de la pi ce...

Страница 26: ...ces du carton et r partissez les en groupes tel qu indiqu sur la liste des pi ces Assurez vous que toutes les pi ces ont t incluses avant de commencer le montage L utilisation d outils lectriques n es...

Страница 27: ...MENT DU SYST ME CAME FONCTIONNEMENT DU SYST M CAME 1 Visser un boulon came dans les petits trous d j perc s sur le panneau Connecter les deux panneaux en s assurant que le boulon came s ins re dans le...

Страница 28: ...Qt 1 Qt 3 Qt 2 G Panneau de s paration droit H1 Fa ade de tiroir H2 Panneau arri re du tiroir Qt 1 Qt 2 Qt 2 H3 C t gauche du tiroir H4 C t droit du Tiroir H5 Support inf rieur du tiroir Qt 2 Qt 2 Qt...

Страница 29: ...3 Cheville en bois M8 x 30 mm Qt 46 2 extra Qt 46 2 extra Qt 74 2 extra 4 Cheville en bois M8 x 20 mm 5 Boulon de 1 4 x 30 mm 6 Rondelle de verrouillage Qt 2 1 extra Qt 6 1 extra Qt 14 1 extra 7 Rond...

Страница 30: ...vant du tiroir H1 l aide d un tournevis cruciforme 3 Fixez les c t s gauche et droit du tiroir H3 et H4 au devant du tiroir H1 l aide de 4 petites serrures came 10 4 Fixez le support inf rieur du tiro...

Страница 31: ...rez vous que le panneau inf rieur du tiroir H6 s ins re bien dans la rainure du panneau arri re du tiroir H2 7 Redressez le tiroir assembl Fixez la poign e 14 aux trous avants du tiroir H1 l aide de d...

Страница 32: ...s panneaux lat raux E et les panneaux avant D et I l aide d un tournevis cruciforme 10 Collez les chevilles bois M8 x 30 mm 3 dans les trous int rieurs du panneau arri re C et des panneaux de s parati...

Страница 33: ...rous came 1 reportez vous la page 3 de l annexe sur le fonctionnement du syst me de verrouillage came 12 Collez des chevilles en bois M8 x 30 mm 3 dans les trous int rieurs des panneaux lat raux E et...

Страница 34: ...panneau avant droit du bureau D 14 Fixez le panneau avant droit du bureau D au panneau de s paration droit G avec un grand verrou came 1 15 Fixez le panneau avant gauche du bureau I au panneau de s pa...

Страница 35: ...du bureau E aux deux c t s en engageant 4 grandes serrures came 1 17 Alignez et fixez l assemblage pr c dent au panneau sup rieur du bureau A en engageant 16 grands verrous came 1 E E D C I F G A A 1...

Страница 36: ...panneau inf rieur du bureau B l assemblage pr c dent l aide des vis de 35 mm 12 19 Fixez le support en m tal 16 au panneau inf rieur du bureau B l aide de deux boulons de 18 mm 8 et de deux rondelles...

Страница 37: ...bureau Q entre le cadre lat ral du bureau U et le pied arri re du bureau S l aide de deux boulons de 18 mm 8 22 Fixez le pied arri re du bureau S au panneau inf rieur du bureau B l aide de deux boulo...

Страница 38: ...ureau R entre les pieds avant et arri re du bureau T et S l aide de deux boulons de 18 mm 8 24 Fixez le pied avant du bureau T au panneau inf rieur du bureau B l aide de deux boulons de 18 mm 8 et de...

Страница 39: ...ral gauche du retour M le panneau lat ral de bureau E et les panneaux avant O et P l aide d un tournevis cruciforme 26 Collez les chevilles bois M8 x 30 mm 3 dans les trous int rieurs du panneau arri...

Страница 40: ...s came 1 reportez vous la page 3 de l annexe sur le fonctionnement du syst me de verrouillage came 28 Collez des chevilles en bois M8 x 30 mm 3 dans les trous int rieurs des panneaux lat raux E et M e...

Страница 41: ...e F avec un grand verrou came 1 31 Fixez le panneau lat ral de bureau E au panneau avant droit de retour P et au panneau arri re L en engageant 2 grandes serrures came 1 32 Fixez le c t gauche de reto...

Страница 42: ...ignez et fixez l assemblage pr c dent au panneau sup rieur du bureau J en engageant 13 grands verrous came 1 34 Fixez le panneau inf rieur du bureau K l assemblage pr c dent l aide des vis de 35 mm 12...

Страница 43: ...ral du bureau W au panneau inf rieur K l aide de deux boulons de 30 mm 5 et de deux rondelles 6 et 7 36 Attachez le cadre du retour V au cadre lat ral W avec un boulon de 18 mm 8 8 W V V W W V La sect...

Страница 44: ...assembl au bureau avec deux boulons de 30 mm 5 et deux rondelles 6 et 7 39 Fixez le cadre du retour V au pied avant du bureau T 40 Fixez le support en m tal 16 au panneau inf rieur du bureau K l aide...

Страница 45: ...roulement billes sur les panneaux de s paration F G et N au maximum y compris le chariot roulement billes Ensuite alignez les glissi res des tiroirs assembl s avec les rails et poussez d licatement l...

Страница 46: ...s d assemblage 44 Ins rez les illets 15 pour couvrir les trous des panneaux sup rieurs A et J 45 Si n cessaire ajustez les niveleurs de sol pr fix s au bas des deux pieds pour mettre l unit niveau 15...

Страница 47: ...ironnement contr l Les carts extr mes de temp rature et d humidit pourraient d colorer tordre r tr cir et fendre le bois Il est conseill de garder le meuble loign du soleil direct car il pourrait en e...

Страница 48: ......

Страница 49: ...i alguna parte est faltante no retorne est producto a la tienda donde lo compr Por favor llame a nuestro departamento de ayuda al cliente teniendo su instructivo y lista de partes para proveer el mode...

Страница 50: ...esorio fijado al cart n antes de tirarlo Una vez apartadas las piezas sep relas en grupos como se indica en la lista Cerci rese de que tiene todas las piezas antes de comenzar el montaje No se recomie...

Страница 51: ...E FIJACION 1 Fije los pernos de fijaci n en los insertos roscados en el panel Conecte los dos paneles juntos asegur ndose que el perno de fijaci n entra en el agujero pre perforado al final del panel...

Страница 52: ...ior del caj n Cant 2 H3 Lado izquierdo del caj n Cant 2 H4 Lado derecho del caj n Cant 2 H5 Soporte inferior del caj n Cant 2 H6 Panel inferior del caj n Cant 2 I Panel izquierdo frontal del escritori...

Страница 53: ...3 Clavija de madera de M8 x 30 mm Cant 46 2 extra Cant 46 2 extra Cant 74 2 extra 4 Clavija de madera de M8 x 20 mm 5 Perno de 1 4 x 30 mm 6 Arandela de presi n Cant 2 1 extra Cant 6 1 extra Cant 14...

Страница 54: ...os pernos de fijaci n peque os 11 en los agujeros peque os designados en el frente del caj n H1 usando el desarmador estrella 3 Sujetar el lado izquierdo y derecho del caj n H3 y H4 al frente del caj...

Страница 55: ...gurar que el panel inferior del caj n H6 encaje en la ranura del panel posterior del caj n H2 7 Poner el caj n ensamblado en posici n vertical Adjuntar la manija 14 a los agujeros pilotos en el frente...

Страница 56: ...erior C en los paneles laterales E y en los paneles frontales D y I usando el desarmador estrella 10 Pegar las clavijas de madera de M8 x 30 mm 3 en los agujeros interiores del panel posterior C y en...

Страница 57: ...al panel posterior C empleando 3 tuercas de fijaci n grandes 1 Consulte la p gina 3 del sistema de tuerca de fijaci n 12 Pegar las clavijas de madera de M8 x 30 mm 3 en los agujeros internos de los pa...

Страница 58: ...del panel derecho frontal del escritorio D 14 Adjuntar el panel derecho frontal del escritorio D al panel divisor derecho G con una tuerca de fijaci n grande 1 15 Adjuntar el panel izquierdo frontal...

Страница 59: ...inear y adjuntar los paneles laterales del escritorio E a ambos lados empleando 4 tuercas de fijaci n grandes 1 17 Alinear y adjuntar el ensamble previo al panel superior del escritorio A empleando 16...

Страница 60: ...Adjuntar el panel inferior del escritorio B al ensamble previo con pernos de 35 mm 12 19 Adjuntar el soporte de metal 16 al panel inferior del escritorio B con 2 pernos de 18 mm 8 y 2 arandelas 6 y 7...

Страница 61: ...nferior B con 2 pernos de 30 mm 5 y 2 arandelas 6 y 7 21 Adjuntar el soporte largo del escritorio Q entre el marco lateral del escritorio U y la pata posterior del escritorio S con 2 pernos de 18 mm 8...

Страница 62: ...to del escritorio R entre las patas posterior y frontal del escritorio T y S con 2 pernos de 18 mm 8 24 Sujetar la pata frontal del escritorio T al panel inferior del escritorio B con 2 pernos de 18 m...

Страница 63: ...quierdo del retorno M en el panel lateral del escritorio E y en los paneles frontales O y P usando el desarmador estrella 26 Pegar la clavija de madera de M8 x 30 mm 3 en los agujeros internos del pan...

Страница 64: ...al panel posterior L empleando 2 tuercas de fijaci n grandes 1 Consulte la p gina 3 del sistema de tuerca de fijaci n 28 Pegar las clavijas de madera de M8 x 30 mm 3 en los agujeros internos de los p...

Страница 65: ...del retorno O al panel divisor izquierdo F con una tuerca de fijaci n grande 1 31 Adjuntar el panel lateral del escritorio E al panel frontal derecho del retorno P y el panel posterior L empleando 2...

Страница 66: ...y adjuntar el ensamble previo al panel superior del retorno J empleando 13 tuercas de fijaci n grandes 1 34 Adjuntar el panel inferior del retorno K al ensamble previo con los pernos de 35 mm 12 O P...

Страница 67: ...torno 35 Adjuntar el marco lateral del retorno W al panel inferior K con 2 pernos de 30 mm 5 y 2 arandelas 6 y 7 36 Adjuntar del soporte del retorno V al marco lateral W con un perno de 18 mm 8 8 W V...

Страница 68: ...amblado al escritorio con 2 pernos de 30 mm 5 y 2 arandelas 6 y 7 39 Adjuntar el soporte del retorno V a la pata frontal del escritorio T 40 Asegurar el soporte de metal 16 al panel inferior del retor...

Страница 69: ...ros en los paneles divisores F G y N todo el camino hacia enfrente incluyendo el carrito de baleros Luego alinear los retornos de corredera en el caj n ensamblado con los carriles de corredera y empuj...

Страница 70: ...4 Insertar los ojales 15 para esconder los agujeros de los paneles superiores A y J 45 Si fuera necesario ajustar los niveladores de piso pre adjuntados a la parte inferior de ambas patas para nivelar...

Страница 71: ...usar cambios como partes pandas molduras que se contraigan o que la madera se raje Es recommendable mantener la unidad lejos del sol directo ya que puede da ar el acabado Cuidados adecuados y limpieza...

Страница 72: ......

Отзывы: