Whadda WPB109 Скачать руководство пользователя страница 7


 7 


2.


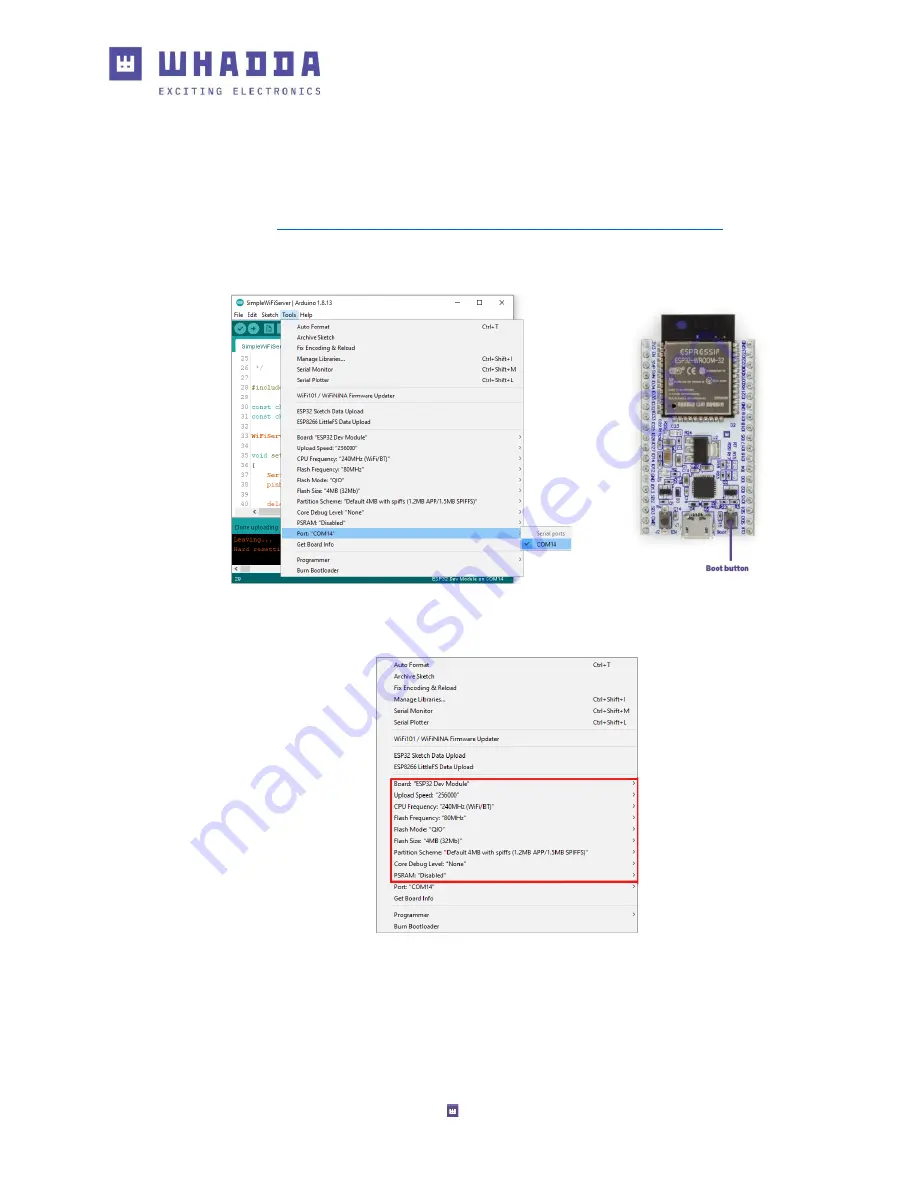
Connect the Whadda ESP32 module to your PC using a microUSB cable. Open the tools 
menu again and check if a new serial port has been added to the port list and select it 
(

Tools > Port: 

COM14

” >

 COM14

). If this is not the case, you may need to install a new 

driver to enable the ESP32 to properly connect to your computer. 


Go to 

https://www.silabs.com/developers/usb-to-uart-bridge-vcp-drivers

 to 

download and install the driver. Reconnect the ESP32 and restart the Arduino® IDE 
once the process is finished. 


3.


Check that the following settings have been selected in the tools board menu: 


Содержание WPB109

Страница 1: ...USER MANUAL EN ESP32 development board WPB109 whadda com ...

Страница 2: ...sons with reduced physical sensory or mental capabilities or lack of experience and knowledge if they have been given supervision or instruction concerning the use of the device in a safe way and understand the hazards involved Children shall not play with the device Cleaning and user maintenance shall not be made by children without supervision General Guidelines Refer to the Velleman Service and...

Страница 3: ...ard is a comprehensive development platform for Espressif s ESP32 the upgraded cousin of the popular ESP8266 Like the ESP8266 the ESP32 is a Wi Fi enabled microcontroller but to that it adds support for Bluetooth low energy i e BLE BT4 0 Bluetooth Smart and 28 I O pins The ESP32 s power and versatility make it the ideal candidate to serve as the brains of your next IoT project Specifications chips...

Страница 4: ...o lower power consumption when preferable onboard boot button Product Description ESP32 WROOM 32 A module with ESP32 at its core EN button Reset button USB to UART bridge Download button Holding down Boot and then pressing EN initiates the firmware download mode for downloading firmware through the serial port microUSB port Converts USB into UART serial to facilitate the communication between the ...

Страница 5: ...computer You can download the latest version by going to www arduino cc en software 2 Open the Arduino IDE and open the preferences menu by going to File Preferences Enter the following URL into the Additional Boards Manager URLs field https raw githubusercontent com espressif arduino esp32 gh pages package_esp32_index json and tap OK ...

Страница 6: ...the search field selecting the most recent version of the esp32 core by Espressif Systems and clicking Install Uploading the First Sketch to the Board 1 Once the ESP32 core has been installed open the tools menu and select the ESP32 Dev module board by going to Tools Board ESP32 Arduino ESP32 Dev Module ...

Страница 7: ...M14 COM14 If this is not the case you may need to install a new driver to enable the ESP32 to properly connect to your computer Go to https www silabs com developers usb to uart bridge vcp drivers to download and install the driver Reconnect the ESP32 and restart the Arduino IDE once the process is finished 3 Check that the following settings have been selected in the tools board menu ...

Страница 8: ... at the bottom Once the message Connecting appears press and hold the Boot button on the ESP32 until the uploading process has finished 5 Open the serial monitor and check that the baud rate is set to 115200 baud Release Boot button Press and hold Boot button ...

Страница 9: ... example was uploaded Having Trouble Restart the Arduino IDE and reconnect the ESP32 board You can check if the driver has been properly installed by checking Device manager on Windows under COM Ports to see if a Silicon Labs CP210x device is recognized Under Mac OS you can run the command ls dev tty cu in the terminal to check this ...

Страница 10: ... where Wi Fi connectivity is required The following example will harness this extra functionality by having the ESP module function as a basic webserver 1 Open the Arduino IDE and open the AdvancedWebServer example by going to File Examples WebServer AdvancedWebServer ...

Страница 11: ...and make sure that the correct board settings in the Tools menu are set and that the proper serial communication port has been selected 4 Click the Upload button and monitor the info messages at the bottom Once the message Connecting appears press and hold the Boot button on the ESP32 until the uploading process has finished Release Boot button Press and hold Boot button ...

Страница 12: ...ut the network connection and the IP address Take a note of the IP address Is the ESP32 Having Trouble to Connect to your Wi Fi Check that the Wi Fi network name and password have been set up correctly and that the ESP32 is in range of your Wi Fi access point The ESP32 has a relatively small antenna so it might have more difficulties to pick up the Wi Fi signal at a certain location than your PC ...

Страница 13: ... in the Arduino IDE You could try out the Bluetooth functionality by trying the example sketches in the ESP32 BLE Arduino folder or try out the internal magnetic hall sensor test sketch ESP32 HallSensor Once you tried out a few different examples you can try to edit the code to your liking and combine the various examples to come up with your own unique projects Also check out these tutorials made...

Страница 14: ...14 whadda com Modifications and typographical errors reserved Velleman Group nv WPB109_v01 Velleman Group nv Legen Heirweg 33 9890 Gavere ...

Отзывы: