background image

- DECO VANITY INSTALL GUIDE - 

(2018-12-04) 


1/14 


CAUTION – IMPORTANT 


TWO PEOPLE ARE NEEDED TO HANDLE AND INSTALL VANITY 

DO NOT LIFT VANITY FROM THE TOP. LIFT VANITY FROM THE 

BOTTOM ONLY. 


DO NOT LIFT FROM SINK TOP 

WILL DAMAGE VANITY 

LIFT FROM EACH SIDE, NOT THE FRONT OR BACK 
 

Содержание deco

Страница 1: ...12 04 1 14 CAUTION IMPORTANT TWO PEOPLE ARE NEEDED TO HANDLE AND INSTALL VANITY DO NOT LIFT VANITY FROM THE TOP LIFT VANITY FROM THE BOTTOM ONLY DO NOT LIFT FROM SINK TOP WILL DAMAGE VANITY LIFT FROM...

Страница 2: ...ality control and was in excellent condition upon leaving the WETSTYLE facility We recommend that you carefully inspect the product prior to its installation If there are any defects please contact th...

Страница 3: ...Safety Instructions must be kept for future use TOOLS AND EQUIPMENT Drill and bits Measuring tape Protective paper Pencil Level Protective eyeglasses Wood Screw 10 3 and 4 long IMPORTANT This install...

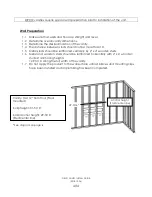
Страница 4: ...than 16 1 5 Metal studs should be reinforced vertically by 2 x 4 wooden studs 1 6 Metal and wooden studs should be reinforced horizontally with 2 x 6 wooden studs at anchoring heights 29 3 16 along t...

Страница 5: ...TANT Please be advised that the DECO COLLECTION was designed to receive WETSTYLE DECO sinks and countertop style sinks as noted in the WETSTYLE price list and catalogue The manufacturer does not take...

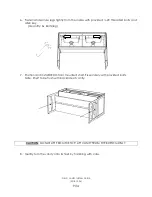
Страница 6: ...WO PEOPLE ARE NEEDED TO HANDLE AND INSTALL VANITY DO NOT LIFT VANITY FROM THE TOP LIFT VANITY FROM THE BOTTOM ONLY DRAWER REMOVAL 1 Remove Vanity drawers and cover glides with masking tape to protect...

Страница 7: ...ace Z clip and screws evenly along width of the Vanity 3 Install Z clip to the wall studs at 29 3 16 center line using evenly spaced 3 long 10 wood screws Fasten securely 4 Position temporarily the Va...

Страница 8: ...rding to horizontally reinforced studs and desired Vanity height 2 Space Z clip and screws evenly along width of the Vanity 3 Install Z clip to the wall studs at 29 3 16 center line using evenly space...

Страница 9: ...0 threaded bolts and Allen key Quantity 6x bolts leg 7 Position and install DECO floor mounted shelf Fix securely with provided bolts Note Shelf to be flush with backside of vanity CAUTION DO NOT LIFT...

Страница 10: ...orarily the Vanity onto Z clip 10 Secure the floor mounted vanity to the back wall Pre drill pilot holes to accommodate 4 long 10 Wood screws From inside the vanity screw the unit every 3 to the back...

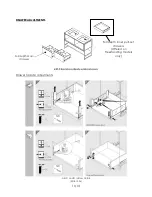
Страница 11: ...ANITY INSTALL GUIDE 2018 12 04 11 14 DRAWER ADJUSTMENTS 48 Floor mounted version shown Drawer fa ade adjustments Full depth Main drawers Full depth Inner pull out drawers Offered on Freestanding model...

Страница 12: ...DECO VANITY INSTALL GUIDE 2018 12 04 12 14 Drawer fa ade removal...

Страница 13: ...ide panel seams must remain dry Wipe away any excess water from vanity side panel seams sweeping towards lavatory basin For standard cleaning we recommend using warm water with mild soap Do not use ab...

Страница 14: ...es natural disasters or other accidents WETSTYLE is not responsible for any fees or recovery charges that may have been generated by the purchase of a product that is not adequate for an existing buil...

Отзывы: