background image

ENGLISH INSTRUCTIONS

4

CLEANING & ASSEMBLY

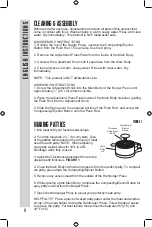
Before and after each use, disassemble and wash all parts of this product that 

come in contact with food.  Wash all parts in warm, soapy water. Rinse with clear 

water. Dry immediately.  This product is NOT dishwasher safe.

DISASSEMBLY INSTRUCTIONS

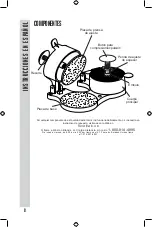
1. Holding the top of the Burger Press, unscrew the Compacting/Ejector 

Button from the Push Rod. This will also free the Spring.  

2. Remove the Adjustment Press Plate from the inside of the Main Body.

3. Unscrew the Adjustment Knob until it separates from the Main Body.

4. Clean all pieces in warm, soapy water. Rinse with clear water. Dry 

immediately. 


NOTE:  This product is NOT dishwasher safe.

ASSEMBLY INSTRUCTIONS

1. Screw the Adjustment Knob into the Main Body of the Burger Press until 

approximately 1” (2.5 cm) remains visible.

2. Place the Adjustment Press Plate inside of the Main Body chamber guiding 

the Push Rod into the Adjustment Knob.

3. Slide the Spring over the exposed portion of the Push Rod, and screw the 

Compressing/Ejector Button onto the Push Rod.

MAKING PATTIES

1. Mix meat with your favorite seasonings.

2. Form the meat into 2 ½” (6.4 cm) balls.  Size 

of the patties will depend on the amount of meat 

used for each patty. NOTE:  When adjusting 

your patty weight, allow for 10% to 20% 

shrinkage when fully cooked.

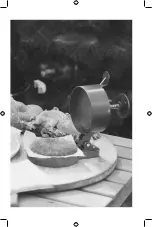
3. Adjust the Thickness Adjustment Knob to the 

desired patty thickness. 

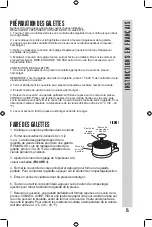
FIGURE 1

4. Close the Main Body lid down and press to form the perfect patty. To compact 

the patty, press down the Compacting/Ejector Button.  

5. Remove any excess meat from the outside of the Hamburger Press.

6. While opening up the Main Body, compress the Compacting/Ejector Button for 

easy patty removal from the Burger Press.  

7. Open the Hamburger Press to reveal your perfectly made patty.  


HELPFUL TIP:  Place a piece of waxed patty paper under the meat and another 

on top of the meat before closing the Hamburger Press.  This will make it easier 

to remove the patty.  For best results, meat should be between 36

O

(2

O

C) and 

40

O

F (4

O

C).

Thickness 

Adjustment 

Knob

Main

Body

Lid

Compacting/

Ejector

Button

FIGURE 1

Содержание 07-0301

Страница 1: ...BURGER PRESS DUE TO CONSTANT FACTORY IMPROVEMENTS THE PRODUCT PICTURED MIGHT DIFFER SLIGHTLY FROM THE PRODUCT IN THIS BOX...

Страница 2: ...Y ENSAMBLADO C MO HACER LAS HAMBURGUESAS SEGURIDAD DE LOS ALIMENTOS INFORMACI N DE GARANT A WESTON DESCRIPTION DE LA PI CE PR PARATION DES GALETTES FAIRE DES GALETTES S CURIT ALIMENTAIRE INFORMATION...

Страница 3: ...ase Plate Push Rod COMPONENTS If any components of this unit are broken the unit does not operate properly or you need a replacement instruction manual visit us on the web at WestonBrands com Or call...

Страница 4: ...pring over the exposed portion of the Push Rod and screw the Compressing Ejector Button onto the Push Rod MAKING PATTIES 1 Mix meat with your favorite seasonings 2 Form the meat into 2 6 4 cm balls Si...

Страница 5: ...the utensils used in grilling after the food is turned for the last time on the grill as well as spatulas and spoons used for stir frying or turning meat as it cooks Make sure to wash your hands afte...

Страница 6: ...sales receipt as proof of purchase is required to make a warranty claim This warranty is void if the product is subjected to any voltage and waveform other than as specified on the rating label e g 1...

Страница 7: ...PRENSA DE HAMBURGUESAS DEBIDO A CONSTANTES MEJORAS EN LA F BRICA EL PRODUCTO QUE SE MUESTRA PUEDE SER LIGERAMENTE DIFERENTE DEL PRODUCTO EN ESTA CAJA...

Страница 8: ...ase mbolo Si cualquier componente de esta unidad est roto si no funciona debidamente o si necesita un instructivo de repuesto vis tenos en la Web en WestonBrands com O llame a Weston Brands LLC larga...

Страница 9: ...expuesta del mbolo y atornille el bot n para compresi n expulsi n en el mbolo C MO HACER LAS HAMBURGUESAS 1 Mezcle la carne con los sazonadores que desee 2 Forme bolas de carne de 2 1 2 pulgadas 6 4...

Страница 10: ...s usados en el asador despu s de haber volteado los alimentos por ltima vez as como las cucharas y esp tulas usadas para fre r o para voltear la carne al estarla cocinando No olvide lavarse las manos...

Страница 11: ......

Страница 12: ...se hubiese utlizado en condiciones distintas a las normales Uso industrial semi industrial o comercial b Cuando el producto no hubiese sido operado de acuerdo con el instructivo de uso c Cuando el pro...

Страница 13: ...PRESSE HAMBURGER PARCE QUE NOS PRODUITS B N FICIENT DE PERFECTIONNEMENTS CONSTANTS APPORT S EN USINE LES ILLUSTRATIONS PR SENTES PEUVENT TRE L G REMENT DIFF RENTES DU PRODUIT RE U...

Страница 14: ...uton de r glage de l paisseur N h sitez pas visiter notre site Web WestonBrands com support si un composant est cass l outil fonctionne mal ou pour commander un nouveau mode d emploi WestonBrands com...

Страница 15: ...compactage jection 5 Enlever l exc s de viande autour du presse hamburger 6 Tout en ouvrant le corps principal appuyer sur le bouton de compactage jection pour retirer facilement la galette de la pre...

Страница 16: ...feu vif en remuant ou pour tourner la viande au fur et mesure qu elle cuit Assurez vous de bien laver vos mains apr s avoir manipul des viandes crues ou des ufs crus Se laver les mains avec du savon e...

Страница 17: ......

Страница 18: ......

Страница 19: ...fectuer une r clamation sous garantie Cette garantie est annul e si le produit est soumis toute tension et toute autre forme d onde autre que celle sp cifi e sur l tiquette des sp cifications nominale...

Страница 20: ...7 00 HNE du lundi au vendredi Customer Service WestonBrands com Num ro de t l phone du service client le pour les r sidents des U 1 800 814 4895 Num ro de t l phone l ext rieur des U 001 216 901 6801...

Отзывы: